


The vein’s reference surface aims to represent the trend or form of the vein. A reference surface that accurately reflects the underlying form of the vein will produce the best hanging-wall and foot-wall surfaces. The challenge is achieving this with limited input data.
Linking your vein’s reference surface to another lithology or fault surface within the model reduces the amount of manual editing required to achieve the desired geological orientation. The custom reference surface adjusts the curvature and shape of the hanging wall and footwall surfaces that determine the vein’s volume. These custom reference surface workflows are dynamic in nature. When the stratigraphic and fault surfaces update as new data is collected; the veins will also update.
Creating your own custom vein reference surface
For complex vein systems that fold, merge and bifurcate, a custom mesh that represents the desired trend for each vein can be generated in the Meshes folder of Leapfrog. Here, you can take advantage of Leapfrog’s different mesh options to create the best fit surface for your vein. By modelling your reference surface in the Meshes folder, you can combine a range of geoscientific data types, including structural data, to influence the vein geometries.
When using a custom reference mesh, it is important to apply context, and use your expertise and geological understanding of the area . Surfaces created to use as a reference surface that do not accurately honour the trend of the vein, will create inaccurate vein models. Careful extraction and choice of mid-points, addition of control points (such as structural points or polylines) and review of parameters, is recommended to ensure that the resultant mesh is a suitable reference surface input.
Things to consider when create your own custom vein surface:
- Select an appropriate mesh type
- Incorporate all available and relevant geoscientific data
- Apply appropriate mesh parameters
- Manually edit the mesh
- Validate
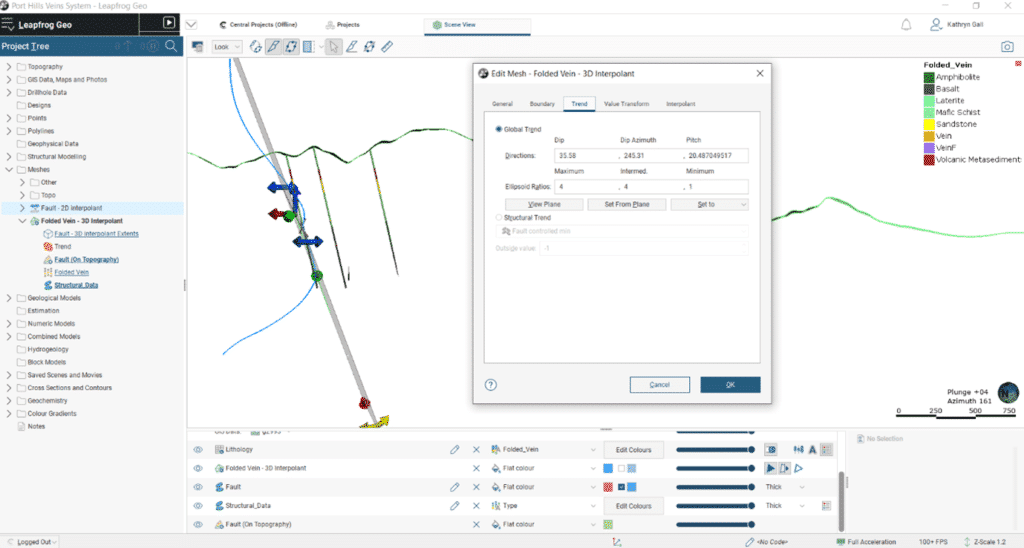
The first step when building your custom vein reference surface is determining the best mesh type to use. In the Meshes folder, there are two new meshes, the 3D Interpolant Mesh and the 2D Interpolant Mesh.
The 2D Interpolant Mesh produces a mesh that is more similar to the curved reference surface than the 3D Interpolant Mesh This often gives a smoother result in less time than when using the same data to build a 3D Interpolant Mesh. A 2D interpolant can work with vertically oriented data and extrapolates the mean trend along strike. A 3D mesh can work better with folded data and allows for the incorporation of structural data. It is worth comparing both meshes to determine the most suitable mesh type for your deposit.
The second step is to ensure that all available data is incorporated to create an accurate representation of the trend. Data types that should be considered include any outcropped mapping, drilling intercepts, open pit or underground mapping and structural data.
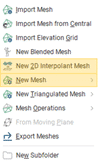
If you wish to incorporate drilling data into your custom reference mesh, midpoints for intervals can be extracted to the points folder.
Right-click Points > New Interval Mid Points.
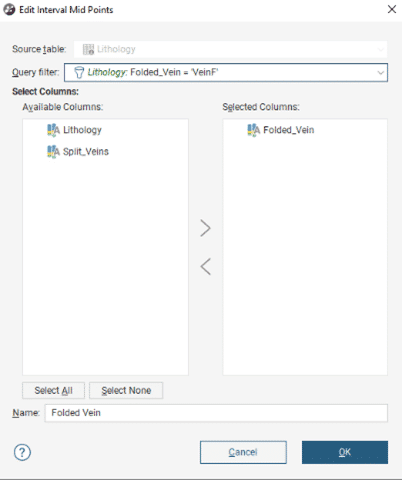
When incorporating structural data, use the categorical selection tool to ensure only data relevant to this structure is influencing the trend of the surface.
Right-click the Structural Data > New Categorical Selection
Categorical Selection is also available on points, to ensure any pit or underground mapping incorporated is from the correct vein trend you are modelling.
Right-click on the Mesh and select Add to add these extracted drilling interval mid-points, structures, points, and any other data.
The mesh should also have an appropriate trend applied. For planar faults, a global trend can be applied using Leapfrog’s Plane tool.
Set your Plane in the 3D scene. Double-click the mesh to Open the Edit Mesh properties.
On the Trend tab select Set From Plane.
The mesh can be manually edited with polylines or structural discs to further refine the surface. Right-click the mesh and select Edit.
Finally, validate the surface.
Once you have applied your custom reference mesh, remember to update the hanging wall and footwall assignments to ensure your vein is accurately honouring drilling intervals.
Summary
The custom reference surface for veins is one of many new features in the latest versions of Leapfrog Geo 6.0, Leapfrog Works 4.0 and Leapfrog Energy 5.0.
For further information on the vein reference surface, please see our help menu.
Ready to start using the custom reference mesh tool in Leapfrog Geo?
Download the latest version hereTo use another surface in the project as a reference surface, enable the Custom reference surface option, then select the mesh from those available in the project.
Using existing surfaces as your vein’s custom reference surface
There may be situations where the trend of your vein is similar to that of another geological unit or where mineralisation modelled as veins follows fault zones. And, while vein modelling in Leapfrog is a popular tool for modelling narrow vein gold deposits, the advanced functionality that the vein tool provides can be utilised for modelling any thin, planar geometries. Common examples include sills where the tabular intrusion can have a similar deformation to stratigraphy, discontinuous horizons within lithological units such as clays and shales, or fault damage zones.
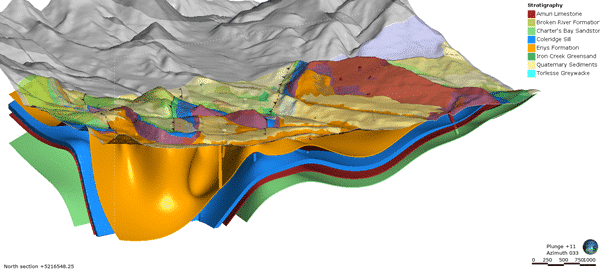
In this first example, we will look at using a stratigraphic surface to influence the trend of the vein. This deposit has a sill within the stratigraphic unit, where the intrusion occurred prior to deformation. In this model, we want to ensure the same fold patterns modelled within the stratigraphic units are replicated within the vein. The structural surface has been used here to model the base of each stratigraphic unit, as it allows for contact and non-contact structural data to inform the surface, accurately reflecting the sub-surface structures while minimising the manual edits required.
We can use the new custom reference surface option to link the structural surface to the vein.
The initial vein generated is planar in nature and applying the custom reference mesh allows the trend of the structural surface to influence the vein. The resulting vein surface more accurately follows the geological orientation of the deposit, particularly in areas where drilling data is sparse.

Even if the units are discontinuous and pinch-outs are activated, selecting a deposit, erosion, stratigraphic or structural surface for the custom reference surface, will ensure the modelled vein unit accurately follows the major trend of the stratigraphy.

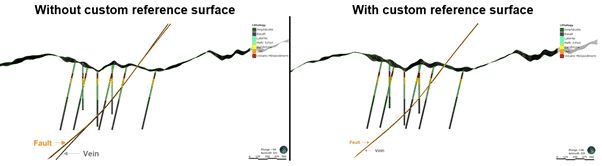
Using a fault surface to influence the trend of the vein
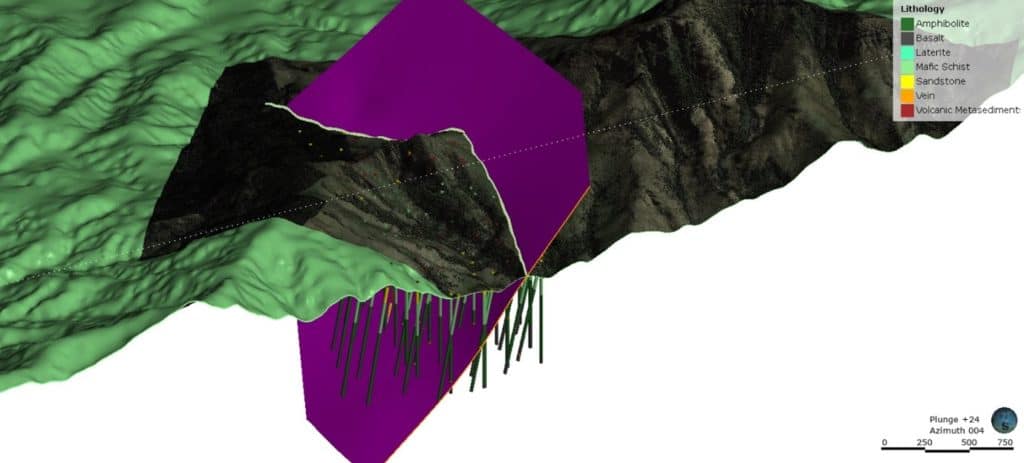
In this second example, we will look at using a fault surface to influence the trend of the vein.
This deposit is controlled by a large-scale fault system that has created pathways for gold bearing fluids through the deposit resulting in high grade zones of mineralisation. In the Leapfrog project separate models have been created for the fault system and the vein system.
In the image below, the fault surface has been made from a combination of geoscientific data types include mapped fault outcrop, drilling intercepts and structural data.
When comparing the initial vein generated, this closely aligns with the fault, however there is still room for improvement.
We can again use the new custom reference surface option to link the vein to the trend of the fault.

The vein will now update to align to the trend of the fault.
Linking your vein’s reference surface to another lithology or fault surface within the model reduces the amount of manual editing required to achieve the desired geological orientation. The custom reference surface adjusts the curvature and shape of the hanging wall and footwall surfaces that determine the vein’s volume. These custom reference surface workflows are dynamic in nature. When the stratigraphic and fault surfaces update as new data is collected; the veins will also update.
Creating your own custom vein reference surface
For complex vein systems that fold, merge and bifurcate, a custom mesh that represents the desired trend for each vein can be generated in the Meshes folder of Leapfrog. Here, you can take advantage of Leapfrog’s different mesh options to create the best fit surface for your vein. By modelling your reference surface in the Meshes folder, you can combine a range of geoscientific data types, including structural data, to influence the vein geometries.
When using a custom reference mesh, it is important to apply context, and use your expertise and geological understanding of the area . Surfaces created to use as a reference surface that do not accurately honour the trend of the vein, will create inaccurate vein models. Careful extraction and choice of mid-points, addition of control points (such as structural points or polylines) and review of parameters, is recommended to ensure that the resultant mesh is a suitable reference surface input.
Things to consider when create your own custom vein surface:
- Select an appropriate mesh type
- Incorporate all available and relevant geoscientific data
- Apply appropriate mesh parameters
- Manually edit the mesh
- Validate
The first step when building your custom vein reference surface is determining the best mesh type to use. In the Meshes folder, there are two new meshes, the 3D Interpolant Mesh and the 2D Interpolant Mesh.
The 2D Interpolant Mesh produces a mesh that is more similar to the curved reference surface than the 3D Interpolant Mesh This often gives a smoother result in less time than when using the same data to build a 3D Interpolant Mesh. A 2D interpolant can work with vertically oriented data and extrapolates the mean trend along strike. A 3D mesh can work better with folded data and allows for the incorporation of structural data. It is worth comparing both meshes to determine the most suitable mesh type for your deposit.
The second step is to ensure that all available data is incorporated to create an accurate representation of the trend. Data types that should be considered include any outcropped mapping, drilling intercepts, open pit or underground mapping and structural data.
If you wish to incorporate drilling data into your custom reference mesh, midpoints for intervals can be extracted to the points folder.
Right-click Points > New Interval Mid Points.
When incorporating structural data, use the categorical selection tool to ensure only data relevant to this structure is influencing the trend of the surface.
Right-click the Structural Data > New Categorical Selection
Categorical Selection is also available on points, to ensure any pit or underground mapping incorporated is from the correct vein trend you are modelling.
Right-click on the Mesh and select Add to add these extracted drilling interval mid-points, structures, points, and any other data.
The mesh should also have an appropriate trend applied. For planar faults, a global trend can be applied using Leapfrog’s Plane tool.
Set your Plane in the 3D scene. Double-click the mesh to Open the Edit Mesh properties.
On the Trend tab select Set From Plane.
The mesh can be manually edited with polylines or structural discs to further refine the surface. Right-click the mesh and select Edit.
Finally, validate the surface.
Once you have applied your custom reference mesh, remember to update the hanging wall and footwall assignments to ensure your vein is accurately honouring drilling intervals.
Summary
The custom reference surface for veins is one of many new features in the latest versions of Leapfrog Geo 6.0, Leapfrog Works 4.0 and Leapfrog Energy 5.0.
For further information on the vein reference surface, please see our help menu.
[/vc_column_text][/vc_column][/vc_row]
Ready to start using the custom reference mesh tool in Leapfrog Geo?
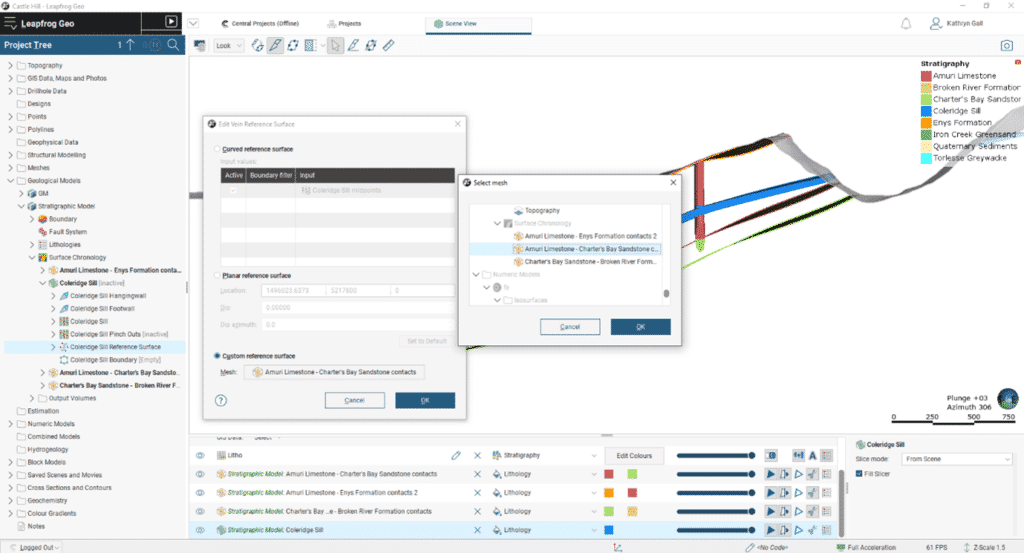
Download the latest version hereTo discover the new custom reference surface functionality, you first need to build a vein, then expand the vein mesh in the project tree and double-click on the Vein Reference Surface.
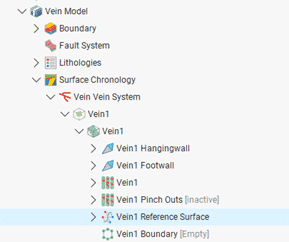
This opens the Edit Vein Reference Surface window with the options available to you.
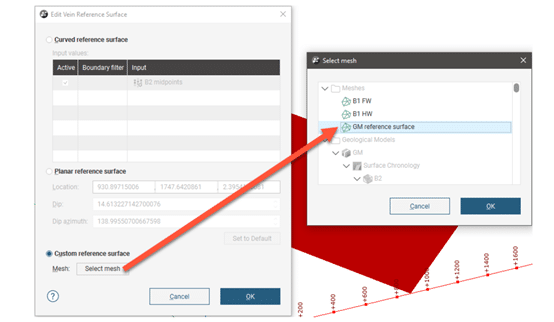
To use another surface in the project as a reference surface, enable the Custom reference surface option, then select the mesh from those available in the project.
Using existing surfaces as your vein’s custom reference surface
There may be situations where the trend of your vein is similar to that of another geological unit or where mineralisation modelled as veins follows fault zones. And, while vein modelling in Leapfrog is a popular tool for modelling narrow vein gold deposits, the advanced functionality that the vein tool provides can be utilised for modelling any thin, planar geometries. Common examples include sills where the tabular intrusion can have a similar deformation to stratigraphy, discontinuous horizons within lithological units such as clays and shales, or fault damage zones.
In this first example, we will look at using a stratigraphic surface to influence the trend of the vein. This deposit has a sill within the stratigraphic unit, where the intrusion occurred prior to deformation. In this model, we want to ensure the same fold patterns modelled within the stratigraphic units are replicated within the vein. The structural surface has been used here to model the base of each stratigraphic unit, as it allows for contact and non-contact structural data to inform the surface, accurately reflecting the sub-surface structures while minimising the manual edits required.
We can use the new custom reference surface option to link the structural surface to the vein.
The initial vein generated is planar in nature and applying the custom reference mesh allows the trend of the structural surface to influence the vein. The resulting vein surface more accurately follows the geological orientation of the deposit, particularly in areas where drilling data is sparse.
Even if the units are discontinuous and pinch-outs are activated, selecting a deposit, erosion, stratigraphic or structural surface for the custom reference surface, will ensure the modelled vein unit accurately follows the major trend of the stratigraphy.
Using a fault surface to influence the trend of the vein
In this second example, we will look at using a fault surface to influence the trend of the vein.
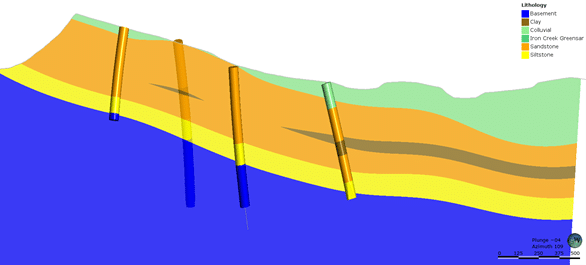
This deposit is controlled by a large-scale fault system that has created pathways for gold bearing fluids through the deposit resulting in high grade zones of mineralisation. In the Leapfrog project separate models have been created for the fault system and the vein system.
In the image below, the fault surface has been made from a combination of geoscientific data types include mapped fault outcrop, drilling intercepts and structural data.
When comparing the initial vein generated, this closely aligns with the fault, however there is still room for improvement.
We can again use the new custom reference surface option to link the vein to the trend of the fault.
The vein will now update to align to the trend of the fault.
Linking your vein’s reference surface to another lithology or fault surface within the model reduces the amount of manual editing required to achieve the desired geological orientation. The custom reference surface adjusts the curvature and shape of the hanging wall and footwall surfaces that determine the vein’s volume. These custom reference surface workflows are dynamic in nature. When the stratigraphic and fault surfaces update as new data is collected; the veins will also update.
Creating your own custom vein reference surface
For complex vein systems that fold, merge and bifurcate, a custom mesh that represents the desired trend for each vein can be generated in the Meshes folder of Leapfrog. Here, you can take advantage of Leapfrog’s different mesh options to create the best fit surface for your vein. By modelling your reference surface in the Meshes folder, you can combine a range of geoscientific data types, including structural data, to influence the vein geometries.
When using a custom reference mesh, it is important to apply context, and use your expertise and geological understanding of the area . Surfaces created to use as a reference surface that do not accurately honour the trend of the vein, will create inaccurate vein models. Careful extraction and choice of mid-points, addition of control points (such as structural points or polylines) and review of parameters, is recommended to ensure that the resultant mesh is a suitable reference surface input.
Things to consider when create your own custom vein surface:
- Select an appropriate mesh type
- Incorporate all available and relevant geoscientific data
- Apply appropriate mesh parameters
- Manually edit the mesh
- Validate
The first step when building your custom vein reference surface is determining the best mesh type to use. In the Meshes folder, there are two new meshes, the 3D Interpolant Mesh and the 2D Interpolant Mesh.
The 2D Interpolant Mesh produces a mesh that is more similar to the curved reference surface than the 3D Interpolant Mesh This often gives a smoother result in less time than when using the same data to build a 3D Interpolant Mesh. A 2D interpolant can work with vertically oriented data and extrapolates the mean trend along strike. A 3D mesh can work better with folded data and allows for the incorporation of structural data. It is worth comparing both meshes to determine the most suitable mesh type for your deposit.
The second step is to ensure that all available data is incorporated to create an accurate representation of the trend. Data types that should be considered include any outcropped mapping, drilling intercepts, open pit or underground mapping and structural data.
If you wish to incorporate drilling data into your custom reference mesh, midpoints for intervals can be extracted to the points folder.
Right-click Points > New Interval Mid Points.
When incorporating structural data, use the categorical selection tool to ensure only data relevant to this structure is influencing the trend of the surface.
Right-click the Structural Data > New Categorical Selection
Categorical Selection is also available on points, to ensure any pit or underground mapping incorporated is from the correct vein trend you are modelling.
Right-click on the Mesh and select Add to add these extracted drilling interval mid-points, structures, points, and any other data.
The mesh should also have an appropriate trend applied. For planar faults, a global trend can be applied using Leapfrog’s Plane tool.
Set your Plane in the 3D scene. Double-click the mesh to Open the Edit Mesh properties.
On the Trend tab select Set From Plane.
The mesh can be manually edited with polylines or structural discs to further refine the surface. Right-click the mesh and select Edit.
Finally, validate the surface.
Once you have applied your custom reference mesh, remember to update the hanging wall and footwall assignments to ensure your vein is accurately honouring drilling intervals.
Summary
The custom reference surface for veins is one of many new features in the latest versions of Leapfrog Geo 6.0, Leapfrog Works 4.0 and Leapfrog Energy 5.0.
For further information on the vein reference surface, please see our help menu.
[/vc_column_text][/vc_column][/vc_row]
Ready to start using the custom reference mesh tool in Leapfrog Geo?
Download the latest version hereThis blog walks you through the new custom vein reference surface functionality, provides tips for best practice when creating your own custom mesh to use as the reference surface and the steps to utilise existing lithology and fault surfaces within your vein modelling workflows.
Setting a custom mesh for the reference surface
To discover the new custom reference surface functionality, you first need to build a vein, then expand the vein mesh in the project tree and double-click on the Vein Reference Surface.
This opens the Edit Vein Reference Surface window with the options available to you.
To use another surface in the project as a reference surface, enable the Custom reference surface option, then select the mesh from those available in the project.
Using existing surfaces as your vein’s custom reference surface
There may be situations where the trend of your vein is similar to that of another geological unit or where mineralisation modelled as veins follows fault zones. And, while vein modelling in Leapfrog is a popular tool for modelling narrow vein gold deposits, the advanced functionality that the vein tool provides can be utilised for modelling any thin, planar geometries. Common examples include sills where the tabular intrusion can have a similar deformation to stratigraphy, discontinuous horizons within lithological units such as clays and shales, or fault damage zones.
In this first example, we will look at using a stratigraphic surface to influence the trend of the vein. This deposit has a sill within the stratigraphic unit, where the intrusion occurred prior to deformation. In this model, we want to ensure the same fold patterns modelled within the stratigraphic units are replicated within the vein. The structural surface has been used here to model the base of each stratigraphic unit, as it allows for contact and non-contact structural data to inform the surface, accurately reflecting the sub-surface structures while minimising the manual edits required.
We can use the new custom reference surface option to link the structural surface to the vein.
The initial vein generated is planar in nature and applying the custom reference mesh allows the trend of the structural surface to influence the vein. The resulting vein surface more accurately follows the geological orientation of the deposit, particularly in areas where drilling data is sparse.
Even if the units are discontinuous and pinch-outs are activated, selecting a deposit, erosion, stratigraphic or structural surface for the custom reference surface, will ensure the modelled vein unit accurately follows the major trend of the stratigraphy.
Using a fault surface to influence the trend of the vein
In this second example, we will look at using a fault surface to influence the trend of the vein.
This deposit is controlled by a large-scale fault system that has created pathways for gold bearing fluids through the deposit resulting in high grade zones of mineralisation. In the Leapfrog project separate models have been created for the fault system and the vein system.
In the image below, the fault surface has been made from a combination of geoscientific data types include mapped fault outcrop, drilling intercepts and structural data.
When comparing the initial vein generated, this closely aligns with the fault, however there is still room for improvement.
We can again use the new custom reference surface option to link the vein to the trend of the fault.
The vein will now update to align to the trend of the fault.
Linking your vein’s reference surface to another lithology or fault surface within the model reduces the amount of manual editing required to achieve the desired geological orientation. The custom reference surface adjusts the curvature and shape of the hanging wall and footwall surfaces that determine the vein’s volume. These custom reference surface workflows are dynamic in nature. When the stratigraphic and fault surfaces update as new data is collected; the veins will also update.
Creating your own custom vein reference surface
For complex vein systems that fold, merge and bifurcate, a custom mesh that represents the desired trend for each vein can be generated in the Meshes folder of Leapfrog. Here, you can take advantage of Leapfrog’s different mesh options to create the best fit surface for your vein. By modelling your reference surface in the Meshes folder, you can combine a range of geoscientific data types, including structural data, to influence the vein geometries.
When using a custom reference mesh, it is important to apply context, and use your expertise and geological understanding of the area . Surfaces created to use as a reference surface that do not accurately honour the trend of the vein, will create inaccurate vein models. Careful extraction and choice of mid-points, addition of control points (such as structural points or polylines) and review of parameters, is recommended to ensure that the resultant mesh is a suitable reference surface input.
Things to consider when create your own custom vein surface:
- Select an appropriate mesh type
- Incorporate all available and relevant geoscientific data
- Apply appropriate mesh parameters
- Manually edit the mesh
- Validate
The first step when building your custom vein reference surface is determining the best mesh type to use. In the Meshes folder, there are two new meshes, the 3D Interpolant Mesh and the 2D Interpolant Mesh.
The 2D Interpolant Mesh produces a mesh that is more similar to the curved reference surface than the 3D Interpolant Mesh This often gives a smoother result in less time than when using the same data to build a 3D Interpolant Mesh. A 2D interpolant can work with vertically oriented data and extrapolates the mean trend along strike. A 3D mesh can work better with folded data and allows for the incorporation of structural data. It is worth comparing both meshes to determine the most suitable mesh type for your deposit.
The second step is to ensure that all available data is incorporated to create an accurate representation of the trend. Data types that should be considered include any outcropped mapping, drilling intercepts, open pit or underground mapping and structural data.
If you wish to incorporate drilling data into your custom reference mesh, midpoints for intervals can be extracted to the points folder.
Right-click Points > New Interval Mid Points.
When incorporating structural data, use the categorical selection tool to ensure only data relevant to this structure is influencing the trend of the surface.
Right-click the Structural Data > New Categorical Selection
Categorical Selection is also available on points, to ensure any pit or underground mapping incorporated is from the correct vein trend you are modelling.
Right-click on the Mesh and select Add to add these extracted drilling interval mid-points, structures, points, and any other data.
The mesh should also have an appropriate trend applied. For planar faults, a global trend can be applied using Leapfrog’s Plane tool.
Set your Plane in the 3D scene. Double-click the mesh to Open the Edit Mesh properties.
On the Trend tab select Set From Plane.
The mesh can be manually edited with polylines or structural discs to further refine the surface. Right-click the mesh and select Edit.
Finally, validate the surface.
Once you have applied your custom reference mesh, remember to update the hanging wall and footwall assignments to ensure your vein is accurately honouring drilling intervals.
Summary
The custom reference surface for veins is one of many new features in the latest versions of Leapfrog Geo 6.0, Leapfrog Works 4.0 and Leapfrog Energy 5.0.
For further information on the vein reference surface, please see our help menu.
[/vc_column_text][/vc_column][/vc_row]
Ready to start using the custom reference mesh tool in Leapfrog Geo?
Download the latest version herePreviously, a vein’s reference surface had two options; it could have a curved reference surface generated from the mid points of selected intervals or a planar reference surface. In the latest release of Leapfrog a third option has been added – the ability to use another mesh from within the Leapfrog project as the reference surface. This option is useful if you wish to:
- use existing surfaces as your vein’s custom reference surface (for example the foot- or hanging-wall surface of an adjacent vein)
- use a fault surface to influence the trend of the vein
- create your own custom vein surface.
This blog walks you through the new custom vein reference surface functionality, provides tips for best practice when creating your own custom mesh to use as the reference surface and the steps to utilise existing lithology and fault surfaces within your vein modelling workflows.
Setting a custom mesh for the reference surface
To discover the new custom reference surface functionality, you first need to build a vein, then expand the vein mesh in the project tree and double-click on the Vein Reference Surface.
This opens the Edit Vein Reference Surface window with the options available to you.
To use another surface in the project as a reference surface, enable the Custom reference surface option, then select the mesh from those available in the project.
Using existing surfaces as your vein’s custom reference surface
There may be situations where the trend of your vein is similar to that of another geological unit or where mineralisation modelled as veins follows fault zones. And, while vein modelling in Leapfrog is a popular tool for modelling narrow vein gold deposits, the advanced functionality that the vein tool provides can be utilised for modelling any thin, planar geometries. Common examples include sills where the tabular intrusion can have a similar deformation to stratigraphy, discontinuous horizons within lithological units such as clays and shales, or fault damage zones.
In this first example, we will look at using a stratigraphic surface to influence the trend of the vein. This deposit has a sill within the stratigraphic unit, where the intrusion occurred prior to deformation. In this model, we want to ensure the same fold patterns modelled within the stratigraphic units are replicated within the vein. The structural surface has been used here to model the base of each stratigraphic unit, as it allows for contact and non-contact structural data to inform the surface, accurately reflecting the sub-surface structures while minimising the manual edits required.
We can use the new custom reference surface option to link the structural surface to the vein.
The initial vein generated is planar in nature and applying the custom reference mesh allows the trend of the structural surface to influence the vein. The resulting vein surface more accurately follows the geological orientation of the deposit, particularly in areas where drilling data is sparse.
Even if the units are discontinuous and pinch-outs are activated, selecting a deposit, erosion, stratigraphic or structural surface for the custom reference surface, will ensure the modelled vein unit accurately follows the major trend of the stratigraphy.
Using a fault surface to influence the trend of the vein
In this second example, we will look at using a fault surface to influence the trend of the vein.
This deposit is controlled by a large-scale fault system that has created pathways for gold bearing fluids through the deposit resulting in high grade zones of mineralisation. In the Leapfrog project separate models have been created for the fault system and the vein system.
In the image below, the fault surface has been made from a combination of geoscientific data types include mapped fault outcrop, drilling intercepts and structural data.
When comparing the initial vein generated, this closely aligns with the fault, however there is still room for improvement.
We can again use the new custom reference surface option to link the vein to the trend of the fault.
The vein will now update to align to the trend of the fault.
Linking your vein’s reference surface to another lithology or fault surface within the model reduces the amount of manual editing required to achieve the desired geological orientation. The custom reference surface adjusts the curvature and shape of the hanging wall and footwall surfaces that determine the vein’s volume. These custom reference surface workflows are dynamic in nature. When the stratigraphic and fault surfaces update as new data is collected; the veins will also update.
Creating your own custom vein reference surface
For complex vein systems that fold, merge and bifurcate, a custom mesh that represents the desired trend for each vein can be generated in the Meshes folder of Leapfrog. Here, you can take advantage of Leapfrog’s different mesh options to create the best fit surface for your vein. By modelling your reference surface in the Meshes folder, you can combine a range of geoscientific data types, including structural data, to influence the vein geometries.
When using a custom reference mesh, it is important to apply context, and use your expertise and geological understanding of the area . Surfaces created to use as a reference surface that do not accurately honour the trend of the vein, will create inaccurate vein models. Careful extraction and choice of mid-points, addition of control points (such as structural points or polylines) and review of parameters, is recommended to ensure that the resultant mesh is a suitable reference surface input.
Things to consider when create your own custom vein surface:
- Select an appropriate mesh type
- Incorporate all available and relevant geoscientific data
- Apply appropriate mesh parameters
- Manually edit the mesh
- Validate
The first step when building your custom vein reference surface is determining the best mesh type to use. In the Meshes folder, there are two new meshes, the 3D Interpolant Mesh and the 2D Interpolant Mesh.
The 2D Interpolant Mesh produces a mesh that is more similar to the curved reference surface than the 3D Interpolant Mesh This often gives a smoother result in less time than when using the same data to build a 3D Interpolant Mesh. A 2D interpolant can work with vertically oriented data and extrapolates the mean trend along strike. A 3D mesh can work better with folded data and allows for the incorporation of structural data. It is worth comparing both meshes to determine the most suitable mesh type for your deposit.
The second step is to ensure that all available data is incorporated to create an accurate representation of the trend. Data types that should be considered include any outcropped mapping, drilling intercepts, open pit or underground mapping and structural data.
If you wish to incorporate drilling data into your custom reference mesh, midpoints for intervals can be extracted to the points folder.
Right-click Points > New Interval Mid Points.
When incorporating structural data, use the categorical selection tool to ensure only data relevant to this structure is influencing the trend of the surface.
Right-click the Structural Data > New Categorical Selection
Categorical Selection is also available on points, to ensure any pit or underground mapping incorporated is from the correct vein trend you are modelling.
Right-click on the Mesh and select Add to add these extracted drilling interval mid-points, structures, points, and any other data.
The mesh should also have an appropriate trend applied. For planar faults, a global trend can be applied using Leapfrog’s Plane tool.
Set your Plane in the 3D scene. Double-click the mesh to Open the Edit Mesh properties.
On the Trend tab select Set From Plane.
The mesh can be manually edited with polylines or structural discs to further refine the surface. Right-click the mesh and select Edit.
Finally, validate the surface.
Once you have applied your custom reference mesh, remember to update the hanging wall and footwall assignments to ensure your vein is accurately honouring drilling intervals.
Summary
The custom reference surface for veins is one of many new features in the latest versions of Leapfrog Geo 6.0, Leapfrog Works 4.0 and Leapfrog Energy 5.0.
For further information on the vein reference surface, please see our help menu.
[/vc_column_text][/vc_column][/vc_row]