


Discover Seequent Central
Central enables you not only to track, manage, and version control your geoscientific data but provides a virtual environment in which your team members and other project stakeholders can effectively visualise and review models, exchange ideas, and define the next steps in near real-time.
Overview
Speakers
Janina Elliot
Global Central Technical Lead – Seequent
Duration
50 min
See more on demand videos
VideosFind out more about Seequent Central
Learn moreVideo Transcript
[00:00:01.410]
<v Janina>Hello, and welcome to today’s video.</v>
[00:00:04.280]
My name is Janina Elliott
[00:00:05.940]
and I’m the global Central technical lead for Seequent.
[00:00:09.720]
And I’m presenting this video to you today
[00:00:12.840]
from my home office.
[00:00:14.250]
And chances are, you’re probably also listening
[00:00:16.970]
to this recording from another location than your usual.
[00:00:21.450]
This is something we’re currently all faced with.
[00:00:24.050]
How can we work productively and effectively
[00:00:27.330]
from a remote environment and in the money industry,
[00:00:30.300]
this is actually quite common,
[00:00:31.770]
just bit more amplified these days.
[00:00:34.850]
So how can Central assist you,
[00:00:36.713]
will help your teams in working remotely?
[00:00:39.840]
This is what we will discuss today.
[00:00:42.980]
At Seequent, it is our mantra and our mission
[00:00:45.830]
to enable our clients to make better decisions
[00:00:48.870]
about the earth, environment and energy challenges,
[00:00:52.600]
but in order to do so,
[00:00:54.210]
we need to be able to understand
[00:00:55.990]
what that decision-making process actually looks like
[00:00:58.970]
and what it entails.
[00:01:02.210]
At the foundation of a decision-making process,
[00:01:05.260]
lies the acquisition of data,
[00:01:06.997]
and in highly complex mining projects,
[00:01:10.500]
that data comes from all sorts of different places,
[00:01:12.870]
be it geo-physical information, geo-chemical information,
[00:01:16.340]
GIS data, engineering data, et cetera, et cetera.
[00:01:19.737]
And all of this information
[00:01:21.390]
and that knowledge that we’ve gathered around our sites
[00:01:25.250]
needs to be represented in a digital format.
[00:01:29.140]
That digital information can then be further utilized
[00:01:33.120]
through software in order to create a subsequent analysis
[00:01:37.450]
and interpretation that happens ideally
[00:01:40.080]
in a collaborative environment.
[00:01:42.480]
And based on those results,
[00:01:44.680]
we can finally form a robust decision.
[00:01:48.860]
Now, in an ideal case scenario,
[00:01:51.090]
throughout this decision-making process,
[00:01:53.950]
throughout the acquisition of data,
[00:01:56.120]
the analytical steps, all the way to the decisions,
[00:01:59.280]
we want to make sure that we consistently work
[00:02:01.730]
in a collaborative environment.
[00:02:03.630]
So we can truly take advantage of each other’s skillsets,
[00:02:07.870]
each other’s experience and knowledge
[00:02:10.390]
that we gathered over time,
[00:02:12.000]
to come together at the final interpretation
[00:02:15.007]
and the right decision for our team
[00:02:17.030]
in order to move forward.
[00:02:19.307]
That is the most important aspect.
[00:02:20.660]
And this is what makes it hard to work remotely,
[00:02:23.710]
to be truly effective as a team.
[00:02:27.090]
In addition to that, of course,
[00:02:28.820]
the data that everyone involved in team
[00:02:31.280]
needs to actively work with,
[00:02:33.130]
needs to be consistently accessible
[00:02:35.860]
and accessible at the right time,
[00:02:38.320]
when you need the information.
[00:02:40.720]
And of course, later on,
[00:02:42.380]
in order to support our decision-making process
[00:02:45.430]
and to support our due diligence aspect of our work,
[00:02:50.860]
the information that we gathered,
[00:02:52.760]
the analysis and the final decision
[00:02:54.510]
needs to be consistently auditable as well.
[00:02:57.700]
When working remotely, whether it is in a mine site,
[00:03:01.790]
whether it is in your home office,
[00:03:03.920]
wherever you are really on the globe,
[00:03:06.000]
the most important aspect is that you have access
[00:03:09.150]
to your team members and of course,
[00:03:11.160]
all of the data that you need on a daily basis
[00:03:14.070]
in order to do your work.
[00:03:15.840]
So the data truly needs to be organized
[00:03:18.420]
and it needs to be stored in a way
[00:03:19.940]
that can be easily managed, found, and integrated.
[00:03:23.590]
And of course, you also need to have access
[00:03:25.600]
to your team members and their knowledge
[00:03:28.080]
and the experience that’s situated with them specifically.
[00:03:33.140]
In most cases, however,
[00:03:34.690]
we see that our industry truly suffers from a complete chaos
[00:03:39.610]
when it comes to data and the location of information.
[00:03:43.650]
And so it is really difficult
[00:03:45.330]
to truly access the information that you need at the time
[00:03:48.810]
in order to create your analysis,
[00:03:51.380]
create your interpretation, your model,
[00:03:53.450]
and collectively reach a decision together
[00:03:56.770]
based on all of the information in place.
[00:03:59.310]
That is a really hard thing to do.
[00:04:01.680]
So the first thing that needs to be organized
[00:04:04.210]
is a structured way and how the data is accessible
[00:04:07.920]
to all of your team members, no matter their location.
[00:04:12.210]
The most important aspect is to ensure
[00:04:14.520]
from the very beginning
[00:04:15.730]
that each individual team member
[00:04:17.670]
has the ability to work from one version of the truth,
[00:04:21.660]
and also has the ability to instantly access this truth,
[00:04:25.720]
this information at any given time,
[00:04:28.710]
at the time when they need it
[00:04:30.750]
in order to progress their modeling aspect,
[00:04:34.110]
their work, et cetera.
[00:04:36.070]
In addition to that,
[00:04:37.020]
each individual team member needs to have full visibility
[00:04:41.030]
to what the current modern process,
[00:04:43.440]
the current work process of the other team member looks like
[00:04:46.900]
so that they can coordinate their efforts
[00:04:49.240]
and truly collaboratively arrive at a decision
[00:04:52.600]
together faster.
[00:04:55.540]
But of course, it is not only the technical realm
[00:04:59.160]
of an organization that requires instant access to the data
[00:05:03.840]
and needs to have visibility and the ability to collaborate.
[00:05:07.050]
It goes beyond that.
[00:05:08.420]
It involves your entire community in your organization,
[00:05:12.140]
from the technical space,
[00:05:13.820]
all the way to the non-technical space.
[00:05:16.570]
Only if information can freely flow
[00:05:19.880]
all the way to the C level
[00:05:22.050]
and even to organizations beyond your company
[00:05:25.520]
that have a stake in your organization
[00:05:28.410]
that have influence on how your make your decisions,
[00:05:32.540]
that information needs to be freely available
[00:05:35.380]
at any given time.
[00:05:36.720]
And it needs to be also visible,
[00:05:38.680]
how individual components of your company
[00:05:41.900]
collaborate with each other
[00:05:44.190]
Only if this is a given,
[00:05:46.040]
then you have your opportunity to truly gain a return
[00:05:49.830]
on your investment.
[00:05:52.340]
For that reason, we have created Central
[00:05:55.690]
to give your organization opportunity
[00:05:58.260]
to work more efficiently, more productively,
[00:06:01.900]
and ultimately gain a competitive advantage.
[00:06:05.850]
Now, what exactly is Central?
[00:06:08.300]
Central is a cloud hosted system
[00:06:10.960]
that allows you to manage your models
[00:06:13.470]
and your scientific data in a single environment.
[00:06:17.430]
Within this environment, you have an opportunity
[00:06:19.660]
to version track all of your information
[00:06:23.100]
and consistently visualize this information over time
[00:06:26.490]
and actively communicate on it.
[00:06:28.710]
So you also have the chance
[00:06:30.090]
to collaboratively access the data,
[00:06:32.820]
visualize it, review it, and make decisions together,
[00:06:36.190]
and then preserve this information,
[00:06:38.230]
this decision-making process, and all of the intelligence
[00:06:41.350]
around your individual modeling steps within the system.
[00:06:46.180]
And based on that consistent history
[00:06:48.240]
that you’ve build over time,
[00:06:50.030]
you build yourself a full audit trail.
[00:06:52.980]
So you have an opportunity to go back in time
[00:06:55.270]
and truly understand why certain decisions
[00:06:58.200]
were made overtime.
[00:07:00.350]
Central also, because of the way it visualizes information
[00:07:04.890]
brings all sorts of different teams together.
[00:07:07.290]
And it doesn’t matter where they are located in the world,
[00:07:10.550]
whether they’re onsite, offsite, in their home offices.
[00:07:14.090]
And it also brings people together that traditionally,
[00:07:17.130]
maybe a little bit more siloed in their way that they work,
[00:07:20.570]
that concerns the geoscientists on the ground,
[00:07:23.270]
the engineers in the production space,
[00:07:25.350]
the resource geologists and of course,
[00:07:27.250]
let’s not forget the non-technical space,
[00:07:29.750]
the decision-makers, and even the third parties,
[00:07:32.730]
the investors, the consultants,
[00:07:35.000]
everyone that has a stake in a specific project
[00:07:38.070]
or the company overall has an opportunity here
[00:07:41.360]
to truly collaborate with each other
[00:07:43.780]
on the interface that is Central.
[00:07:46.810]
Of course, with collaborations
[00:07:48.350]
in the forefront of our minds,
[00:07:50.420]
Seequent recognizes that different professionals
[00:07:53.170]
use a number of different software packages.
[00:07:55.520]
And for that reason,
[00:07:56.480]
we equipped Central with a data room
[00:07:59.350]
that can store any kind of file type.
[00:08:01.960]
So if you have models or meshes
[00:08:03.560]
coming from other software packages,
[00:08:05.550]
you can store and version track them there
[00:08:07.920]
if you want to introduce designs, GIS objects,
[00:08:10.820]
resource reports, whatever you have
[00:08:12.420]
that is project specific,
[00:08:14.660]
you can organize this information within our data room,
[00:08:18.010]
in the Central portal, access it there,
[00:08:21.290]
version control all of your different files.
[00:08:24.270]
And if your file represent a mesh
[00:08:27.530]
that our Leapfrog products can actively recognize,
[00:08:30.720]
then you can also consume the mesh directly
[00:08:33.760]
within the Leapfrog models
[00:08:35.470]
and actively stay on top of the latest version
[00:08:39.470]
of meshes that might’ve been introduced
[00:08:41.360]
from another software package.
[00:08:44.630]
Of course, when it comes to working from a remote location,
[00:08:47.850]
whether it is on site or your home office,
[00:08:51.280]
bandwidth is a big topic.
[00:08:53.650]
And in this environment,
[00:08:54.930]
it’s not often possible to really download large projects
[00:08:58.120]
every single time.
[00:08:59.490]
Within Central, you have an opportunity to visualize
[00:09:02.560]
and review each other’s models,
[00:09:04.540]
actively comment on them within a browser environment,
[00:09:08.620]
our desktop application
[00:09:09.970]
that allows you to have instant access
[00:09:12.490]
to each of the models that have been published
[00:09:14.570]
into the system overtime.
[00:09:17.250]
So no need for downloading large projects
[00:09:19.890]
every time you wish to have a look
[00:09:21.750]
at what your colleagues have done.
[00:09:23.450]
In addition to that,
[00:09:24.520]
you have an opportunity through the Central technology
[00:09:27.960]
to only upload or download the incremental changes
[00:09:32.290]
from one version to the next.
[00:09:34.640]
What that means is that every time
[00:09:36.500]
that you have a new addition to your project,
[00:09:39.280]
instead of having to upload the entire project
[00:09:42.360]
into a server environment
[00:09:44.520]
for somebody else to access and review,
[00:09:47.160]
you only send the changes in small packages,
[00:09:50.810]
and that allows you not only to deal
[00:09:52.700]
with a lower bandwidth environment,
[00:09:54.990]
but it also saves you a lot of time in digital space,
[00:09:58.700]
especially since this technology also works in a reverse.
[00:10:02.750]
So when you download a project from somebody else
[00:10:05.370]
and you already have it on your computer sitting there,
[00:10:08.540]
Central will recognize the differential,
[00:10:10.950]
the delta between the two
[00:10:12.460]
and only download the appropriate changes.
[00:10:16.230]
So it will only add a few megabytes to your hard disk
[00:10:19.280]
and not fill it up with large projects every single time.
[00:10:24.750]
Now, how does this actually work?
[00:10:27.020]
Central has three different gateways
[00:10:29.490]
through which you can access your data
[00:10:31.510]
and visualize the information
[00:10:33.200]
that’s placed into the cloud hosted environment.
[00:10:37.200]
One of their first gateways is the Leapfrog modeling suite,
[00:10:39.720]
Leapfrog Geo, for example,
[00:10:41.850]
where you can actively download and upload
[00:10:44.420]
or publish your models into the cloud hosted space.
[00:10:49.440]
It is also the place where you can actively pull
[00:10:52.300]
other people’s meshes or wire frames
[00:10:54.920]
in order to integrate them directly
[00:10:57.000]
into your Leapfrog model.
[00:10:59.200]
That’s a very important aspect of the workflow
[00:11:01.810]
that Central can establish.
[00:11:03.270]
And I’ll have a closer look at that later on
[00:11:05.520]
during our demonstration.
[00:11:08.420]
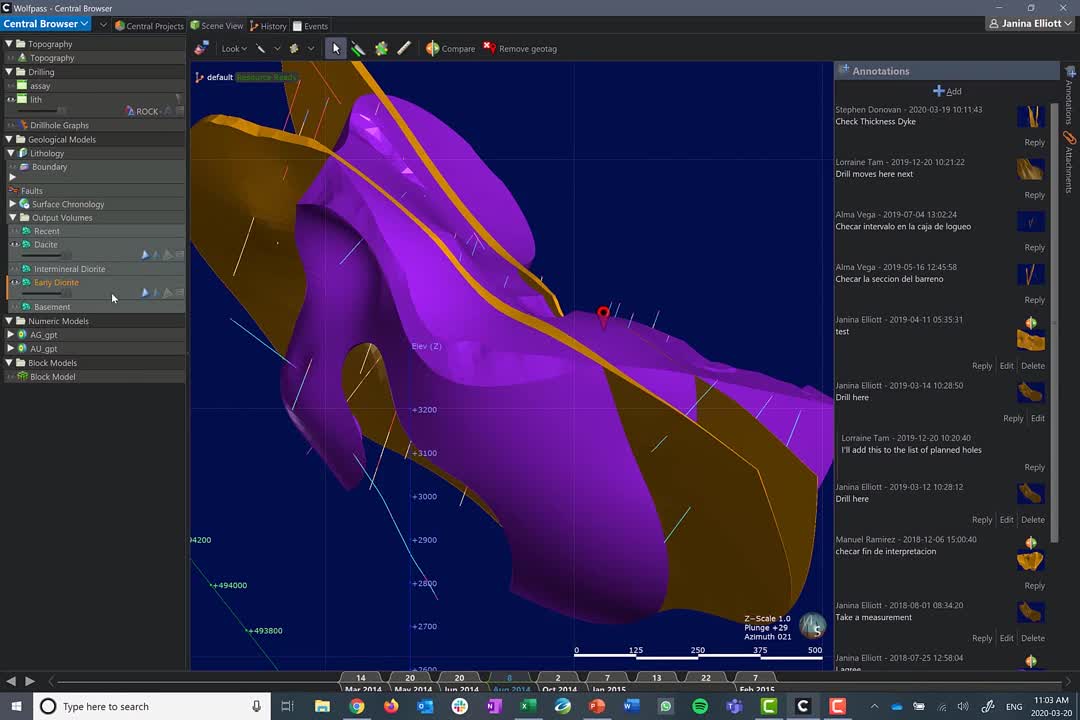
Another gateway is the Central browser
[00:11:10.737]
and is arguably the most important component of Central
[00:11:14.460]
because this is your communication platform.
[00:11:17.710]
This is where you have an opportunity
[00:11:20.260]
to open up your modeling world, your project world,
[00:11:24.330]
first thing in the morning,
[00:11:25.610]
and realize what everyone’s been up to.
[00:11:27.810]
It’s basically like opening up a newspaper, for example,
[00:11:31.100]
specific to your project.
[00:11:33.200]
Within here, you have an opportunity
[00:11:35.080]
to visualize your models, visualize your colleague’s models,
[00:11:38.650]
actively annotate them in 3D space
[00:11:41.780]
and also actively export information
[00:11:44.260]
that may be newly added for example, by your colleagues.
[00:11:48.020]
You can also compare versions
[00:11:49.890]
and truly discuss with each other what the next steps are
[00:11:53.940]
in your decision-making process.
[00:11:56.030]
This is the Central browser,
[00:11:57.695]
and we’ll have a close look at that in just a few minutes.
[00:12:00.960]
The last access point or gateway is the Central portal.
[00:12:04.720]
The Central portal has two particular purposes.
[00:12:07.270]
One of them is for the license administrator
[00:12:11.050]
to hand out the appropriate licenses, of course,
[00:12:13.960]
to the team members, as well as to set permissions
[00:12:17.210]
to each individual project.
[00:12:19.130]
It is important of course,
[00:12:20.360]
that everyone only gets to see what they’re supposed to see,
[00:12:23.800]
that your data is secure,
[00:12:25.500]
particularly when working with third parties, for example.
[00:12:28.970]
This is where you can set this up.
[00:12:31.150]
The Central portal is of that browsing environment.
[00:12:34.120]
So it’s easily accessible to everyone,
[00:12:36.250]
even if they’re not directly related to your company,
[00:12:39.010]
if you give them the permission to do so.
[00:12:41.780]
It is also the place where we have a project specific
[00:12:45.160]
data room environment, which I mentioned earlier.
[00:12:47.830]
Again, you can save here any kind of file information
[00:12:51.200]
that can come from any kind of software package.
[00:12:53.650]
And this data room allows you to actively connect of course,
[00:12:57.560]
to the Leapfrog Geo environment, as well,
[00:13:00.160]
as mentioned earlier.
[00:13:02.400]
So in the next little while,
[00:13:03.920]
we’re going to have a look
[00:13:04.900]
at all of those different components
[00:13:06.710]
that make up Central in itself,
[00:13:09.300]
how to navigate them,
[00:13:10.740]
and we’ll see just exactly how the data flows
[00:13:14.110]
from one component to the next
[00:13:16.250]
and how we can actively collaborate
[00:13:18.410]
on every single step that we take
[00:13:20.550]
in our modeling journey through Central.
[00:13:23.810]
So let’s get started by looking at the Central browser.
[00:13:27.740]
The Central browser, as mentioned earlier,
[00:13:29.530]
is a desktop application
[00:13:31.410]
and also your communication platform
[00:13:33.740]
amongst your team members.
[00:13:37.320]
When you open the Central browser,
[00:13:39.340]
you’ll sign in through your Seequent ID,
[00:13:42.040]
and that will automatically populate
[00:13:44.400]
the left-hand panel here
[00:13:46.140]
with the servers that you’ve been given permission to.
[00:13:49.570]
When clicking on one of these service here,
[00:13:51.820]
and when you’re connected,
[00:13:53.530]
you automatically get a number of Central projects
[00:13:56.850]
in this view.
[00:13:58.300]
The Central project or tiles are separated
[00:14:01.680]
or grouped by location.
[00:14:04.870]
And each of them represents a place holder
[00:14:07.580]
for your project history.
[00:14:11.260]
When I take on one of my Central projects,
[00:14:14.650]
I’m automatically placed into my history tab
[00:14:18.050]
and in the history tab,
[00:14:19.410]
we have here a graphical representation
[00:14:22.340]
of how my project has evolved over time.
[00:14:25.760]
Each individual note that you see on this version tree
[00:14:29.620]
is representative of a model version
[00:14:32.880]
that’s been uploaded consecutively.
[00:14:35.770]
Each node is equipped
[00:14:37.450]
with a number of different commentaries,
[00:14:40.170]
metadata, et cetera,
[00:14:41.810]
in order to make it really easy to navigate to history
[00:14:45.540]
even if you want to understand a year down the road,
[00:14:48.360]
just exactly why a certain modeling decision has been made.
[00:14:53.510]
In addition to that,
[00:14:54.660]
each of these nodes or versions can also be equipped
[00:14:58.400]
with a stage label.
[00:15:00.540]
The stage labels are completely customizable
[00:15:03.370]
and will allow you to add your very own peer review process
[00:15:07.690]
to your organize version history.
[00:15:12.620]
You will notice on our project tree or our version tree
[00:15:16.570]
that there are individual branches coming off.
[00:15:18.940]
And what do they actually represent?
[00:15:21.230]
Most of us tend to have a master project approach
[00:15:24.810]
where one version of the master project follows another,
[00:15:28.210]
but that might not necessarily be the best way
[00:15:31.110]
of separating the workload amongst individuals.
[00:15:35.440]
One of the ways you can utilize Central
[00:15:37.330]
is by splitting out your main project into parts,
[00:15:41.630]
and these parts could represent, for example,
[00:15:44.850]
a separate location.
[00:15:46.270]
So one branch here could focus in a specific location
[00:15:50.010]
of your project.
[00:15:51.960]
It could represent a different skillset,
[00:15:54.360]
or if you want to give a specific aspect of your work
[00:15:57.510]
to a skilled professional in your team,
[00:15:59.840]
such as a geochemist or a geophysicist
[00:16:02.240]
or a structural geologist,
[00:16:04.620]
or this branches could also be utilized
[00:16:07.440]
as a separate workspace to follow up on experiments
[00:16:11.360]
or a hypothesis.
[00:16:13.720]
You can create an individual space that’s not loaded with
[00:16:17.900]
or burdened with all of the data
[00:16:20.180]
that is in a master project,
[00:16:21.940]
but that can be stripped down to a much smaller project,
[00:16:25.250]
a much lighter-weight project that can be run much faster
[00:16:29.260]
and then be pushed through a peer review process
[00:16:31.750]
much more quickly.
[00:16:33.660]
At the end, when everyone has peer reviewed a project
[00:16:36.960]
and they’re happy with the results,
[00:16:39.080]
there are various opportunities within Central
[00:16:42.040]
that will allow you to introduce the information
[00:16:45.000]
that everyone agreed upon to bring them back
[00:16:47.420]
into the master environment.
[00:16:50.950]
When I click on a specific node,
[00:16:52.720]
such as this particular version here,
[00:16:54.740]
you’ll also notice that on the right side here,
[00:16:57.410]
more and more detail about this particular version
[00:16:59.870]
is displayed.
[00:17:01.120]
So for example, some of the main objects
[00:17:03.220]
that have been introduced into this view
[00:17:05.870]
on this particular version can be highlighted.
[00:17:08.730]
And so by just clicking on these different objects,
[00:17:11.010]
I get already a little bit of an idea
[00:17:12.870]
of what this is all about.
[00:17:14.500]
That includes also the block modeling environment,
[00:17:17.540]
and then on the very right side here,
[00:17:19.350]
you will see a summary page for all of the annotations
[00:17:22.610]
and comments that have been created
[00:17:24.250]
for this particular model of a version overtime.
[00:17:28.230]
The nice thing about this particular panel
[00:17:30.260]
is that you can fill it with any kind of commentary
[00:17:33.330]
and a beautiful thing in anything Leapfrog
[00:17:35.950]
on anything Central is that our conversation happens
[00:17:39.840]
in the 3D space.
[00:17:41.950]
So each individual comment that you may place here
[00:17:44.760]
is automatically equipped with a thumbnail
[00:17:47.570]
that is hinged in a 3D environment.
[00:17:50.270]
So for example,
[00:17:51.103]
if I click on one of these thumbnails here,
[00:17:54.500]
I’m automatically placed in my scene view.
[00:17:59.980]
In the Central panel,
[00:18:01.080]
I’m now presented with exactly the objects
[00:18:03.980]
relating to the comment that I clicked on earlier.
[00:18:07.070]
And now on the right side here, in this annotation panel,
[00:18:09.850]
I can go ahead and either actively reply to a comment
[00:18:13.610]
and create a thread within here,
[00:18:16.110]
or I can create my own comment or annotation
[00:18:19.000]
by clicking on the add button
[00:18:20.710]
and also placing my own geo-tech
[00:18:22.940]
in order to hinge this conversation at exactly the XYZ space
[00:18:27.460]
that I need to talk about.
[00:18:29.060]
So no need anymore to write epic emails describing,
[00:18:33.287]
“Okay, now navigate between those two drillholes,
[00:18:36.483]
“350 meters to the Northwest,
[00:18:38.317]
“and do you see this little geological feature?”
[00:18:41.260]
That can be forgone.
[00:18:42.530]
So it’s a very handy tool to have at hand.
[00:18:46.640]
In addition to the comments that you can place here,
[00:18:49.650]
you can also place an attachment at the appropriate time.
[00:18:53.620]
So if I click here,
[00:18:54.650]
you can place any kind of file that you wish to introduce
[00:18:58.940]
in order to support the conversation with your colleagues.
[00:19:03.120]
You can also place a URL here,
[00:19:05.210]
if you’d like to point to a specific location
[00:19:08.240]
on another server, for example, or a website.
[00:19:11.700]
Of course, when it comes to the placement of various files,
[00:19:15.050]
there are a number of different places
[00:19:16.990]
where you can preserve information,
[00:19:19.150]
the data room being another one,
[00:19:21.100]
which I’m going to highlight a little later on.
[00:19:23.940]
Another comment on the annotations panel.
[00:19:26.810]
So you can see here, it’s been used in this scenario here,
[00:19:29.770]
basically as a chatbox.
[00:19:31.410]
However, this can be used in very creative ways.
[00:19:34.550]
For example, we see various clients now utilizing this
[00:19:38.080]
as a reporting feature.
[00:19:39.830]
So for example,
[00:19:40.663]
if you need to have weekly reports being summarized,
[00:19:43.780]
if you want to go paperless,
[00:19:45.230]
this is a fantastic place to do it.
[00:19:48.140]
Now, if you require to review your model
[00:19:51.980]
and individual objects associated with it,
[00:19:54.780]
all you have to do is to go to the left side here
[00:19:57.330]
and on this panel,
[00:19:58.530]
which is very similar to the project tree in Leapfrog Geo,
[00:20:02.130]
you can highlight the individual objects
[00:20:05.160]
you need to have a look at.
[00:20:06.290]
So for example, by just clicking on the eyeball icon here.
[00:20:09.560]
You also then have a couple of other objects here
[00:20:12.870]
that allow you to visualize the different features
[00:20:16.250]
in various ways,
[00:20:17.620]
whatever makes it easiest for you to review your project.
[00:20:22.660]
In addition to that, on the left side here,
[00:20:24.900]
you can also actively export information.
[00:20:28.010]
So without having to ask your colleague
[00:20:30.070]
to send you a specific information
[00:20:32.290]
or to download the project in its entirety,
[00:20:35.180]
you can go ahead and you can pull polylines to your turfs
[00:20:39.420]
meshes of any form,
[00:20:40.640]
where they’re surfaces or output volumes
[00:20:42.990]
and block models directly from the browser environment.
[00:20:46.840]
And it’s fairly straight forward to do,
[00:20:49.280]
all you need to do is right click, export, and here you go.
[00:20:53.020]
And now you can go ahead and batch export
[00:20:55.410]
this specific files that you’re interested in,
[00:20:57.930]
in any kind of format that you’re interested in
[00:21:00.450]
potentially as well.
[00:21:02.120]
This is of course, particularly handy
[00:21:04.550]
if you are a third party, for example,
[00:21:06.990]
or consultant or somebody in the project
[00:21:10.100]
that uses a different software package
[00:21:12.490]
in order to assist with the modeling of the project.
[00:21:17.950]
So you can go ahead and pull just exactly what you need
[00:21:21.070]
at the time when you need it,
[00:21:22.950]
without having to ask your colleagues
[00:21:24.720]
for the specific detail of information.
[00:21:27.390]
So that already really increases the efficiency
[00:21:30.020]
and how people can interact with each other,
[00:21:32.430]
even when located remotely.
[00:21:36.620]
Again, with the aspect of collaboration in mind,
[00:21:39.340]
one of the things that we quite frequently do as a team
[00:21:42.560]
is to actively compare
[00:21:44.260]
how our model has progressed overtime.
[00:21:46.287]
And this is also something
[00:21:47.600]
that we tend to present to others,
[00:21:49.500]
other stakeholders in the project,
[00:21:51.340]
other decision-makers often on a higher level,
[00:21:53.920]
they need to know how far your project has come,
[00:21:56.800]
what decisions you’ve made and what the next steps are.
[00:22:00.170]
And for that,
[00:22:01.003]
we have a number of different objects here in place
[00:22:03.690]
that will allow you to visualize progress overtime.
[00:22:07.610]
So for example, on the bottom here,
[00:22:09.590]
you will have noticed there are a number of different dates
[00:22:12.790]
on this panel,
[00:22:14.600]
and they will allow you to jump basically,
[00:22:16.770]
to the future version here of this model.
[00:22:21.530]
So you can jump back and forth between these different dates
[00:22:25.770]
and automatically, all the objects
[00:22:28.000]
that you had previously selected
[00:22:29.730]
will then be shown in the new version.
[00:22:33.600]
The nice thing here is, again,
[00:22:35.540]
these particular objects that you’re seeing on the screen
[00:22:39.230]
are not the full model itself.
[00:22:42.450]
There are tiny little file sizes
[00:22:44.950]
that are just currently being cashed on your computer.
[00:22:47.970]
So it’s not affecting you very strongly
[00:22:50.320]
in terms of your bandwidth
[00:22:52.110]
and the way that you interact with the data.
[00:22:54.320]
So again, if you’re on a remote location
[00:22:57.600]
and you struggle with bandwidth connectivity,
[00:23:00.140]
this is not a concern, they’re tiny little files.
[00:23:03.900]
In addition to that,
[00:23:04.910]
I’d also like to highlight that we have
[00:23:06.860]
another compare function available,
[00:23:09.150]
and that sits at the very top here.
[00:23:11.720]
The compare button, if I click on it here,
[00:23:14.090]
opens up a new tab.
[00:23:16.560]
And in this tab,
[00:23:17.970]
I can go ahead and I can pull two different revisions
[00:23:22.180]
of the same model into the same view.
[00:23:25.630]
So for example, here,
[00:23:27.100]
I can juxtapose another revision,
[00:23:30.280]
an earlier one here, for example,
[00:23:32.290]
and place the objects relating to this
[00:23:35.150]
directly against the others coming from the later revision.
[00:23:39.950]
So just to highlight this a little bit more,
[00:23:42.130]
I can then go ahead and I can enhance the differences
[00:23:45.902]
between the two objects that have been loaded.
[00:23:49.190]
So for example, here on the drillholes side,
[00:23:52.060]
I can go ahead and increase, let’s say the radius
[00:23:55.760]
of all of the different drillholes
[00:23:57.680]
that have been introduced at a later stage.
[00:24:00.900]
And when it comes to the objects,
[00:24:02.440]
the meshes here themselves,
[00:24:04.290]
I can highlight here with using this little triangle button,
[00:24:07.570]
just exactly what that previous mesh would have looked like
[00:24:11.090]
relative to the later interpretation in this case
[00:24:15.160]
of this particular dike.
[00:24:17.900]
Of course, you need to go ahead
[00:24:20.700]
and then actively talk about those particular changes
[00:24:24.700]
that have occurred in those subsequent revisions.
[00:24:27.200]
And for that, we also have an annotation panel
[00:24:30.240]
available here in the compare tab.
[00:24:32.930]
So you can go ahead and comment around this.
[00:24:35.570]
And again, our clients have been incredibly creative
[00:24:38.720]
in this space and it can be used
[00:24:40.410]
in a number of different ways.
[00:24:42.350]
I mentioned earlier the reporting idea
[00:24:45.410]
for the annotations panel.
[00:24:47.300]
So something that we see with various companies
[00:24:49.680]
at the moment is that for example,
[00:24:52.117]
new quick log information is being introduced here
[00:24:55.280]
relative to an older model, an older model version
[00:24:59.352]
or the current model version and the current section
[00:25:03.370]
relating to the model itself as well.
[00:25:06.500]
So you can see how the individual drillholes
[00:25:09.770]
progress overtime,
[00:25:11.400]
how they develop and what the caller can see,
[00:25:14.250]
and how that would instantly affect
[00:25:16.130]
the way that you interpret your model.
[00:25:17.967]
And you can discuss it right here.
[00:25:21.130]
So to summarize,
[00:25:22.880]
I’m just going to go back to the scene view here.
[00:25:25.440]
The Central browser is indeed your communication platform.
[00:25:30.720]
It is the place where you want to enter in the morning
[00:25:33.550]
to see what has happened in your project world
[00:25:36.630]
and where you can actively communicate with your colleagues
[00:25:40.370]
to see what are the next step
[00:25:42.240]
in your decision-making process.
[00:25:44.440]
Of course, it’s also the place
[00:25:45.790]
where you can build a true audit trail overtime,
[00:25:49.230]
because just version tracking your individual models,
[00:25:52.290]
that’s a great thing to do,
[00:25:53.820]
but keeping the intelligence
[00:25:55.460]
around each individual modeling step,
[00:25:57.840]
not having to reinvent the wheel an year down the road
[00:26:00.860]
and building a good due diligence track, that is key.
[00:26:04.380]
And that is what the Central browser can do for you.
[00:26:08.700]
So let’s have a look at the Central portal next,
[00:26:11.760]
and a nice thing here is that I can automatically link
[00:26:15.070]
from my Central browser to my portal,
[00:26:17.960]
by clicking this little button.
[00:26:20.419]
By clicking here, I’m automatically opening up
[00:26:22.600]
one of my web browsers
[00:26:24.240]
’cause the Central portal is hosted on a website.
[00:26:29.270]
Just as a reminder,
[00:26:30.540]
the Central portal has a twofold application.
[00:26:34.550]
For one, it is the place for the administrator office system
[00:26:39.190]
to hand out a specific user licenses
[00:26:42.290]
and invite the users through their Seequent ID
[00:26:45.800]
to participate in the community that is Central.
[00:26:49.680]
In addition to that,
[00:26:50.840]
the administrator has an opportunity here
[00:26:53.790]
to provide the individual with access
[00:26:56.080]
to the various projects and in each individual project,
[00:27:00.200]
he or she also defines if the user has the ability
[00:27:04.110]
to just view the project and potentially just export
[00:27:07.790]
a couple of features from the Central browser.
[00:27:10.230]
So this could be basically any stakeholder in a project
[00:27:13.790]
that may not necessarily be a modeler
[00:27:16.320]
or maybe a third party
[00:27:18.180]
that is also interested in the project.
[00:27:20.900]
And the other aspects,
[00:27:22.370]
that’s all the other permission rights
[00:27:23.950]
that an admin can handout are the level of editor and owner.
[00:27:29.120]
When an editor or an owner,
[00:27:30.500]
then the user of the system has the capability
[00:27:34.369]
of actively connecting to the Central system
[00:27:38.760]
through Leapfrog Geo and introducing new revisions
[00:27:41.610]
of the model into the system.
[00:27:44.680]
The second function that the portal fulfills
[00:27:47.030]
is to allow every project stakeholder
[00:27:49.890]
to access their project and find information
[00:27:53.600]
specific to it’s project.
[00:27:56.090]
So if I navigate now to the project
[00:27:58.210]
that we looked at earlier on in the browser right here,
[00:28:02.670]
what I’m first presented with is a dashboard environment
[00:28:06.190]
that shows me just exactly what is currently happening
[00:28:09.700]
in my project world.
[00:28:11.750]
What are the various revisions,
[00:28:13.077]
the history of it, et cetera.
[00:28:15.810]
In addition to that,
[00:28:17.060]
the project here is outfitted with a files tab,
[00:28:20.590]
and that files tab refers to the data room
[00:28:23.670]
that I mentioned earlier.
[00:28:25.480]
So if I click here on files,
[00:28:28.100]
I can see I have here a folder structure
[00:28:31.120]
that’s probably quite similar to what you’re used to
[00:28:33.250]
from SharePoint, Dropbox, et cetera,
[00:28:35.667]
all of those are various types of data rooms
[00:28:37.990]
that are out there.
[00:28:39.530]
Now, the nice thing about the Central data room
[00:28:42.130]
is that you can structure it in any way you like.
[00:28:45.370]
So for example, here,
[00:28:46.590]
I can create my own folder structure overtime.
[00:28:50.310]
And if I click here on my various folders
[00:28:54.740]
and individual files,
[00:28:56.360]
you will also notice the panel on the right side.
[00:28:59.610]
This panel here shows me that there are various versions
[00:29:04.170]
of this particular pit mesh available to me.
[00:29:07.410]
So within the data room environment,
[00:29:09.470]
I can actively version track on a temporal basis here.
[00:29:14.050]
So for example,
[00:29:15.180]
if I have a new file available that supersedes the other,
[00:29:18.540]
all I have to do is to upload a new version,
[00:29:21.870]
and then it doesn’t even matter
[00:29:23.350]
if it’s named the same thing or not,
[00:29:25.120]
it will then be placed on top of the other.
[00:29:28.100]
That doesn’t mean that the old file
[00:29:29.690]
is not available to you anymore.
[00:29:31.670]
You can go ahead and download any file
[00:29:33.850]
that you’ve ever preserved in this environment
[00:29:36.230]
at any given time.
[00:29:37.360]
However, the newer version will always sit on top.
[00:29:41.990]
In addition to that, if you are preserving mesh information,
[00:29:46.360]
wire frame information that has been produced,
[00:29:48.740]
either any prompt to you or various other software products
[00:29:52.640]
within the data room,
[00:29:54.020]
you have an opportunity here to link these meshes
[00:29:57.300]
directly back into your Leapfrog Geo model.
[00:30:00.900]
So there’s a complete flow of information
[00:30:03.310]
from the data room environment to Leapfrog Geo,
[00:30:06.570]
at the moment and form of meshes and wire frames.
[00:30:10.360]
So for example, if a colleague who works in another product,
[00:30:14.240]
let’s say a resource geologists, for example,
[00:30:16.660]
which using data mine, micromine, Vulcan,
[00:30:18.940]
whatever you may have it,
[00:30:20.340]
they can preserve their specific file types within here.
[00:30:23.900]
And then there can be automatically pulled
[00:30:26.130]
into your own geo project without any problems.
[00:30:29.150]
And so if your colleague then goes ahead
[00:30:31.070]
and has a new version available,
[00:30:33.110]
they can version track it within the data room environment
[00:30:35.990]
and you will be automatically informed of that update.
[00:30:40.310]
And that’s what I am going to show you next.
[00:30:43.800]
Now, here’s our third gateway
[00:30:45.410]
into the Central server environment,
[00:30:47.500]
and that’s the Leapfrog modeling suite.
[00:30:50.080]
In this case, Leapfrog Geo.
[00:30:52.180]
And again, here I signed in with my Seequent ID,
[00:30:55.940]
completely dongless and easy to do.
[00:30:58.260]
And that automatically then connected me
[00:31:01.010]
to the servers that I have access to.
[00:31:04.220]
Now then, you can click on the server that you require,
[00:31:07.430]
click on it here, and once connected,
[00:31:09.560]
all of the different Central projects
[00:31:12.080]
that you’ve been given permission to
[00:31:14.428]
and you’re actively working on will pop up right here.
[00:31:18.040]
Now, I’m just going to jump here into my Wolf Pass project,
[00:31:21.400]
and it’s a stripped down version of what we saw earlier on,
[00:31:25.030]
but it’s the same idea.
[00:31:27.190]
Now, what we see here is the same project history
[00:31:30.010]
that has come through the Central link.
[00:31:33.540]
And if I click on any of these here,
[00:31:35.227]
you’ll also notice on the right side here,
[00:31:37.960]
that not just the actual project is now available
[00:31:40.720]
to me for download,
[00:31:42.000]
but I can also visualize all of the annotations
[00:31:45.080]
and the commentary around it.
[00:31:47.200]
And the beautiful thing is that each of these
[00:31:49.610]
is equipped with the thumbnail that I mentioned earlier.
[00:31:52.820]
So if I click on that,
[00:31:53.970]
I’ll be then automatically placed
[00:31:55.840]
into the correct scene view
[00:31:57.970]
so I can work on exactly that XYZ location
[00:32:01.090]
that my colleague might have highlighted for me
[00:32:03.450]
in order to keep working on that particular part.
[00:32:07.890]
What you will see here is on this version tree
[00:32:11.010]
that we have a master environment
[00:32:14.030]
and highlighted is here in the master branch.
[00:32:18.010]
We’ve got a lithology branch
[00:32:19.950]
and we’ve got a resource branch.
[00:32:21.630]
And the important aspect about Central
[00:32:24.630]
is that it will allow you to link
[00:32:27.910]
different Leapfrog Geo projects
[00:32:30.210]
with each other through meshes.
[00:32:33.120]
So what that means is that if I have a colleague
[00:32:35.630]
working on one particular aspect of the project,
[00:32:39.827]
whether it may be a structure,
[00:32:41.460]
it could be a lithological domain, et cetera,
[00:32:44.400]
I can go ahead and leverage off that work
[00:32:48.170]
and utilize their surfaces, their output volumes,
[00:32:53.210]
any kind of mesh that they’ve created
[00:32:55.060]
and actively link it into my own model.
[00:33:00.010]
Now, based on that idea, I’d like to show you here,
[00:33:02.530]
my master project that actually pulls
[00:33:05.600]
quite a bit of information from the lithology branch
[00:33:08.890]
and the resource branch as well,
[00:33:11.120]
to be a full representation
[00:33:13.020]
of what my colleagues have created
[00:33:15.230]
yet not actually having to reproduce in full
[00:33:18.240]
in the master environment.
[00:33:20.610]
So how does that work?
[00:33:21.880]
Well, first of all, I’ve downloaded here the master project,
[00:33:25.720]
just by right clicking, download
[00:33:27.970]
and enabled myself to have a offline copy
[00:33:31.530]
directly available on my computer.
[00:33:33.270]
So to anyone that’s suffering
[00:33:35.530]
from low bandwidth environment, again,
[00:33:38.090]
once you’ve downloaded your project,
[00:33:40.520]
it will then be stored on your computer.
[00:33:42.700]
You can actively work in an offline environment,
[00:33:45.910]
and then once you’re ready to publish it back
[00:33:48.700]
into the Central cloud hosted system,
[00:33:52.800]
then you need it to be connected (indistinct)
[00:33:55.060]
no problem, you can completely work offline.
[00:33:58.140]
In addition to that,
[00:33:59.070]
I should also mention,
[00:34:00.360]
if the project is already once available
[00:34:04.070]
in the server environment and in Central,
[00:34:06.850]
you’ve published it before,
[00:34:08.500]
then all that you have to do and publish again,
[00:34:10.870]
the next time around is just a differential,
[00:34:14.160]
that delta between the previous version and the next.
[00:34:17.290]
So again, really speaking to environments
[00:34:20.410]
that suffer from a low bandwidth,
[00:34:22.820]
but let’s go back to the object integration idea.
[00:34:26.750]
So I’m opening up here my master environment,
[00:34:30.180]
and I already clicked on this earlier on.
[00:34:32.380]
So you see I’m here in editing mode,
[00:34:34.680]
which brought this project up in my scene view.
[00:34:39.140]
Now, in my scene view, you see here,
[00:34:41.080]
I’ve got a lithology model at hand
[00:34:44.140]
and this lithology model is completely sourced
[00:34:47.750]
by my colleagues model.
[00:34:49.950]
So that comes from here,
[00:34:51.740]
from the top of my lithology branch.
[00:34:54.320]
And how does this now work?
[00:34:55.650]
How was I able to pull all of those output volumes
[00:34:59.450]
into my model here?
[00:35:02.050]
So the way to do it is to utilize the meshes folder.
[00:35:06.430]
If you right click on the meshes folder here,
[00:35:08.540]
you have the option to import a mesh from Central.
[00:35:13.400]
Once clicked, I can then access
[00:35:15.460]
all of the different Central projects
[00:35:17.840]
that I’ve been given permission to.
[00:35:20.210]
So for example, if I click here now
[00:35:22.260]
on the Wolf Pass project, again,
[00:35:24.410]
I have two options.
[00:35:25.780]
First, I can navigate
[00:35:27.430]
all the way through my project history
[00:35:29.930]
that includes my adjacent branches
[00:35:32.820]
and all of the related models here
[00:35:35.490]
and all of the different services
[00:35:37.720]
associated with this model, including typography meshes,
[00:35:41.160]
boundary meshes, any kind of clipped or bullion mesh,
[00:35:44.470]
any kind of surface or volume
[00:35:46.160]
that you would have created overtime.
[00:35:48.230]
All of this is available to you.
[00:35:50.940]
As a second option,
[00:35:52.020]
you can also click on the files tab, which again,
[00:35:55.010]
refers to the data room environment in Central.
[00:35:59.020]
So if you have in one of your folders, a mesh store
[00:36:03.450]
that may come from another software package, for example,
[00:36:06.910]
and these are all the currently supported formats
[00:36:09.370]
right here.
[00:36:10.490]
Then you can also pull that mesh directly
[00:36:13.520]
into your ongoing model.
[00:36:16.130]
Now for this particular project,
[00:36:17.760]
I’ve already prepared a few.
[00:36:19.150]
So what I’ve done here is I’ve gone to my project history
[00:36:22.620]
to my lithology branch here, to the very top.
[00:36:25.690]
And I’ve pulled my output volumes from my geological model,
[00:36:30.850]
all of these guys.
[00:36:33.430]
Now, once they arrive,
[00:36:35.100]
I can put them in nice sub folders
[00:36:37.130]
and get nicely organized as you’re used to.
[00:36:39.990]
And all of those meshes come in
[00:36:41.800]
with these little blue symbols.
[00:36:43.770]
Now, as soon as we’ve established this link,
[00:36:46.580]
this link will be continuously remembered.
[00:36:49.790]
And so every time that a change occurs
[00:36:52.690]
in the Central system,
[00:36:54.640]
if my colleague introduces a new version
[00:36:57.650]
of a particular mesh or a particular wire frame, et cetera,
[00:37:01.310]
then my project gets automatically notified by this.
[00:37:04.767]
And this is what this clock symbol here symbolizes,
[00:37:08.410]
a new version of this particular mesh is available to me.
[00:37:12.450]
So I’m consistently connected to all the ongoing effort
[00:37:16.650]
in my colleagues modeling world.
[00:37:19.210]
And now once all of my meshes here
[00:37:21.170]
are located in this folder,
[00:37:22.800]
I can then go ahead and link them
[00:37:24.610]
to my ongoing interpretation in my own model environment.
[00:37:28.620]
So for example, here in my lithology model,
[00:37:31.890]
what I’ve done is I filled all of my surfaces up,
[00:37:35.310]
like my colleagues did,
[00:37:36.760]
and all I did here,
[00:37:37.800]
instead of linking to an existing database,
[00:37:41.360]
I linked to an output volume and this output volume here
[00:37:45.990]
represents the relative surface.
[00:37:48.400]
And as you can see here,
[00:37:49.830]
my output volumes are a little bit out of date at the moment
[00:37:53.640]
symbolized by this clock symbol.
[00:37:55.930]
So in order for me to now refresh my model that you see here
[00:38:00.310]
and give it the latest view, the latest interpretation
[00:38:04.663]
that my colleague has come up with,
[00:38:06.730]
all I have to do is to go to the source
[00:38:09.320]
by clicking on the hyperlink here, for example,
[00:38:12.360]
right click on the mesh
[00:38:15.200]
and reload from the latest on the branch,
[00:38:18.010]
or even choose a specific mesh
[00:38:20.370]
from the existing project history.
[00:38:23.240]
And now, this has a whole number of opportunities at hand.
[00:38:27.490]
So for example, if my colleague were to work
[00:38:30.520]
on an existing regional, false structure, for example,
[00:38:33.850]
I can go ahead and I can link their mesh
[00:38:37.000]
directly into my model.
[00:38:39.477]
And then of course,
[00:38:40.430]
every time that he or she updates the model,
[00:38:43.093]
that that new information will automatically cascade
[00:38:46.770]
into my own model, for example,
[00:38:49.400]
the fault systems folder and update my model.
[00:38:52.230]
And of course, you can be very creative in this space.
[00:38:56.170]
For example, for our recess geologists,
[00:38:59.350]
if you’re interested in using Edge or already using Edge,
[00:39:02.890]
you can create a new demand estimator, for example,
[00:39:06.410]
in the same fashion and linking
[00:39:08.790]
your original lithological domain
[00:39:11.500]
to one of the meshes that have been pulled through Central.
[00:39:15.430]
So if your colleague works on the geological interpretation
[00:39:18.710]
of an area and you require that lithological domain
[00:39:22.630]
in order to forward your resource work,
[00:39:25.190]
all you have to do is to link your estimation model
[00:39:29.120]
in Edge and Geo directly
[00:39:31.440]
to that particular lithological domain.
[00:39:33.650]
And then every single time that your colleague
[00:39:36.560]
will make an update,
[00:39:37.890]
you can automatically have this updated information
[00:39:40.900]
flow into your estimation.
[00:39:43.140]
And this is really quite a unique thing
[00:39:46.050]
because the usual way that we interact with our geologist,
[00:39:50.080]
if you are a resource modeler,
[00:39:51.690]
is that we’re handed lithological domains,
[00:39:54.240]
maybe every three months, six months, maybe even annually.
[00:39:58.040]
And that makes it really hard to stay on top
[00:40:00.240]
of the current geological modeling process.
[00:40:03.320]
With this, you have an opportunity
[00:40:04.950]
to be part of that geological modeling process
[00:40:07.840]
and really participate in the conversation around it.
[00:40:11.630]
So for example,
[00:40:12.530]
if you find specific trends in the data
[00:40:15.210]
that support maybe a slightly different interpretation
[00:40:18.420]
of the geological orientation of a body,
[00:40:21.290]
you can go ahead and tell that and actually influence
[00:40:24.490]
how the model is progressed all the time.
[00:40:27.520]
So you can see,
[00:40:28.651]
there’s a whole number of different workflows
[00:40:30.523]
that can arise from the use of the Central system
[00:40:34.360]
and the opportunity to leverage off each other’s work.
[00:40:40.730]
So the last thing I want to highlight here
[00:40:42.440]
is how do we actually bring the information
[00:40:44.943]
back into the Central system?
[00:40:47.820]
So by clicking here onto our project tab,
[00:40:51.870]
we have an opportunity then to publish the information
[00:40:55.690]
back to the server environment
[00:40:57.820]
or to a cloud hosted environment.
[00:41:00.640]
Initially here,
[00:41:01.590]
you can highlight just exactly the objects
[00:41:04.210]
that you wish to actively talk about.
[00:41:06.910]
And that is what is being presented
[00:41:09.020]
in the browser environment.
[00:41:12.270]
Just to briefly show you
[00:41:13.517]
and we navigate to the browser itself,
[00:41:16.230]
the objects that you see here on the left side,
[00:41:19.560]
these are the objects that are instantly presented
[00:41:24.810]
when you tick on these various boxes.
[00:41:27.520]
So for example,
[00:41:28.353]
if you wish to just actively communicate with somebody
[00:41:31.190]
and just show them a few different aspects
[00:41:33.140]
about your modeling workflow,
[00:41:34.419]
your ideas that you want to share,
[00:41:36.620]
and maybe get peer reviewed,
[00:41:38.490]
all you have to do is then tick on the various objects
[00:41:41.380]
and in the Central browser environment,
[00:41:43.553]
that is what’s going to be shown.
[00:41:45.850]
At that particular point,
[00:41:47.510]
you don’t necessarily have to add
[00:41:50.240]
an entire Geo project to your upload.
[00:41:53.480]
And that is the next thing that’s going to be asked of you.
[00:41:56.520]
So would you like to attach to the entire Geo project?
[00:41:59.730]
Not every step of your conversation with somebody else
[00:42:02.850]
will necessarily need that, okay?
[00:42:05.500]
So this is for backup.
[00:42:06.750]
This is about sharing models,
[00:42:08.440]
but if your conversation requires
[00:42:10.750]
only to show somebody visually
[00:42:13.410]
a couple of objects from your model,
[00:42:16.710]
then you can go ahead and say,
[00:42:18.077]
“No, I don’t need to share my Geo project right now.”
[00:42:21.530]
And when thinking about working
[00:42:23.310]
from a home office environment or from a location
[00:42:25.930]
where you have relatively smaller bandwidth,
[00:42:29.490]
maybe not necessarily every single upload
[00:42:31.890]
requires to have a full Geo project attached to it.
[00:42:35.750]
Having said that, I mentioned earlier,
[00:42:38.100]
there are a number of different ways
[00:42:39.510]
and how Geo projects can be uploaded
[00:42:41.950]
in a really minimal file size.
[00:42:44.320]
So if you already have a previous version
[00:42:47.080]
of your Geo project in place,
[00:42:49.060]
and the changes are not dramatic,
[00:42:50.960]
then you only upload a couple of megabytes,
[00:42:53.200]
then by all means, say yes every single time.
[00:42:56.090]
If you’re concerned about bandwidth
[00:42:57.970]
and you really just want to facilitate a conversation,
[00:43:00.480]
it’s okay to say no.
[00:43:02.860]
In case you do say yes,
[00:43:04.570]
there are two different ways of compression
[00:43:06.550]
that you can then choose.
[00:43:07.930]
And then you can go ahead and publish
[00:43:10.200]
on a specific branch environment.
[00:43:12.820]
So this is something that you will find overtime,
[00:43:16.250]
just exactly how your tree will look like,
[00:43:19.260]
how you want to divide up the work
[00:43:21.630]
amongst all of your different colleagues
[00:43:23.740]
in order to truly divide and conquer,
[00:43:26.510]
to bring down the sizes of your individual Geo projects
[00:43:29.610]
and collaboratively create a master environment,
[00:43:32.130]
for example.
[00:43:33.280]
In this particular case here,
[00:43:34.780]
we are more than happy to assist you
[00:43:37.530]
in any kind of workflow question that you might have.
[00:43:40.200]
And we also have a number of examples available to you
[00:43:43.530]
to help you define just exactly
[00:43:45.790]
what’s right for your organization.
[00:43:49.440]
This concludes the product demonstration
[00:43:51.580]
for the different components of Central.
[00:43:54.180]
But just to summarize a little bit, Central in itself,
[00:43:57.550]
focuses on collaboration and of course, virtual control.
[00:44:02.840]
It allows you to truly build a new culture of communication
[00:44:07.270]
amongst your team members,
[00:44:09.030]
particularly when remotely located in your home offices
[00:44:12.770]
or on site.
[00:44:14.870]
The Central browser in particular,
[00:44:16.690]
and the annotation panels within it, et cetera,
[00:44:19.470]
allow you to truly keep everyone actively connected
[00:44:23.030]
and create a true community despite people being elsewhere.
[00:44:28.800]
It gives you an idea of consistent updates
[00:44:31.290]
and always keeps you in the know when change occurs
[00:44:34.660]
and allows you to visualize just exactly
[00:44:38.000]
where the next steps are.
[00:44:40.210]
You can visualize information at any given time.
[00:44:42.390]
You can compare models, no matter what it is.
[00:44:45.050]
You can really track progress.
[00:44:46.730]
And because of that, you can make decisions together
[00:44:49.820]
and build a consistent on a trail
[00:44:51.950]
around these decisions as well.
[00:44:54.920]
Part of this new culture of communication
[00:44:56.880]
can also be how you consistently test ideas
[00:45:00.160]
and peer review your different modeling updates.
[00:45:04.200]
You can utilize the Central system
[00:45:06.330]
to differentiate different workspaces, for example,
[00:45:09.760]
that test different ideas.
[00:45:11.410]
And then now everyone in the team
[00:45:13.400]
to actively partake in the conversation
[00:45:15.840]
about the next steps.
[00:45:17.460]
That’s one way of how you can utilize the system,
[00:45:20.250]
and particularly the browser environment
[00:45:21.847]
due to its visualization components.
[00:45:25.730]
Another aspect where Central could help you
[00:45:27.700]
to work more efficiently in a collaborative environment
[00:45:30.630]
is by helping you restructure and organize
[00:45:33.600]
the way that you model.
[00:45:35.070]
So your active modeling workflows
[00:45:37.770]
can benefit from the ability
[00:45:40.360]
to separate different components of your work
[00:45:43.150]
and thus minimizing the Geo databases
[00:45:46.400]
relative to those individual portions of the model.
[00:45:49.880]
So for example, you can go ahead and separate out a model
[00:45:52.990]
based on location, and then bring it all back
[00:45:55.700]
into a master environment,
[00:45:57.380]
similarly to what we discussed earlier,
[00:45:59.720]
but it can also be used in other ways.
[00:46:01.670]
So for example,
[00:46:02.840]
separating out the work based on professional skillset
[00:46:06.580]
a branch specific force structure,
[00:46:08.520]
a branch specific for resource development,
[00:46:11.310]
there’s a branch specific for geo chemistry, geo physics,
[00:46:14.130]
whatever you have it,
[00:46:15.550]
you have an opportunity here to really have everyone
[00:46:19.090]
that has a specific skillset
[00:46:20.870]
work in a separate yet completely transparent workspace
[00:46:25.480]
that can be peer reviewed
[00:46:27.340]
so they can work faster,
[00:46:28.970]
build the interpretations more quickly
[00:46:31.190]
and really bring in the information from other bright minds
[00:46:34.910]
in the organization to come to that next conclusion,
[00:46:37.920]
that next step in the interpretation,
[00:46:39.670]
and then bring it all back in a master environment.
[00:46:44.460]
And of course, the last piece that Central allows you to do
[00:46:47.610]
is truly, to cross collaborate
[00:46:50.120]
by being able to leverage of somebody else’s work
[00:46:53.530]
and introduce that through a live link
[00:46:56.110]
into your own project.
[00:46:57.800]
We’ve given the example of the dynamic linking earlier
[00:47:00.880]
through the resource project,
[00:47:02.810]
where you have a lithological domain
[00:47:04.920]
that’s created by a colleague
[00:47:06.550]
that then can be actively hyperlinked
[00:47:08.620]
into your very own resource model in Edge
[00:47:11.782]
and the Leapfrog Geo.
[00:47:13.506]
And there are lots of different ways
[00:47:14.760]
and how you can link information that’s being created
[00:47:17.920]
either within the Leapfrog Geo environment
[00:47:20.200]
or even in software packages outside,
[00:47:23.100]
so through the data room, it can be pulled straight back
[00:47:25.890]
into your active modeling progress.
[00:47:28.840]
And that’s extremely powerful.
[00:47:30.240]
Being able to work, intercut workflows,
[00:47:32.690]
where you do not have to reinvent the wheel
[00:47:35.350]
and just pull the information directly when you need it.
[00:47:39.740]
At Seequent, we always think about what’s the next step?
[00:47:43.600]
What can we do to make our products better,
[00:47:46.480]
to support our customers, to make your life easier,
[00:47:49.740]
to make your workflow simpler
[00:47:51.680]
and to make your work more productive and efficient.
[00:47:54.610]
When it comes to Central,
[00:47:56.110]
the big key is always communication and collaboration.
[00:47:59.540]
And along those lines, we thought,
[00:48:00.960]
okay, we need to bring in a notification system
[00:48:03.850]
that allows you to be even more in the know
[00:48:07.010]
when change occurs
[00:48:08.240]
so that you can be at the rapped
[00:48:10.170]
of any current decision that needs to be made
[00:48:12.840]
within your company.
[00:48:14.190]
And so I’d like to give you a quick sneak peek
[00:48:16.920]
of what’s coming up in April/May.
[00:48:20.320]
And here we are,
[00:48:21.153]
we are back in the Central portal environment.
[00:48:24.240]
And what you will notice here that’s different,
[00:48:26.600]
is this little bell symbol.
[00:48:29.020]
And so whenever you have a notification
[00:48:32.610]
or commentary that you have subscribed to,
[00:48:35.350]
you will have a little bell symbol pop up here in blue.
[00:48:41.090]
With clicking on that,
[00:48:41.923]
you will also notice that I have now
[00:48:44.070]
an option to set preferences, and that’s really important.
[00:48:47.860]
We wanted to make sure that you create something
[00:48:50.160]
that doesn’t end up with you receiving
[00:48:52.433]
more and more emails on top of everything else
[00:48:54.960]
that you’re already receiving right now,
[00:48:57.000]
particularly considering that lots of different people
[00:49:00.100]
are not in your immediate environment
[00:49:01.790]
and probably will try to reach out to you via email.
[00:49:05.550]
So what you can do here is to subscribe
[00:49:08.420]
to your individual projects
[00:49:10.420]
that you have a personal stake in,
[00:49:12.680]
and then you can go ahead and decide
[00:49:14.540]
how or what type of information you’d like to receive
[00:49:18.100]
either project specific notification,
[00:49:20.470]
revisions and branches, collaborative information,
[00:49:23.480]
such as annotations and mentions
[00:49:25.550]
in the browser, for example,
[00:49:28.030]
and how the user access changes overtime.
[00:49:32.120]
Then you can decide if each of these notifications
[00:49:34.620]
should be sent to you either via an in Central app
[00:49:38.250]
or a Leapfrog Geo app.
[00:49:40.320]
And that’s here, the little clock symbol or bell symbol,
[00:49:43.360]
or via an email.
[00:49:45.090]
So it’s entirely customizable,
[00:49:47.240]
how you’d like to subscribe to these modifications,
[00:49:49.820]
how you’d like to be part of the conversation.
[00:49:52.810]
And that concludes the presentation.
[00:49:54.730]
So if you’re curious about Central
[00:49:56.600]
and interested in a free trial,
[00:49:58.960]
please reach out to your personal account manager.
[00:50:01.730]
Or if you don’t have one yet,
[00:50:03.390]
your local representatives in your regional offices.
[00:50:07.610]
For any other queries or questions,
[00:50:09.380]
please don’t hesitate to contact us and visit our website,
[00:50:12.570]
seequent.com.
[00:50:15.800]
So thank you very much for joining us today
[00:50:18.010]
and we hope to see you next time again at Seequent.
The video transcript gets copy and pasted here