


Planning
large campaigns of surface drillholes for resource definition or grade control infill
can be a time-consuming task. Collars need to be designed and snapped to
topography; variations in target depth are also a consideration to ensure drill
meters are utilised wisely.
Creative ways to use existing tools within Leapfrog can help streamline workflows and make drill planning easier. The following blog details the steps required to calculate the elevation for all planned collars simultaneously and outlines two potential workflows for determining the target depth by using existing meshes or geological models.
For more information on how to plan individual drillholes, a fence of drillholes, or a fan of drillholes in Leapfrog take a look at one of our previous blogs or our online help:
Preparation
For this workflow on how to plan a campaign of
drillholes, the following information will be required:
- Topography Surface
- Target Surface (this can be created in Leapfrog or imported into the Meshes Folder)
- Collar locations (import, or these can be created in Leapfrog using a Grid of Points)
Determine the Elevation of planned Collars
This
workflow will begin by using the Points folder in Leapfrog. The Points folder
provides an array of functionality that users can take advantage of and which
will help to save time when planning large campaigns of drillholes. In Leapfrog,
points are a set of X,Y,Z coordinates, with or without associated values.
Drillhole collar points can be planned in Leapfrog using the Grid of Points functionality, or alternatively, can be imported from another software package. Many companies use a GIS software package to plan collars as all relevant and up to date information regarding tenements, approved plan of work areas, as well as environmental and heritage sensitivity information is available in this space.
If the collars are already planned within a GIS package, then a unique SiteID as well as x and y coordinates for each of the planned collar locations can be exported from the GIS package and imported in Leapfrog. When importing this information as points into Leapfrog, a dummy z value will be required. This can be assigned in excel by adding an additional column for the z and setting all elevation values to a default RL e.g. 600. During the import process, the unique Site ID or planned drillhole ID can be included by importing this information as a Category.
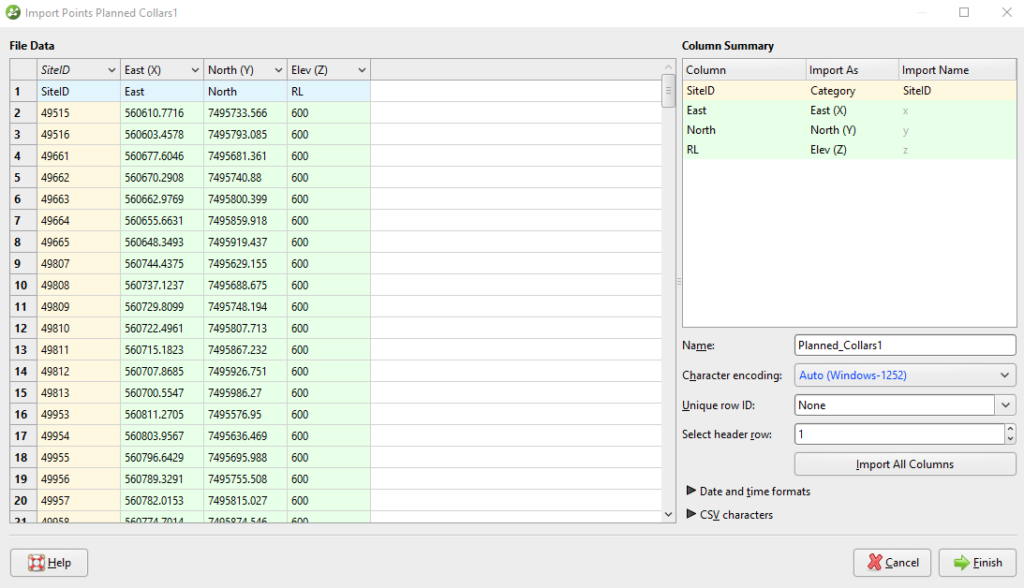
If using Leapfrog’s Grid of Points functionality, export this information as a .csv file and reimport as points to continue the following workflow (exporting and importing again will open up different functionality).
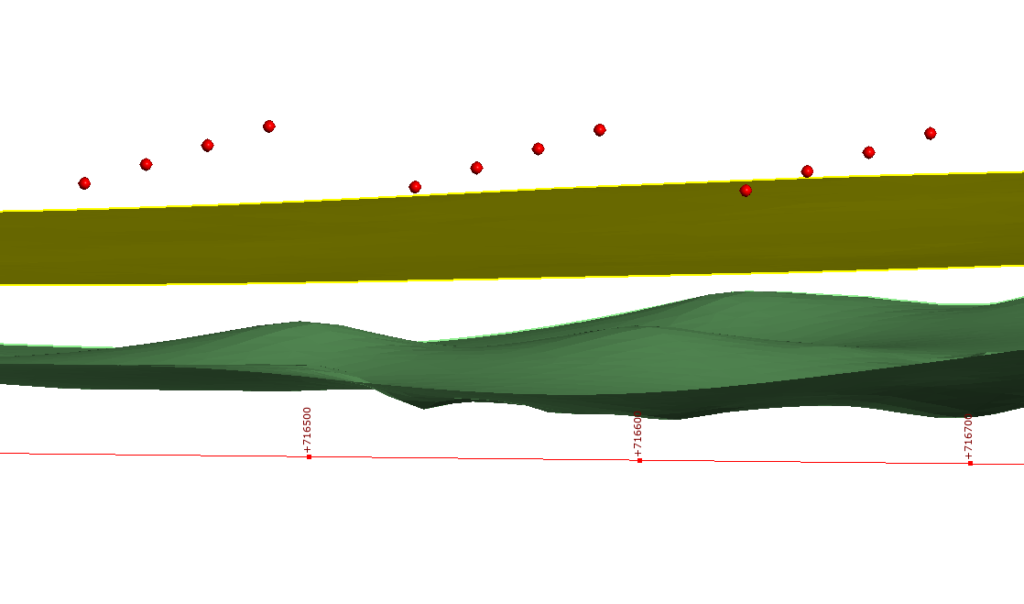
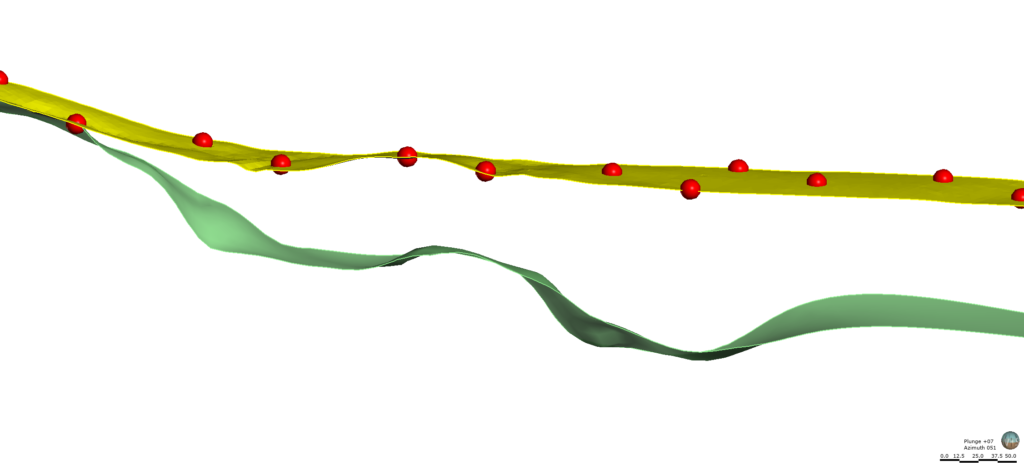
Before commencing the next steps ensure that the topographic and target surfaces are in the Leapfrog project. Load these into the Scene View.
In Leapfrog, it is possible to set an
elevation for all points simultaneously. This can be completed using the Set
Elevation functionality.
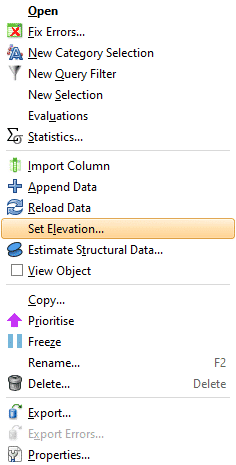
Right-click on the collar points in the project tree > Set Elevation
In the drop-down menu Select Surface choose the topography surface and click OK.
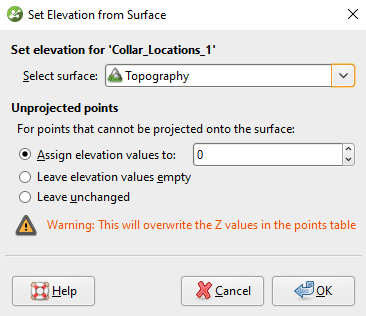
This will overwrite the Z values in the collar points file to the corresponding elevation on the topography.
Once the Z values has been set, export the
points file by right clicking > Export. Save this csv as Planned_Collar_RL.csv
Next, prepare a template for importing into the Planned Drillholes folder.
HINT: the easiest way to prepare this template for import is to plan a drillhole in the Planned Drillholes folder and export the Parameters to use a template with the correct headers.
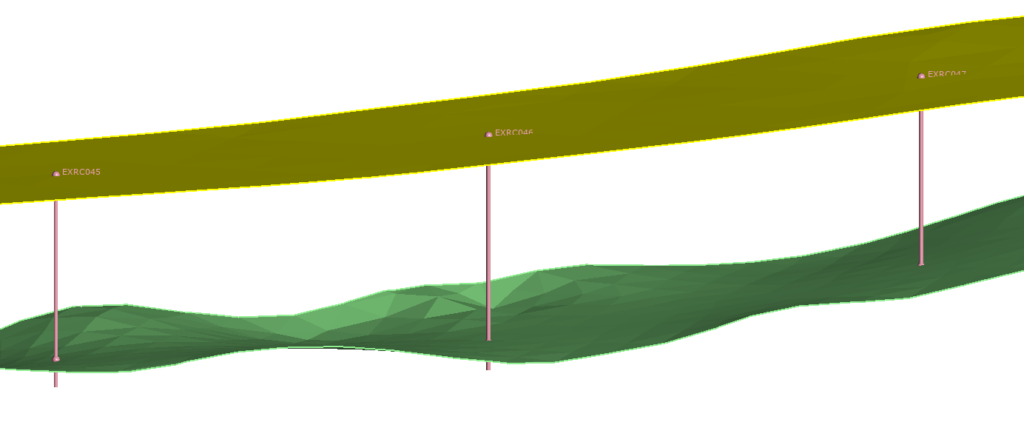
Copy across the X,Y, and Z values from the Planned_Collar_RL.csv into the drill planning template. Name the drillholes with a unique hole ID (if not already named). Add Azimuth and Dip information as well as Lift Rate, Drift Rate, and Distance (over which lift and drift will occur).
Determining the Target Depth of your planned Drillholes using Points
Now that we have the correct collar
information, the target depth of the drillholes needs to be determined. If the
target surface is represented by an open mesh e.g. the base of mineralisation
or geological unit of interest, this can be utilised with the Set Elevation
option again to rapidly determine the target depth of the planned drillholes.
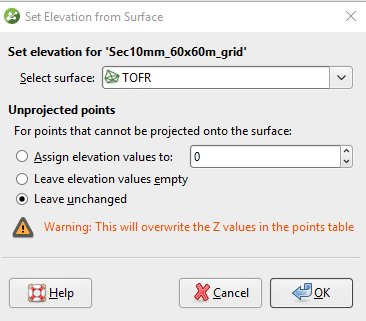
In Leapfrog > right-click on the points file
> Set Elevation. This time choose the target surface. In this example
the target surface is the TOFR (Top of Fresh Rock).
Check the box for Leave unchanged. Collars outside of the Target Mesh will maintain the topography RL.
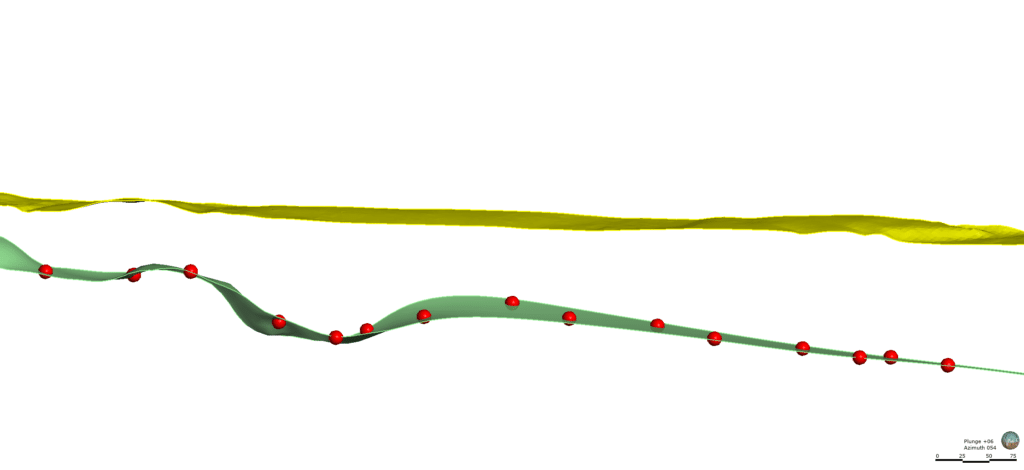
The Z value of the points will update again and now be based on the target surface.
Export the updated points as a separate csv,
by right clicking > Export. Save this csv as Planned_Target_RL.csv
There should now be two csv files. The
SiteID, X and Y values should be the same in each csv export, however the Z
values will be different. Combining these two exports (Planned Collar RL and Planned
Target RL) into a single spreadsheet and subtracting the Target Z from the
Collar Z will calculate the Target Depth.
Copy and paste this information into the Drill
Planning Template and round these depths as required.
The Extension field in the Drill
Planning Template is a handy way set the amount of waste rock you want to
drill to confirm your mineralisation has been closed out. The Extension is
the distance past target depth. This can be used to help minise the amount of
waste drilled. In this case, 6 metres past the TOFR was chosen. Comments can
also be added to the drillholes to help communicate drilling and geological information
to other geologists within the team.
Save this template again. You now have all the data needed and the last step is to import the template into the Planned Drillholes folder. The planned drillholes now have the correct Z value aligned to the topography surface, and have the Target depth determined, as well as extension metres to drill.
Once imported into Leapfrog, the data can be visualised by dragging into the Scene View.
Determining the Target Depth of Planned Drillholes using Geological Models – alternative workflow
If the target surface has been built into a
Geological Model and output volumes are available, the Geological Model can
be used to help quickly determine the target depth of planned drillholes. The
workflow works best if the mineralisation / target is a closed volume.
In the Drill Planning Template, set a
default depth for all your planned drilling. Ensure the default depth is deeper
than the expected mineralisation. Import the Planned Drillholes into Leapfrog.
Right Click Planned Drillholes > Import
Planned Drillholes
Evaluate the Geological Model onto the planned drillholes. Evaluating the geological model onto the planned drillholes allows you to predict (with some degree of uncertainty based on the current model) what the expected geology may be during drilling.
Right click on the Planned Drillholes
Group > Evaluations
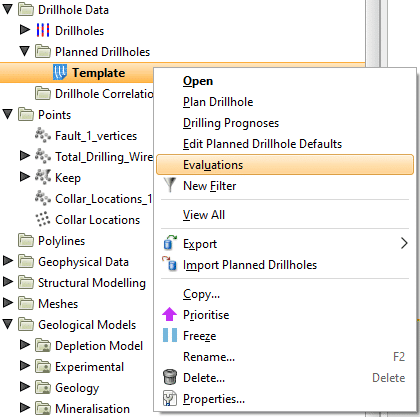
The evaluated geological model is availble to be displayed in the 3D scene or seen in tabulated format using the Drilling Prognosis tool. The Drilling Prognosis will provide the from and to depths for all volumes intersected by the planned holes. To access this, right click the Planned Drillholes Group > Drilling Prognoses.
Next, export both the Export Parameters for the planned holes and the Export as Interval Tables data.
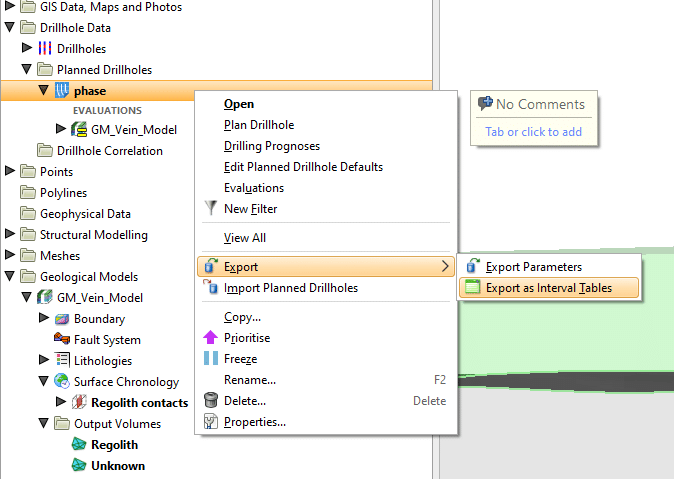
Open
both as .csv files and filter the interval tables from the GM for only the target
volume depths. This information can be copied and pasted (or use a vlookup) into
the Target Depth in the parameters table. Set an Extension Depth
based on company procedures.
Save
and re-import to the Planned Drillholes folder. To update the existing
information within Leapfrog, right click on the existing group of planned
drillholes and select Import Planned Drillholes.
The
Planned Drillholes will now have the adjusted target depth and extension based
on the Geological Model volumes.
It
is recommended to visually validate the planned drillholes to ensure all the
information is correct. If planning drilling to test open mineralisation or extend
an orebody, it is best to assess this information on a hole by hole basis.
Leapfrog provides handy tools to speed up drill planning activities and ensures optimal target depth is achieved. The above workflow as well as powerful visualisation technology makes Leapfrog the perfect tool for planning your next drilling campaign.
Determining accessible collar locations based on slope
Drilling
in steep terrain can pose a high safety risk to companies. Drilling and
Exploration companies may have procedures which outline the recommended and
maximum slope gradient a drill rig can safely access. Leapfrog can help ensure collars
are planned in safe and accessible locations.
To
determine which collar locations are drillable follow these tips:
Load the topography and planned collars into the Scene View. In the Shape List dropdown change the Topography display to Face dip. Set up a colour map with relevant divisions for your drill rigs and/or company procedures.
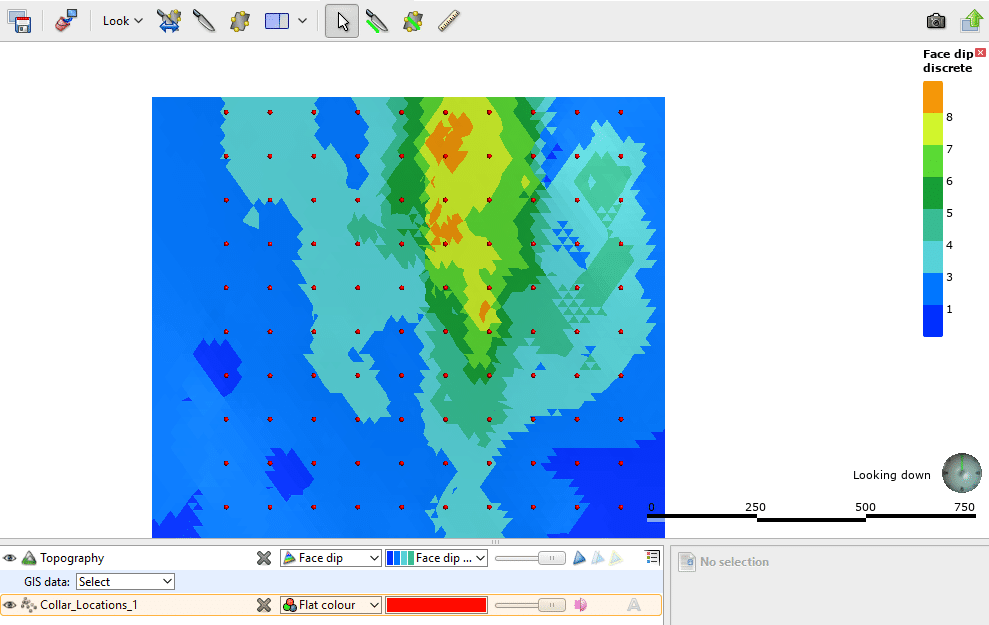
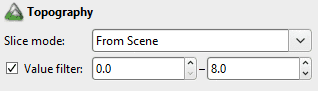
Apply a value filter to the topography in the Properties Panel. This will hide the triangles within the mesh with a dip that is deemed unsafe for pad and track construction.
A geological map or geophysical image can now be draped over the topography, with accessible areas displayed.

To Summarise:
- Planned Collars can be imported into
the Points folder in Leapfrog. - The Set Elevation option for points
can be used to determine the RL of Collars as well as the Target RL of multiple
points at once if an open surface is available. This information can then be
used to calculate Target Depth. - Evaluating Geological Models onto
Planned Drillholes can also be used to help assess the target depth. - The Face Dip display option for
Topographic surfaces can be used to assist planning pads in safe and accessible
locations.
This blog provides an overview of different methods for improving drill planning workflows for large campaigns. Leapfrog’s powerful visualisation tools and intuitive workflows can help save you time and reduce risk during the planning phase of your exploration program.