


This webinar presents the best practice workflow for using Leapfrog Works and Seequent Central in a BIM transportation project.
This workflow will cover creating a geological model in Leapfrog Works, importing and handling the interaction of BIM designs and the subsurface 3D model, and finally creating an IFC geological model, all while highlighting the benefits of using Seequent Central.
Overview
Speakers
Fiamma Giovacchini
Customer Solutions Specialist – Seequent
Duration
38 min

See more on demand videos
VideosFind out more about Leapfrog Works
Learn moreVideo Transcript
[00:00:02.930]
<v ->Hello, everyone.</v>
[00:00:04.450]
Welcome to the webinar,
[00:00:06.017]
“Using Leapfrog Works and Central
[00:00:08.610]
in a BIM Transportation Project.”
[00:00:10.980]
My name is Xiao Ma
[00:00:12.000]
and I work as a Regional Specialist for Leapfrog Works,
[00:00:16.340]
I’m a geologist by background.
[00:00:18.980]
Today, we’re going to look at creating a geological model
[00:00:22.250]
in Leapfrog Works.
[00:00:24.000]
I’m going to show you how to import designs
[00:00:26.300]
and handle the interaction of those beam designs
[00:00:30.320]
with the subsurface 3D model.
[00:00:33.130]
And finally,
[00:00:33.963]
we’re going to look at creating an IFC geological model,
[00:00:38.300]
all while highlighting the benefit
[00:00:40.510]
of using our cloud solution, Sequent Central.
[00:00:45.410]
We believe these webinars can support you
[00:00:48.860]
on understanding how we can help your day to day activity
[00:00:54.830]
of creating and refining your geological,
[00:00:57.490]
radio technical interpretation.
[00:01:00.190]
And we can also improve your understanding of the subsurface
[00:01:05.900]
and its interaction with the designs.
[00:01:09.366]
So you can provide the best design parameters
[00:01:12.650]
and ultimately decrease risk and improve efficiency.
[00:01:17.570]
So let’s move on to showing you our cloud solution, Central.
[00:01:25.520]
We’re going to start in our cloud environment called Central.
[00:01:31.240]
This is the web interface of Central.
[00:01:34.670]
We are now looking at the projects tab
[00:01:36.950]
where I have already searched.
[00:01:40.000]
As you can see here on the right hand side
[00:01:41.890]
in the search tab,
[00:01:44.190]
our project that is called “Road Cut and Tunnel.”
[00:01:48.700]
So let’s proceed to open it
[00:01:50.320]
to see the different tabs available for this project.
[00:01:54.160]
We’re now in the overview tab,
[00:01:56.240]
where we can see the history section for the project,
[00:02:00.310]
where we can look at the different versions
[00:02:03.150]
for this project.
[00:02:05.130]
Here we have just one.
[00:02:07.180]
We can visualize which branch this version belongs to
[00:02:10.970]
in the project tree or in the graph on the left hand side
[00:02:15.180]
and visualize any note that has been made for this version
[00:02:19.560]
when it was uploaded.
[00:02:21.140]
The stage this version is at,
[00:02:24.180]
we are at the progress of 50%
[00:02:27.520]
and the user that uploaded this version.
[00:02:30.120]
So this is where we can do virtual control
[00:02:33.650]
and we can have our single source of tools
[00:02:37.560]
when working on a specific project.
[00:02:40.510]
Moving onto the user stop,
[00:02:42.750]
this is where we can assign users to this project
[00:02:46.960]
with three different levels of permission
[00:02:49.930]
that I have displayed in his example.
[00:02:52.690]
We have the owner and editor,
[00:02:56.860]
and also the viewer with the lowest levels of permission.
[00:03:01.630]
This role especially is ideal for members of the company
[00:03:06.631]
that don’t need to work directly on the project,
[00:03:09.520]
but just need to view and comment on the project
[00:03:13.100]
and also for stakeholders.
[00:03:15.500]
So for example, from a joint venture or for customers.
[00:03:20.380]
Let’s move on to the data room now, the first tab.
[00:03:24.290]
In this section,
[00:03:25.290]
we can store all the relevant data for the project
[00:03:29.110]
that is now available in a common location,
[00:03:32.210]
available for all users that need to work on the project.
[00:03:36.690]
And we can also pull files from here
[00:03:39.580]
directly from Leapfrog Works.
[00:03:44.880]
Another interesting feature of the data home
[00:03:48.980]
is that we can check
[00:03:50.370]
if there are multiple versions of the same file
[00:03:53.900]
uploaded at different times.
[00:03:55.830]
So as you can see for our example,
[00:03:58.510]
for the R 2D data within the boreholes,
[00:04:01.480]
if I click on it, you see here in the file history section,
[00:04:07.370]
we can see the different versions that have been uploaded
[00:04:12.080]
and we can also download or delete them.
[00:04:19.900]
So if we go back into our overview tab,
[00:04:22.630]
I now want to show you how comments work.
[00:04:26.960]
As you can see,
[00:04:27.793]
I’ve just left a comment to my colleague, Nickil,
[00:04:32.070]
to show him the latest update of the geological model.
[00:04:37.520]
So I’m going to now click on the comment
[00:04:39.300]
and I’m going to be automatically redirected
[00:04:41.960]
to our web visualization platform called Webviz
[00:04:47.890]
where I have prepared a scene
[00:04:51.510]
showing the geological model for him to see.
[00:04:56.870]
This is the 3D space where we can visualize our models.
[00:05:03.200]
We can slice them.
[00:05:12.340]
And we can also leave comments for our colleagues.
[00:05:29.740]
And tag them.
[00:05:31.210]
And we can also geo locate our comments.
[00:05:47.640]
The last thing I want to show you about Central
[00:05:51.120]
is the notification section
[00:05:53.340]
that you can access from the bell button up here,
[00:05:58.080]
where you’re going to be notified of any sort of activity
[00:06:02.600]
that happens in Central,
[00:06:04.810]
so you can be notified of comments,
[00:06:07.300]
users that are added,
[00:06:08.810]
new versions that are added for a project as well.
[00:06:15.350]
You also have preferences where you can set up
[00:06:20.950]
what sort of notifications you want to receive.
[00:06:23.950]
So if you want to receive them in the web app or via email,
[00:06:29.170]
you have all of your options.
[00:06:32.150]
And also you can select which projects
[00:06:35.150]
you want to receive notifications for and mute some of them.
[00:06:42.950]
So let’s move now to the modeling suite
[00:06:46.356]
so we can proceed with our demonstration.
[00:06:53.380]
So when we open the modeling suite,
[00:06:57.260]
we are in the projects tab
[00:06:59.040]
where we can see the recent projects,
[00:07:02.030]
and also all the projects that we have worked on.
[00:07:06.640]
Here on the right hand side, in this section,
[00:07:09.890]
we are already connected to Central.
[00:07:15.230]
And if I click on the three dots,
[00:07:18.590]
we get a number of options,
[00:07:20.970]
and we’ll be able to view the projects
[00:07:23.350]
that I have stored in Central,
[00:07:25.290]
go to the bar tab that I’ve just showed you,
[00:07:28.310]
modeled, so disconnect from Central.
[00:07:33.890]
So now I’m going to open the project here.
[00:07:39.160]
So we are now in the project tab.
[00:07:41.630]
You can see the project history,
[00:07:43.530]
which is an exact replica of what we saw before
[00:07:47.290]
in the web app of Central.
[00:07:50.070]
And I’m going to proceeded to opening the project
[00:07:55.090]
in a scene view.
[00:07:57.690]
So if you’re not familiar with the Leapfrog interface,
[00:08:01.410]
I’m going to give you a whistle stop tour.
[00:08:07.930]
I’m going to bring in an object.
[00:08:10.330]
So the big white rectangle
[00:08:13.030]
that you can see in the middle of the screen,
[00:08:16.170]
where I’m holding on to,
[00:08:18.480]
is where you can see your objects,
[00:08:20.670]
and you can rotate them around in the 3D space.
[00:08:24.620]
At the bottom of the screen, we have the shape list.
[00:08:28.590]
The shape list is where we have the list of all the objects
[00:08:31.930]
available in scene view,
[00:08:34.460]
where we can also switch them on and off.
[00:08:40.550]
And we can also regulate visualization settings.
[00:08:43.730]
So for example, transparency,
[00:08:46.330]
as you can see now.
[00:08:49.000]
And much more.
[00:08:51.630]
The project tree
[00:08:52.610]
is the heart of the Leapfrog modeling engine.
[00:08:56.200]
It’s been designed with a workflow oriented mindset
[00:09:02.100]
and a top down approach,
[00:09:04.070]
which means that you ideally approach it at the top
[00:09:08.410]
and work your way down as you work at your project.
[00:09:16.030]
In the project tree,
[00:09:17.300]
you can upload your input data
[00:09:21.670]
in the topography folder, down to the meshes folder.
[00:09:26.610]
You can create models, geological models, numeric models,
[00:09:31.050]
and combined models.
[00:09:33.460]
With the hydrogeology extension,
[00:09:35.410]
you can create mud flow and feed flow grids,
[00:09:39.360]
and you could, with the contaminants extension,
[00:09:42.500]
you can
[00:09:44.420]
create
[00:09:47.050]
block models.
[00:09:48.250]
But also you can use three different algorithms
[00:09:53.080]
for estimation.
[00:09:55.240]
So you can use your Nearest Neighbor,
[00:09:58.740]
Dual Kriging and Inverse Distance algorithms.
[00:10:05.280]
So I’m going to now guide you through
[00:10:07.400]
how to build to a geological model together.
[00:10:12.280]
First of all, I’m going to show you the input data
[00:10:14.920]
for this geological model
[00:10:16.330]
that I have already uploaded into the screen.
[00:10:20.860]
I will just keep it to the relevant elements.
[00:10:31.150]
So we’re now looking at the borehole data for this model.
[00:10:39.140]
You can see the legend up here.
[00:10:41.920]
So this is going to be part of the input data
[00:10:44.960]
for our geological model.
[00:10:46.520]
I’m going to clear the scene and show you the final model
[00:10:51.210]
that we wanted to create,
[00:10:53.230]
where I’m not going to be able
[00:10:54.730]
to drive you through the whole process,
[00:10:56.920]
but we’re just going to go through the initial stages together.
[00:11:01.730]
So this is the final model
[00:11:04.340]
that has been created within this project.
[00:11:08.040]
As you can see, we have the volume of the model,
[00:11:13.310]
and we also have three-fourths.
[00:11:17.450]
Today, we’re going to focus on start modeling
[00:11:21.960]
a few of the contact surfaces
[00:11:25.650]
that we have created within this model.
[00:11:28.610]
So now I’m going to clear my scene again,
[00:11:31.820]
right-click on geological models
[00:11:33.880]
and create a new geological model.
[00:11:38.460]
So a geological model is an object
[00:11:41.420]
that I’m going to describe you in a second.
[00:11:43.670]
One of the first things we need to decide
[00:11:45.890]
is the base lithology column.
[00:11:47.950]
So which lithology column that we’re going to utilize
[00:11:51.840]
from our borehole data.
[00:11:52.977]
And in this case, we’re going to use the one code GM.
[00:11:57.990]
We’re going to select to have
[00:11:58.910]
a surface resolution of 50 meters.
[00:12:05.170]
And we are going to use the extent,
[00:12:08.900]
so the cube that encloses the volume,
[00:12:12.200]
where we’re going to model
[00:12:13.810]
from the original or final geological model
[00:12:19.003]
that we have just looked at together.
[00:12:36.500]
And call it
[00:12:40.420]
Geological
[00:12:43.070]
Model.
[00:12:47.330]
So we have several elements within our geological model.
[00:12:56.090]
So it’s formed by, in it’s case, by a bonding box.
[00:13:00.880]
And also cupped upwards by our topography.
[00:13:06.740]
In the GN, we also have a fault system
[00:13:10.720]
where we can model faults and apply them to the volume
[00:13:14.580]
in order to create different fault blocks
[00:13:17.280]
and generate a displacement along our contact surfaces.
[00:13:22.880]
We have our lithologies.
[00:13:27.760]
So if I double click,
[00:13:29.480]
you can see a list of all the lithologies
[00:13:32.250]
available in the boreholes.
[00:13:37.550]
We then have our surface chronology,
[00:13:40.440]
which is where we’re going to start and build
[00:13:44.310]
our contact surfaces
[00:13:46.320]
in order to reach the end goal
[00:13:48.730]
of building a geological model,
[00:13:50.330]
which is generating lithological volumes.
[00:13:54.210]
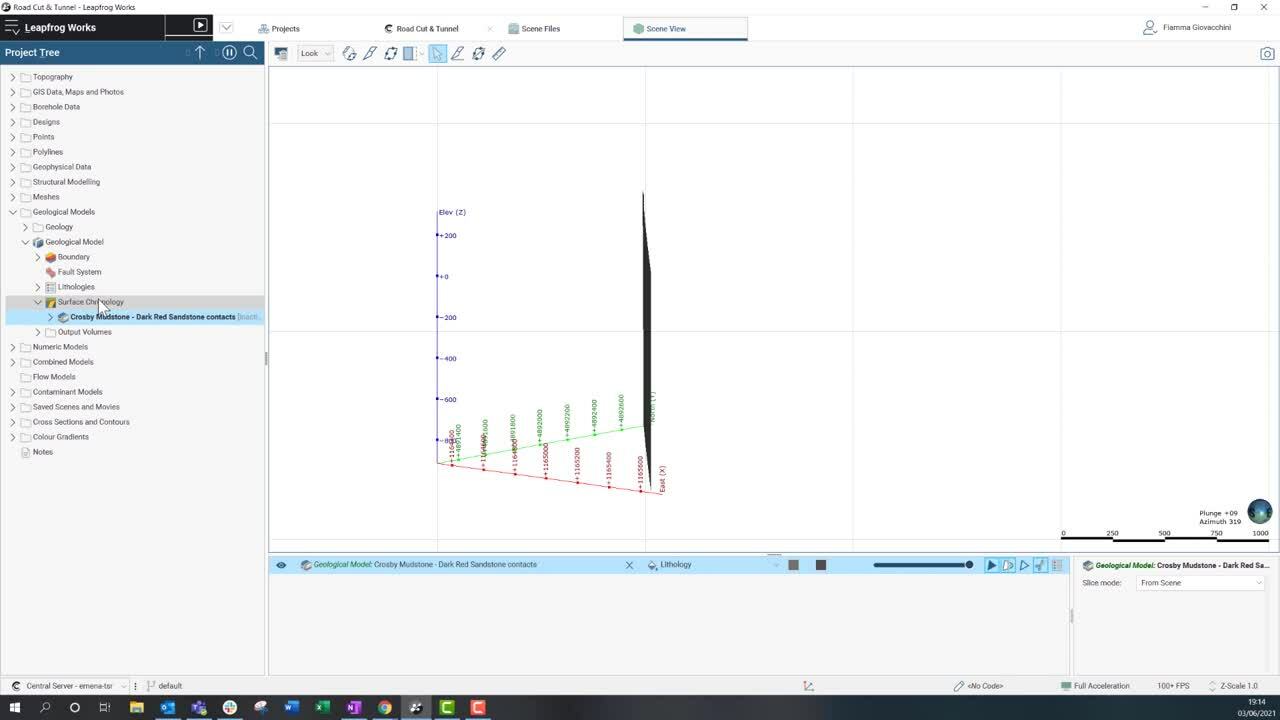
So I’m going to start at the bottom of the chronology.
[00:13:59.340]
So I’m going to start to building the contact
[00:14:02.120]
between the dark red sandstone
[00:14:05.010]
and the (indistinct) mudstone.
[00:14:07.670]
I’m going to right click onto surface chronology,
[00:14:11.990]
select the deposit tool,
[00:14:16.760]
and I’m going to build these using GIS vector data.
[00:14:29.530]
And I’m going to select the contact on topography
[00:14:35.100]
represented by a GIS line.
[00:14:38.460]
Click okay.
[00:14:39.930]
I’m going to select the dark red sandstone
[00:14:43.480]
as the younger lithology
[00:14:45.220]
and the (indistinct) mudstone as the older lithology.
[00:14:49.790]
And click okay.
[00:14:51.000]
And this is our first contact surface.
[00:14:58.200]
Then I’m going to move on
[00:14:59.860]
to the rice seal stone baseless contact.
[00:15:05.160]
So I’m going to right click build it again as a deposit
[00:15:11.890]
from contact on topography.
[00:15:21.560]
I’m going to select the appropriate GIS file
[00:15:28.330]
and rice seal stone is going to be the younger lithology,
[00:15:33.640]
dark red sandstone is going to be the older lithology.
[00:15:38.063]
And I’m going to click okay.
[00:15:40.550]
In this case, I know that I have other data available,
[00:15:44.530]
so, I’m going to, first of all,
[00:15:46.710]
drag and drop it into the screen
[00:15:48.230]
and we’re going to see how the surface changes
[00:15:50.630]
as we add other data.
[00:15:53.470]
So we’re going to, first of all,
[00:15:55.220]
select to add the contacts that we see in the boreholes
[00:16:01.260]
from borehole data.
[00:16:04.330]
So we’ll have to select my rice seal stone
[00:16:07.290]
and use the contacts below with the dark red sandstone.
[00:16:13.340]
Click
[00:16:15.240]
okay.
[00:16:20.430]
And you see, the first example of dynamic updating.
[00:16:23.810]
So how the surface changes
[00:16:26.140]
as soon as we add other data to it.
[00:16:30.360]
I also know that I have some additional data available
[00:16:33.720]
in the form of structural data
[00:16:37.970]
that I am going to select
[00:16:41.140]
and I am going to click okay
[00:16:42.870]
and it’s going to automatically be added to my surface.
[00:16:46.480]
And you see now how this surface is now shaped.
[00:16:50.550]
You see that this is now a fold.
[00:16:54.350]
And if I go to my project tree
[00:16:56.220]
and I click on the dropdown arrow besides this surface,
[00:17:00.330]
you’re going to see that now,
[00:17:02.310]
it’s listing the three different kinds of data
[00:17:05.060]
I have added to it.
[00:17:08.507]
I will go off now
[00:17:10.630]
and finish modeling my whole surface chronology,
[00:17:16.220]
and we’re going to come back to activate our contact surfaces
[00:17:21.750]
in order to create the volumes.
[00:17:27.410]
So we are back.
[00:17:30.250]
As you can see, I have completed my surface chronology,
[00:17:35.048]
and I’m going to show you how to activate our surfaces.
[00:17:43.020]
So double clicking on surface chronology,
[00:17:45.410]
I’m going to activate all of my contact surfaces
[00:17:48.720]
and click okay.
[00:17:54.340]
And now Leapfrog, it’s processing within the processing tab
[00:17:58.910]
in order to create our final lithological volumes.
[00:18:08.890]
Now, the final lithological volumes have been created,
[00:18:11.660]
so I’m going to clear the scene and drag and drop them
[00:18:15.970]
into the screen.
[00:18:19.090]
So this is the final product
[00:18:23.290]
where the faults haven’t been activated yet.
[00:18:26.640]
The next step would be activating the faults,
[00:18:29.890]
which are not,
[00:18:30.760]
we’re not going to do it today
[00:18:32.930]
in order to obtain our final product,
[00:18:41.570]
which is this model here that we have looked at before.
[00:18:50.060]
So moving on to the next topic,
[00:18:57.330]
I want to drive you through a two step process.
[00:19:00.640]
So I want,
[00:19:01.560]
I will show you how to upload a second set of boreholes,
[00:19:06.800]
which is a feature that we have recently introduced
[00:19:09.990]
with the major release 2021.1.
[00:19:14.110]
And we’re going to create together a numeric model
[00:19:17.510]
out of those, the new data.
[00:19:22.000]
So as you can see,
[00:19:23.600]
we already have a set of boreholes
[00:19:25.820]
and we’re going to upload a new one.
[00:19:28.300]
So I’m going to right click,
[00:19:30.650]
select import boreholes from Central.
[00:19:33.180]
So this is where we’re going to look directly
[00:19:35.370]
into the data room for this project.
[00:19:38.330]
I’m going to select the project
[00:19:41.620]
and we will
[00:19:47.100]
select the colors.
[00:19:52.860]
So we’re going to import the color file.
[00:19:57.550]
We’re not going to import the geology
[00:20:00.660]
as we already have imported that,
[00:20:06.020]
but we are going to look directly
[00:20:09.470]
at the R 2D and fracture frequency.
[00:20:14.710]
So if you remember before,
[00:20:16.520]
we saw there were two versions of this file.
[00:20:21.270]
So I’m going to import this
[00:20:28.480]
in the import wizard is extremely simple
[00:20:32.170]
and here, everything has already been selected
[00:20:35.390]
for the color file.
[00:20:37.050]
So, EC knotting, elevation of each point,
[00:20:40.560]
and the max depth of the borehole.
[00:20:44.310]
And in the next step,
[00:20:48.460]
we can also see
[00:20:49.370]
that everything is correctly set up for the survey file.
[00:20:54.964]
And instead, for the R 2D table,
[00:20:58.550]
we will need to select the R 2D column
[00:21:01.280]
to be imported as a numeric file.
[00:21:06.060]
So data type and same for the fracture frequency column.
[00:21:12.530]
So I’m going to finish.
[00:21:16.290]
Once we’re finished,
[00:21:17.240]
we can import the object into the screen.
[00:21:20.910]
So if we zoom in,
[00:21:22.180]
we can see that we have
[00:21:23.530]
our visualization of the borehole data as a cylinder,
[00:21:27.810]
and I’m going to switch that off just to look, uh,
[00:21:31.190]
a little bit better at the graphs
[00:21:32.970]
that have been automatically created by Leapfrog.
[00:21:36.010]
And as you can see,
[00:21:37.430]
we have a very good R 2D in most of the area
[00:21:40.910]
and just a few boreholes with a little bit less good R 2D.
[00:21:46.180]
So let’s move on to the second step,
[00:21:48.140]
which is creating a continuous model
[00:21:51.460]
using the RBF interport.
[00:21:56.530]
So here we’re going to select our R 2D
[00:22:00.140]
to be a R 2D from the second set of boreholes
[00:22:05.630]
to be our base data.
[00:22:11.430]
We’re going to select to, um,
[00:22:16.870]
enclose this data, initially,
[00:22:20.530]
as to basically select a boundary.
[00:22:25.600]
I’m just going to make sure
[00:22:29.510]
we get
[00:22:31.710]
an approximate
[00:22:34.780]
elevation.
[00:22:35.630]
So it’s just a bit below the boreholes.
[00:22:40.950]
We’re going to select surface resolution of 50,
[00:22:46.740]
and we’re good to go.
[00:22:47.670]
So we’re going to create our first iteration
[00:22:50.510]
of the numeric model,
[00:22:53.180]
which I’m going to drag and drop into the scene now.
[00:22:58.580]
This first iteration is not,
[00:23:01.750]
has not the desired intervals,
[00:23:03.820]
so I’m going to open by double clicking
[00:23:07.630]
and go to our outputs tab and select to add the 40 interval.
[00:23:13.970]
And we want to have a surface,
[00:23:16.700]
a nicer surface at the value of 20.
[00:23:21.281]
The other would be 40, 60,
[00:23:26.058]
and 80.
[00:23:31.170]
I have also quickly set up the colors
[00:23:34.690]
for the different volumes to match the same color scale
[00:23:39.050]
that we have used in the boreholes.
[00:23:42.756]
So I’m going to click okay.
[00:23:45.556]
And we’re going to look at the result together.
[00:23:50.930]
So this is the result with the correct color scaling
[00:23:55.160]
and colors applied to it.
[00:23:58.770]
I’m going to slice it for you
[00:24:06.900]
and to show it inception.
[00:24:12.700]
I also want to go through a final step.
[00:24:15.890]
So we open again our continuous model
[00:24:20.130]
and in out trend tab,
[00:24:23.800]
I want to select the one of the faults
[00:24:25.690]
that we know are in this model
[00:24:29.890]
to set up a trend.
[00:24:32.550]
I’m not going to get into too much detail today about this,
[00:24:35.980]
but a trend is basically a preferential direction
[00:24:39.540]
of where and it all should be also be within the model.
[00:24:42.770]
So as you can see now,
[00:24:43.720]
the trend has been set up to the orientation of the fault,
[00:24:49.170]
and we also have some anisotropy applied to this model.
[00:24:54.370]
So I’m going to click okay,
[00:24:55.527]
and we’re going to see how the model dynamically updates
[00:24:58.960]
in order to adapt to these new information
[00:25:01.760]
that we have set up for it.
[00:25:08.460]
Okay.
[00:25:10.330]
So, now,
[00:25:11.163]
I’d like to move on to the third step before,
[00:25:15.720]
for this part of the process with the numeric model.
[00:25:18.620]
So I’d like to show you
[00:25:20.300]
how we can pool the latest version for this data
[00:25:24.700]
in order to update our model.
[00:25:29.770]
So I’m going to go to my second set of boreholes, again.
[00:25:35.830]
I’m going to right click on the table that I wish to update,
[00:25:40.920]
select reload from Central and look at Central history.
[00:25:45.040]
So here, I’m looking directly at this file
[00:25:48.050]
and at all the versions available for this file.
[00:25:52.960]
So I can see that there is a latest version of the file
[00:25:55.470]
that also contains borehole data.
[00:26:00.180]
So R 2D data for the phase two boreholes
[00:26:02.800]
telling the previous version weren’t populated.
[00:26:08.250]
So I have, I will select to utilize that version.
[00:26:13.150]
So to get it directly from Central,
[00:26:17.030]
click,
[00:26:19.480]
actually, before doing this,
[00:26:21.120]
I just want to make sure we can visualize those workloads.
[00:26:26.490]
So we’ll see where they are added.
[00:26:30.940]
So going back to that, reload from Central,
[00:26:35.100]
reload from history,
[00:26:37.250]
I’m going to select that and click okay.
[00:26:40.390]
So now you should see our new boreholes.
[00:26:43.450]
Actually,
[00:26:44.283]
before we’re going to go through our importing process
[00:26:47.070]
that we have seen before,
[00:26:48.270]
where everything has been set up of ready.
[00:26:50.700]
So we’re going to finish
[00:26:51.780]
and so you should not see the new boreholes
[00:26:55.210]
appear in this area
[00:26:57.360]
and the model change
[00:27:00.210]
within your information for those boreholes.
[00:27:04.160]
I’m going to just slice it through here
[00:27:06.590]
so you can see how it has changed.
[00:27:11.920]
Now, I’d like to move on to showing
[00:27:14.920]
the next workflow for this webinar.
[00:27:18.380]
So I’m going to collapse the project tree
[00:27:21.850]
and clear the scene.
[00:27:25.470]
So this workflow is aimed at the extruding the lithology
[00:27:31.880]
so we have created in our geological model
[00:27:34.470]
along the tunnel.
[00:27:35.720]
We’re going to do this in two steps.
[00:27:37.720]
First of all,
[00:27:38.553]
we’re going to create a geological model
[00:27:40.970]
and that generates a volume inside of the tunnel extent.
[00:27:45.170]
And then in the combined models folder,
[00:27:48.080]
we’re going to combine that with a complete geological model
[00:27:52.640]
in order to extrude the our lithologies.
[00:27:56.160]
So let’s start with our workflow.
[00:27:58.880]
First step is creating our tunnel volume model,
[00:28:03.120]
geological model.
[00:28:06.450]
So we’re going to select as base lithologycal unknown,
[00:28:09.730]
you’ll see why in a second.
[00:28:12.920]
Surface resolution 50,
[00:28:15.830]
extent of the model is going to be
[00:28:17.690]
the previous original geological model extent.
[00:28:23.290]
So it’s going to be this one.
[00:28:27.260]
And we’re going to call it Tunnel Volume.
[00:28:37.150]
Once that’s created, we need to create the two lithologies.
[00:28:47.810]
So inside tunnel
[00:28:52.400]
and outside tunnel
[00:28:56.820]
and click okay.
[00:29:00.110]
Now we’re going to create the contact surface
[00:29:02.250]
in order to generate the inside tunnel volume.
[00:29:05.390]
We’re going to select any intrusion,
[00:29:07.270]
which is a pretty flexible tool.
[00:29:11.210]
The input data is going to be
[00:29:13.260]
the surface that represents the tunnel extent.
[00:29:16.060]
So we’re going to navigate back to the designs folder
[00:29:19.410]
and select tunnel extent
[00:29:22.260]
and click okay.
[00:29:24.270]
So the lithology inside,
[00:29:26.770]
generated inside is going to be inside tunnel
[00:29:30.830]
and the one outside, outside tunnel.
[00:29:33.770]
Click okay.
[00:29:35.210]
We’re going to drag and drop it into the screen
[00:29:37.280]
to check it’s correct.
[00:29:39.820]
It is.
[00:29:41.730]
Now we’re going to activate it
[00:29:43.630]
in order to create our volume.
[00:29:52.650]
So the volume has been created, as you can see.
[00:29:57.090]
And I’m also going to show you a cross section of this model.
[00:30:03.120]
There we go.
[00:30:06.040]
So moving on to the second step,
[00:30:08.110]
we’re going to create a combined model.
[00:30:15.490]
We are going to use our tunnel volume
[00:30:18.650]
that we have just created.
[00:30:20.550]
And also
[00:30:23.310]
the old data model that we have created with,
[00:30:28.540]
that I have showed you before,
[00:30:29.940]
so this is the final model,
[00:30:33.910]
final geological model of the area.
[00:30:37.890]
So I’m going to click okay.
[00:30:42.090]
So now I will select the full geological model
[00:30:47.960]
and inside tunnel volume,
[00:30:53.495]
I’m going to bring this up.
[00:30:56.550]
So this is going to be the first level
[00:30:58.230]
of our combined model and then select the outside tunnel.
[00:31:03.028]
And click okay.
[00:31:07.540]
So this has now processed.
[00:31:11.160]
We can see the inside tunnel volumes,
[00:31:13.820]
so we’re going to drag and drop them into the screen.
[00:31:19.560]
So as you can see, we have created an extrusion
[00:31:23.860]
of our lithologies along the tunnel,
[00:31:28.130]
and we have some funky colors
[00:31:30.530]
automatically generated by Leapfrog
[00:31:33.000]
and you have at your legend up here.
[00:31:36.800]
And I also want to show you
[00:31:38.290]
that if you click on any of these elements,
[00:31:42.190]
you can see which lithology is that element composed by.
[00:31:47.050]
In this case, the green segment is dark red sandstone.
[00:31:51.530]
You can see its location in information window,
[00:31:55.260]
but also its volume and area.
[00:32:00.920]
So now I’d like to drive you through the last bit of our,
[00:32:07.760]
of our workflow that I’d like to show you.
[00:32:10.200]
So I’m going to collapse the project tree again.
[00:32:15.320]
The steps I’d like to quickly describe you
[00:32:18.120]
to end this webinar,
[00:32:20.300]
consists in exporting the IFC model.
[00:32:28.670]
So in this case,
[00:32:30.230]
I’d like to export our combined model in the IFC format.
[00:32:37.140]
So first of all,
[00:32:38.260]
I will right click onto the combined model
[00:32:41.460]
and select volume attributes
[00:32:43.680]
in order to generate some attributes for this volume.
[00:32:51.430]
So everything I would need to do
[00:32:53.400]
is click on the asterisk button
[00:32:56.600]
and select a new attribute.
[00:33:03.170]
So we’re going to create the attribute density
[00:33:06.600]
and click okay.
[00:33:08.870]
So now, I can attribute a density
[00:33:13.940]
to each of my volumes.
[00:33:17.370]
So for example, for,
[00:33:19.800]
sorry, for, actually,
[00:33:22.350]
sandstone,
[00:33:24.360]
I will attribute a density of 2.6 grams per cubic meter.
[00:33:32.000]
I will,
[00:33:32.833]
I can do this for all of my volumes
[00:33:35.340]
and attribute more than one column to them
[00:33:39.010]
and then click save.
[00:33:42.330]
And this is now part of the,
[00:33:45.380]
would be now exported within the IFC model.
[00:33:52.110]
So I’m going to now go back to my combined model,
[00:33:55.810]
right click, export.
[00:33:59.770]
And I will have to select
[00:34:02.077]
all the elements that I want to export
[00:34:04.130]
in this case, my whole inside tunnel model.
[00:34:11.980]
So I’m going to just tick all the boxes
[00:34:16.250]
and we select the industry foundation classes here,
[00:34:20.850]
and I can also combine it,
[00:34:22.860]
combine the outputs into a zip archive, should I wish to.
[00:34:28.090]
So I’m going to select export now.
[00:34:35.330]
So this is now completed and I’m back (indistinct).
[00:34:39.090]
So I have also showed you
[00:34:40.520]
how to export to your finished models
[00:34:43.480]
into the IFC format.
[00:34:47.410]
You can do this for your borehole data.
[00:34:51.420]
So I’m going to quickly show you how to do it
[00:34:53.680]
with our first set of boreholes.
[00:34:56.150]
Export.
[00:34:57.180]
And select the export to IFC
[00:35:00.670]
and just follow the same procedure we have followed now.
[00:35:05.850]
We can also do this for geological models, numeric models,
[00:35:09.610]
and as we just saw, combined models.
[00:35:15.410]
So the last thing that I’d like to show you today
[00:35:18.710]
is how to publish back into Central
[00:35:21.400]
the latest version of the project
[00:35:23.150]
that you have just completed.
[00:35:25.920]
So I’m going to go to the bottom left hand side corner,
[00:35:30.620]
click on the three dots,
[00:35:32.390]
making sure I am connected to my Central server
[00:35:35.960]
and click onto publish.
[00:35:40.420]
Here, I’m going to select all the objects
[00:35:43.670]
that I want to make sure
[00:35:47.010]
I can visualize once into Webviz.
[00:35:51.030]
This step is just to,
[00:35:53.380]
in order to have these objects available into Webviz,
[00:35:59.130]
but actually all of these objects
[00:36:01.350]
are going to be available
[00:36:03.140]
when re-downloading this version of the project.
[00:36:08.100]
So I’m going to click onto next.
[00:36:10.610]
I’m going to select the project workflow stage,
[00:36:14.260]
I was it a progress of 50% before,
[00:36:17.050]
now I’m going to select 75%.
[00:36:20.170]
I’m going to, of course, included the project as complete
[00:36:25.570]
and click onto next.
[00:36:28.020]
I’m going to select to stay in the default project branch.
[00:36:31.820]
And I’m going to say,
[00:36:33.637]
“That I have created the numeric model
[00:36:39.660]
and extrusion of lithologies along the tunnel.”
[00:36:48.447]
I’m going to click onto next
[00:36:50.910]
and the project is now going to be uploaded into Central.
[00:37:03.060]
Now that the project is published,
[00:37:05.120]
if we go back to the project tab in Leapfrog,
[00:37:10.350]
we’re going to see the now a second version
[00:37:12.780]
has appeared in our project history.
[00:37:16.370]
Where you want to see my notes
[00:37:19.340]
that I just typed into the publishing workflow.
[00:37:25.340]
So this is everything I wanted to cover with you today.
[00:37:28.830]
Thank you very much for attending this webinar
[00:37:31.690]
and happy modeling.