


A technical review of the vein modelling tool aimed at achieving robust and dynamic workflows in your geological modelling.
This session takes a deeper look at how Leapfrog Geo constructs a vein system in order to build upon and provide a better understanding of the tools available at your disposal.
Duration
51 min

See more on demand videos
VideosFind out more about Seequent's mining solution
Learn moreVideo Transcript
[00:00:03.600]<v ->Thank you for joining us today for this Tech Talk</v>
[00:00:08.660]on vein modeling in Leapfrog Geo.
[00:00:13.510]So as we know,
[00:00:14.520]any modeling workflow will of course start with loading
[00:00:20.320]and validating available data.
[00:00:23.520]So whether that be drillholes, mapping pickups,
[00:00:26.540]either as points, polylines or GIS lines,
[00:00:30.818]and any geo reference, photos, maps,
[00:00:33.150]field sketches, for example.
[00:00:36.160]So in my project today, my base lithology is defined
[00:00:40.650]by drilling information
[00:00:42.810]and I’ve already gone through my original lithology table
[00:00:48.200]to create an interval of selection defining three different
[00:00:52.850]diorite dyke populations.
[00:00:55.110]And that’s the selection that we can see
[00:00:57.620]in scene at the moment,
[00:00:59.629]the legends there for reference.
[00:01:03.310]So coming down now to my geological model folder,
[00:01:08.930]I have a new model object created
[00:01:12.730]but I haven’t yet started
[00:01:14.380]to define any of my geological surfaces.
[00:01:18.470]So under the Surface Chronology,
[00:01:21.340]we have a couple of options available for veins.
[00:01:25.200]We can choose to build individual veins
[00:01:29.480]or where a single lithology represents all the veins
[00:01:33.430]in our geological model,
[00:01:35.450]then it may be more appropriate to create a vein system
[00:01:39.550]to define all of those lithologies as a whole.
[00:01:44.190]The vein system itself will define how the veins interact
[00:01:49.050]or you terminate to one another
[00:01:51.270]according to their different relative ages
[00:01:54.670]and can be added to using the same techniques
[00:01:58.167]to create those individual veins.
[00:02:02.110]So, as I have identified more than one diorite dyke
[00:02:06.570]in my drillholes,
[00:02:07.630]then I’m going to start by creating a new vein system.
[00:02:12.620]And I’m going to use my diorite as my internal vein lithology.
[00:02:17.330]If I sort of had only one contact lithology here,
[00:02:22.060]then I could set an outside lithology,
[00:02:24.770]otherwise leave as unknown for multiple context.
[00:02:32.280]I’m going to come to the vein system,
[00:02:34.290]right clicking to now add my new veins to the system.
[00:02:39.430]Now, in this case, of course I have drillholes,
[00:02:41.700]so I would be using base lithology.
[00:02:45.270]However, if I did have other contact points,
[00:02:47.810]perhaps imported as a separate interval table,
[00:02:51.670]or indeed polylines GIS back to data or points,
[00:02:55.070]then I could also select them here.
[00:02:57.810]But for now I’m going to select my diorite dyke one,
[00:03:01.640]first of all.
[00:03:03.710]And I can decide at this stage
[00:03:06.130]whether or not to use the points at the end of holes.
[00:03:10.180]This simply means that where a hole ends
[00:03:13.160]or begins in a vein unit,
[00:03:15.500]then we can choose whether Leapfrog creates a hangingwall
[00:03:19.570]or a footwall point at that location.
[00:03:23.350]Our recommendation would be to toggle this off,
[00:03:27.020]but that decision is very much data-driven.
[00:03:29.830]And in this case where I have a simple data set,
[00:03:32.780]I’m just going to leave the defaults as they are for now.
[00:03:37.600]So I’m going to go back
[00:03:38.670]and just repeat that exact same process for dyke two
[00:03:43.350]and indeed for dyke three.
[00:03:46.644](mouse clicking)
[00:03:59.000]And if I start to expand under the vein system,
[00:04:04.320]we’ll see those three individual dykes being created.
[00:04:09.530]If I keep expanding down
[00:04:13.600]and we’re going to see all of the standard parts
[00:04:17.090]that define a vein
[00:04:18.700]and we’re going to talk about these in more details
[00:04:21.280]in one moment.
[00:04:22.760]And expanding these even further,
[00:04:26.070]we’ll show the hyperlinked input data,
[00:04:29.810]informing each of the parts.
[00:04:33.240]So if I focus in just on the building blocks
[00:04:36.330]of a vein surface creation for a moment,
[00:04:40.600]we can say that veins are built in five stages.
[00:04:44.060]It’s going to be easier to see this
[00:04:45.390]just in a perpendicular slice.
[00:04:47.940]Let me just turn off the depth markers for now.
[00:04:52.410]All right.
[00:04:53.260]Step one, a reference surface is going to be built
[00:04:58.950]based of the midpoints.
[00:05:01.030]Let me jump these up in size.
[00:05:06.300]On the midpoints of the vein intervals,
[00:05:08.540]and it’s this that controls,
[00:05:10.190]it’s this reference surface that controls
[00:05:12.490]the direction of a vein in one direction.
[00:05:17.320]The second step is that
[00:05:20.250]the vein segments are going to be extracted
[00:05:23.110]from my drillhole data
[00:05:26.980]and assigned to either a hangingwall in red here
[00:05:31.410]or a footwall side
[00:05:33.070]based on their orientation to this reference surface.
[00:05:37.640]You can use the legend up here to keep you right.
[00:05:44.130]Step three,
[00:05:45.620]separate hangingwall and footwall points
[00:05:51.071]and then generate it
[00:05:52.604]at the top and bottom of these segments.
[00:05:56.570]I just hide that a second.
[00:05:58.750]Let’s make these a little bit bigger.
[00:06:03.470]Then you can hopefully just see these hangingwall
[00:06:06.101]and footwall points that have been generated.
[00:06:10.370]The hangingwall surfaces
[00:06:11.920]and the footwall surface are then generated
[00:06:16.430]as offset surfaces to that reference plane.
[00:06:24.000]And it’s the final vein product
[00:06:29.420]that is created is that volume enclosed
[00:06:32.290]between that hangingwall and footwall surface.
[00:06:38.860]Clear my scene.
[00:06:39.827]I’m just going to bring in just dyke one for now,
[00:06:42.030]along with my drillhole information.
[00:06:45.800]Just to take a bit of a closer look.
[00:06:48.380]Now at this stage,
[00:06:51.220]there is quite a bit of editing required
[00:06:53.970]to have these surfaces match my geological interpretation.
[00:06:59.860]One of the first things perhaps to note is that
[00:07:03.460]the default vein boundary will extend
[00:07:06.970]to that of model boundary,
[00:07:09.590]regardless of whether the vein interval is intersected
[00:07:13.830]in all of my drillholes.
[00:07:16.600]I just turn on all of my lithologies here in the project.
[00:07:21.840]I’m just going to focus in on this northeastern corner.
[00:07:28.590]Let’s just take the transparency down a little bit,
[00:07:30.770]so that hopefully you can see in my drillhole 31 here,
[00:07:37.001]and I’ve got that blue intersection
[00:07:40.230]of my diorite dyke one coming in,
[00:07:43.020]but I’m actually not seeing that same intersection
[00:07:47.080]in my hole 34.
[00:07:50.540]So irrespective at this point
[00:07:53.230]of not being any of the dyke one logging,
[00:07:57.900]my vein is still going to extend through it at this point,
[00:08:02.470]irrespective of that.
[00:08:04.720]So in this scenario,
[00:08:05.970]it’s likely that we’re going to want to update
[00:08:08.520]the vein extents.
[00:08:10.490]And we have a couple of options to look at now to do so.
[00:08:15.420]First, we could choose to have Leapfrog identify
[00:08:20.340]such drillhole intervals, such as these,
[00:08:23.260]without that vein intersection
[00:08:25.240]and truncates the vein accordingly.
[00:08:27.990]I can do that by simply turning on my pinch out function.
[00:08:36.250]And we’ll see that update in a second.
[00:08:39.400]Now, in real terms, what Leapfrog is doing here
[00:08:43.650]with the pinch out function is that it’s creating
[00:08:47.030]a vein interval in the drillholes
[00:08:49.860]without the dyke one logging intersection,
[00:08:54.170]then reversing the hangingwall, footwall vein segments,
[00:08:57.810]which in turn causing the hangingwall,
[00:09:01.050]footwall surfaces cross over one another,
[00:09:04.350]preventing the surface from being created.
[00:09:07.680]All of that is going to be a bit easier to see
[00:09:09.550]in a perpendicular slice.
[00:09:11.210]So let me just going to hone in for now just on 34,
[00:09:16.260]hole 34, in just a perpendicular slice view.
[00:09:22.750]And if we hark back once again
[00:09:25.120]to those original building steps,
[00:09:28.270]then this time around,
[00:09:30.760]we have a vein interval segment created.
[00:09:36.700]You can see that pink interval there,
[00:09:42.400]together now with the corresponding hangingwall
[00:09:46.350]and indeed footwall points.
[00:09:48.940]So if I bring my two hangingwall, footwall surfaces in,
[00:09:52.680]and I’m just going to color the footwall a different color,
[00:09:56.150]that’s a blue make it that,
[00:09:58.320]made that visual a little bit easier to see.
[00:10:02.470]Then we can see that if I now step back from hole 34,
[00:10:08.230]so where the pinch out has been identified,
[00:10:11.260]and if I just work backwards away,
[00:10:14.150]then we’re going to see that hangingwall,
[00:10:16.568]footwall surfaces start to uncross one another.
[00:10:20.010]And we see our vein start to come into view.
[00:10:24.970]In addition to that function, however,
[00:10:27.290]we can also choose to edit each vein boundary individually,
[00:10:32.940]or indeed we could actually set
[00:10:35.830]a minimum, maximum vein thickness.
[00:10:38.580]I’m just under my Surfacing tab.
[00:10:40.670]So if you have those sparse data
[00:10:42.920]and want to prevent perhaps
[00:10:44.510]some pinching out of your surfaces,
[00:10:46.300]then you could set a minimum thickness
[00:10:48.850]or indeed blowouts, set a maximum thickness
[00:10:53.490]to control those blowouts.
[00:10:57.350]But for now, however,
[00:10:58.420]what I’m going to do is actually just concentrate
[00:11:01.210]on editing my dyke three boundary.
[00:11:04.200]So let me just clear my scene and bring in dyke three.
[00:11:10.800]And let’s talk about how we can edit
[00:11:12.800]our boundary first of all.
[00:11:14.010]Now you may already have some known boundaries
[00:11:18.100]for your surfaces.
[00:11:19.680]So for example, you might have a map limit
[00:11:22.410]or indeed a concession boundary,
[00:11:25.090]but otherwise one useful workflow could be to limit
[00:11:29.340]the boundary a certain distance from your drilling data.
[00:11:33.660]Now, one easy way to visualize this is to create
[00:11:37.960]a distance buffer.
[00:11:40.150]So in this case,
[00:11:41.470]I have created a buffer using my drillhole data,
[00:11:48.300]and then I’ve just set a few different spacings
[00:11:53.180]to get increasingly further away.
[00:11:58.040]If I come now and apply or copy or evaluate that one
[00:12:02.460]to my dyke three surface,
[00:12:07.850]let me turn that now to the distance.
[00:12:10.950]You might want to just go in
[00:12:12.380]and just create an appropriate color map,
[00:12:16.710]just to sort of help make sense of what we’re looking at.
[00:12:20.830]So I can use this information to help dictate
[00:12:26.160]where my boundary should be.
[00:12:28.140]So perhaps I might want to cut off
[00:12:31.110]some of these lower informed areas,
[00:12:34.060]roughly 200 to 300 meters away
[00:12:39.360]from the nearest drillhole point.
[00:12:42.450]So if I come now and right-click my dyke three boundary
[00:12:47.410]and say edit,
[00:12:49.160]I’m going to see that boundary plane come into view.
[00:12:52.300]We’ll just make it little bit more transparent
[00:12:54.760]so I can see both.
[00:12:56.400]And I’m just going to look at it simply roughly face on.
[00:13:01.230]Using my polyline here,
[00:13:03.340]I can then go in and define a boundary.
[00:13:07.180]And of course, this is going to be very rough
[00:13:08.840]for the sake of time.
[00:13:10.210]You’re going to be of course
[00:13:11.220]a lot more careful than I am being,
[00:13:13.470]but I’m simply just selecting a boundary.
[00:13:18.440]That’s roughly in this case,
[00:13:20.340]300 meters away from my nearest drillhole.
[00:13:23.080]And this is one of the times in Leapfrog
[00:13:24.960]that you do need to close your polyline.
[00:13:27.360]You’ll see that little circle icon currently,
[00:13:30.360]meaning that my a polyline is closed.
[00:13:35.260]When I save that,
[00:13:36.540]then we should now see the dyke three update.
[00:13:45.050]So once I’m happy,
[00:13:46.840]let’s leave that behind and move on.
[00:13:50.590]Now, it’s going to be quite common
[00:13:53.150]that you have some additional data
[00:13:56.360]to inform your vein surfaces.
[00:13:59.520]So points, polylines,
[00:14:02.210]they can all be added into the vein hangingwall, footwall
[00:14:07.370]or indeed reference surface,
[00:14:09.710]and, or we can directly edit all of the individual parts
[00:14:14.660]with the polyline just the same way we saw a moment ago
[00:14:18.630]with the boundary.
[00:14:21.470]So I’m just going to bring in dyke one and two, first of all,
[00:14:27.860]and let’s just have a look at those.
[00:14:31.670]Now, in this example, if I’m honest,
[00:14:34.260]I’m not 100% happy with the current trend of dyke two,
[00:14:40.290]this reference surface here has just been extrapolated
[00:14:44.650]quite far away from my last drillhole data point.
[00:14:49.320]And if I want to alter this now to create a cleaner,
[00:14:54.070]more dynamic termination with dyke two later on,
[00:14:58.260]then I can do so by actually editing
[00:15:00.800]the reference surface itself.
[00:15:03.530]So if I make sure that I’m bringing in
[00:15:05.260]the correct reference surface this time for dyke two,
[00:15:09.920]I’m just going to set up the scene
[00:15:11.510]by simply making a slice quite far away
[00:15:14.690]from the actual point that I want the termination to be.
[00:15:17.920]So probably somewhere over here is sufficient.
[00:15:23.350]And let me just remove the faces,
[00:15:25.110]so we can kind of get a bit of a cleaner view.
[00:15:29.820]So my aim here is to essentially move the red line here,
[00:15:34.060]that’s my reference surface intersection,
[00:15:36.960]and I want to move it onto the near side of dyke one.
[00:15:42.570]So if I come to my reference surface, right-click and edit,
[00:15:47.910]then I’ve got options up here to draw a polyline
[00:15:51.970]or draw some points.
[00:15:56.340]I’m simply just going to make a simple polyline
[00:16:01.040]over on this side.
[00:16:02.560]And if I come out of the slice mode
[00:16:08.010]and just looked down,
[00:16:10.690]then when I hit save now,
[00:16:12.890]we should get quite an easy view
[00:16:16.590]of seeing that dyke two surface update.
[00:16:23.980]Then there we go.
[00:16:27.370]It’s worth noting at this stage,
[00:16:30.930]that vein reference surfaces that are built
[00:16:35.430]from lithology data will be curved as default.
[00:16:42.570]It is generally better to use a curved surface
[00:16:46.590]over a user defined plane of reference surface,
[00:16:51.690]just in terms of what is more geologically reasonable.
[00:16:55.540]There may be exceptions to that rule.
[00:16:57.920]There is also now an option in Geo 6.0
[00:17:01.920]to use a predefined mesh here instead.
[00:17:05.370]Again, that might be a better fit.
[00:17:07.840]That’s the data or indeed the deposit type that you have.
[00:17:11.600]For now though, I’m just going to leave it
[00:17:13.740]as my curved reference surface.
[00:17:16.050]And James, indeed, will come back
[00:17:18.390]and talk about this a little bit more detail.
[00:17:20.760]So let’s move on for now.
[00:17:25.530]All right, I clear my scene.
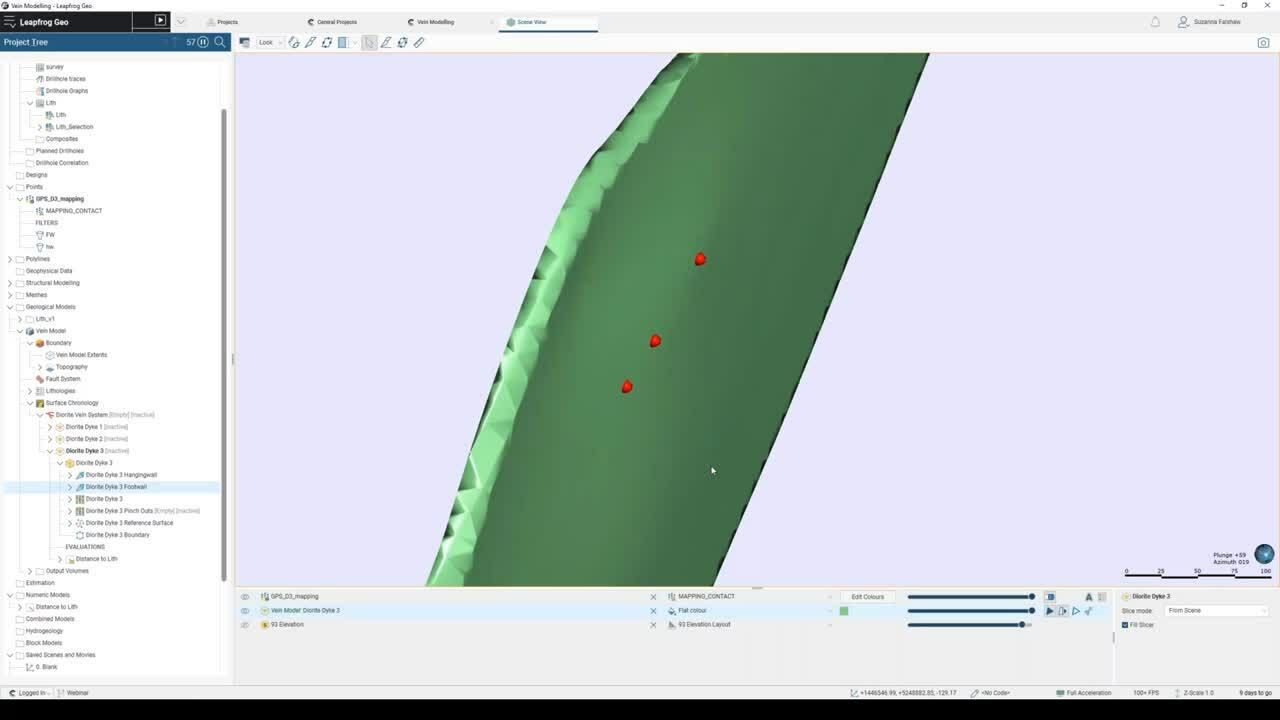
[00:17:29.270]And I’m going to bring in a beautifully prepared
[00:17:33.960]field map here,
[00:17:35.620]which is for dyke three.
[00:17:39.600]Let’s just turn that back to a flat color for now,
[00:17:44.570]and let’s just hone in on what we have.
[00:17:48.860]So these points here quite simply,
[00:17:52.500]they’re just a few GPS points taken
[00:17:56.570]by walking out the vein contact in the pit bottom.
[00:18:01.390]This is the exact same workflow for underground face
[00:18:05.520]or drive mapping as well.
[00:18:08.490]But what I’ve done is that I’ve imported
[00:18:11.560]these GPS pickup points into my points folder,
[00:18:17.270]along with the sort of hangingwall base mapping category,
[00:18:23.800]a footwall mapping category, I should say.
[00:18:27.490]And we would recommend that you use points in this workflow,
[00:18:33.350]simply as they can be appended to
[00:18:36.590]or reloaded very similar
[00:18:40.840]as your drillholes.
[00:18:43.200]Now let me bring those into scene,
[00:18:44.870]so we can have a look at these in a bit more detail.
[00:18:47.010]So simply those six points picked out from my field map.
[00:18:54.520]Now, currently,
[00:18:55.970]if I want to apply these to my individual hangingwall
[00:19:00.500]or indeed footwall surface,
[00:19:03.040]then I’m going to have to just differentiate the two sides.
[00:19:07.970]And I can do that just very simply with a query filter.
[00:19:12.410]I already have one built up for my footwall.
[00:19:15.780]If I apply that in scene,
[00:19:17.590]then you can see what that is doing,
[00:19:19.290]it’s just simply picking out those three footwall points,
[00:19:22.400]and I’m going to do the same now for my hangingwall.
[00:19:27.160]So right-click new query filter.
[00:19:30.850]And I’m going to build a query that simply just says
[00:19:34.010]that where my mapping contact is done,
[00:19:38.020]I’ve already done the footwall,
[00:19:38.880]so where is my hangingwall?
[00:19:46.800]And if I apply that now,
[00:19:49.490]then we see that other set
[00:19:51.390]of hangingwall points in the scene.
[00:19:54.340]All right.
[00:19:55.620]So if I now want to apply those down to my surfaces,
[00:20:00.100]then I’m going to come all the way down
[00:20:01.980]to my dyke three hangingwall surface, first of all,
[00:20:06.840]right-click add,
[00:20:08.600]and in this case, I’m going to add some points
[00:20:11.490]and I’m going to do so by applying that query filter
[00:20:15.090]I just created.
[00:20:18.420]Whilst that’s processing,
[00:20:19.630]I’m going to do the exact same thing for my footwall.
[00:20:22.240]So I’m going to add my footwall points,
[00:20:25.100]but this time around, of course,
[00:20:27.710]with the footwall query filter, instead.
[00:20:32.240]Now, while that’s processing,
[00:20:34.270]probably would have been helpful to have shown that
[00:20:36.600]in a slide,
[00:20:37.470]but let’s have a look at that slice now.
[00:20:42.618]And if I just play with the transparency a minute,
[00:20:46.530]then you should be able to see
[00:20:49.870]what was my original mapping data points
[00:20:53.620]and how the surface has now come out to meet them.
[00:21:00.760]Now, at this stage, if I just flip around,
[00:21:06.080]we can see on the triangulation here
[00:21:10.270]on the edges of the triangulation,
[00:21:12.600]that these points are simply being used
[00:21:14.880]as a guide to the surface build at this point.
[00:21:19.210]I can always change this, however,
[00:21:22.290]by individually going into my,
[00:21:26.010]in this case, dyke three object
[00:21:29.630]and on the Surfacing tab here,
[00:21:32.840]I can choose how I want to,
[00:21:35.200]if I want to include this data in my snapping rules.
[00:21:39.520]So currently my snapping rules are inherited
[00:21:42.840]for my geological model
[00:21:44.840]and that’s just snapped to drilling only.
[00:21:48.090]So I have a couple of different options,
[00:21:51.580]but one that’s quite useful is custom,
[00:21:55.030]which will allow me to come to my in-points tab,
[00:21:58.230]inputs tab, sorry,
[00:22:00.550]and be able to choose from the data present in my projects
[00:22:05.970]what I want to use to snap to.
[00:22:08.730]So let me toggle on both of those points,
[00:22:14.600]but you can see here that you can make
[00:22:16.940]an independent decision
[00:22:18.620]for either the hangingwall or footwall.
[00:22:21.060]So if, for example,
[00:22:22.350]I just wanted the hangingwall to be informed
[00:22:25.080]by drilling only, then I can do so,
[00:22:28.320]or indeed I can use both.
[00:22:31.938]All right, let me just say okay to that.
[00:22:35.470]And as that reprocesses,
[00:22:38.200]we should now see the triangulation updating
[00:22:43.320]in order to now snap to those points.
[00:22:48.930]All right.
[00:22:50.220]And also, just to point out,
[00:22:51.670]as I touched on previously,
[00:22:54.500]all the hyperlinks are maintained
[00:22:57.450]under each of the vein parts.
[00:23:00.210]If I keep drilling down,
[00:23:02.060]then you’ll now see the hyperlink for that mapping data,
[00:23:06.580]which is linking me back to my points folder.
[00:23:11.780]And if need be, of course, as more data becomes available,
[00:23:16.020]I can then go and either append or reload that data
[00:23:20.880]and all of that information is going to filter down.
[00:23:25.010]Of course, just double check once
[00:23:26.970]if you do dynamically update information
[00:23:30.500]that the same filters that we applied are applicable
[00:23:35.250]or remain applicable.
[00:23:38.650]Let’s clear my scene again,
[00:23:40.170]and I’m going to load in dyke one
[00:23:45.700]and along with its vein segments.
[00:23:55.355]Hopefully you can see that.
[00:23:57.020]Now due to the way
[00:23:59.220]Leapfrog automatically classifies vein segments,
[00:24:05.260]it will generally always do a good job
[00:24:07.970]with wall-to-wall sample types,
[00:24:11.250]kind of vaguely similar to what we have here,
[00:24:13.970]even if those are fragmented.
[00:24:17.290]It may not do so well with incomplete,
[00:24:21.640]very long or short intervals
[00:24:24.190]or where you have purely internal sample types
[00:24:29.310]or indeed where you might have sub-vertical veining
[00:24:32.820]or low angle drillholes to a vein.
[00:24:36.520]These will all usually produce
[00:24:38.950]some poor surface triangulations
[00:24:41.380]and may just need a bit of manual editing.
[00:24:44.460]So if you do have holes in your vein
[00:24:46.740]or indeed, if it’s not behaving as you think it should,
[00:24:50.150]then best to come check your vein segment classification,
[00:24:53.960]first of all.
[00:24:55.870]And I can see one such example of this on my dyke one.
[00:25:00.390]Hopefully you can see this by zoom in.
[00:25:03.210]Let me just put the triangles on.
[00:25:06.640]You can see that I’ve got two holes here
[00:25:09.720]that are conflicting
[00:25:12.320]and they are incorrectly assigned that is resulting
[00:25:16.020]in the vein pinching out at that point.
[00:25:20.210]There are a couple of options to handle scenarios
[00:25:23.140]such as these.
[00:25:24.970]First, I can look to directly edit
[00:25:28.400]the vein segments in scene
[00:25:30.950]in order to override that automatic classifications.
[00:25:35.710]So if I right click my vein segments,
[00:25:40.490]then I should get this dialogue.
[00:25:42.380]And if I click on my first drillhole,
[00:25:45.273]we’ll zoom in a bit more,
[00:25:48.730]and hopefully see a very faint A coming up
[00:25:51.250]and I can choose to override the classification
[00:25:55.510]and to simply either reassign that segment
[00:25:59.750]to my hangingwall, footwall,
[00:26:02.050]or indeed exclude it altogether from the surface generation.
[00:26:07.550]I can do the same over here.
[00:26:09.120]So again, I’m just going to exclude that top segment.
[00:26:16.020]And if I hit save now, just close that dialogue,
[00:26:23.190]then we should now see the vein start to regenerate
[00:26:34.020]and prevent that pinch out occurring.
[00:26:37.610]Now, if it looks like such manual editing is going to take
[00:26:41.670]a lot of time,
[00:26:43.330]especially in the case of a lot of,
[00:26:45.991]sort of internal vein samples,
[00:26:48.600]then you actually might be best to reassign
[00:26:51.310]your intervals altogether using the interval selection tool.
[00:26:56.700]Now I already have an interval selection created
[00:27:02.130]for my lithology table.
[00:27:04.370]Good Leapfrog practice, by the way.
[00:27:06.830]So all I need to do in this scenario is to identify
[00:27:12.270]and select some of these sort of intervals
[00:27:16.430]that I perhaps wish to ignore.
[00:27:19.667]So if I spin around,
[00:27:21.940]let me just hide those a second,
[00:27:25.720]then perhaps might not be obvious,
[00:27:27.600]but there is a little bit of a dimple coming in
[00:27:30.730]to my surface over here.
[00:27:33.240]This would be easier to look at in slice mode,
[00:27:35.790]but if I turn the model off,
[00:27:37.560]we’ll turn the visibility of,
[00:27:39.090]then we can see that that’s dictated to
[00:27:40.940]by the this very, very small intersection
[00:27:44.140]that I have in hole 26.
[00:27:47.380]So in this case, I’m going to just start to select this
[00:27:51.320]and I’m going to choose to create a new lithology column
[00:27:54.753]that I’m just going to call Ignore.
[00:27:57.660]You’ll see that that sort of changed color now
[00:28:00.407]to that new classification.
[00:28:02.830]When I hit save,
[00:28:08.980]then of course,
[00:28:09.813]because of everything being dynamically linked,
[00:28:12.820]any changes that I’m making up here
[00:28:15.674]in my lithology table is going to flow down
[00:28:20.030]and we can see all of my dyke one currently reprocessing.
[00:28:26.030]So in this case,
[00:28:27.540]by updating the base lithology informing
[00:28:32.640]my geological model,
[00:28:35.410]it just means this interval will no longer be considered
[00:28:38.460]in the surface build as it’s simply no longer identifiable
[00:28:43.000]as part of the vein lithology.
[00:28:44.800]And hopefully you can see where there was a dimple,
[00:28:48.970]there is no longer a dimple.
[00:28:51.520]So that might be a much quicker way of starting to identify
[00:28:56.850]and edit some of your intervals.
[00:29:00.950]If you want a bit more control,
[00:29:02.430]then of course you can edit the vein segments directly.
[00:29:09.020]All right, lovely.
[00:29:09.853]Let me just go backwards.
[00:29:11.630]And I’m just going to load all of my drillhole, sorry,
[00:29:14.677]all of my dykes into the scene now,
[00:29:22.650]and let’s look down.
[00:29:24.710]So at this point, I’m now ready to set some interactions.
[00:29:31.440]So if I double click my vein system now
[00:29:36.550]and come to my vein system,
[00:29:40.280]then I’m going to add my first interaction type for dyke two.
[00:29:45.730]And what I want it to do
[00:29:48.220]as I sort of try to draw there was to terminate
[00:29:52.200]against dyke one,
[00:29:54.260]but remembering that you have to sort of pick
[00:29:56.160]that right side.
[00:29:57.050]So in this case, I want it to terminate
[00:29:59.720]on the footwall side of dyke one,
[00:30:05.960]and I’m going to do the exact same thing for dyke three.
[00:30:08.870]So let’s add a termination against dyke one
[00:30:13.400]and the hangingwall side in this case is correct.
[00:30:23.460]Right, so let’s bring that into scene,
[00:30:26.040]I just hide those parts for now.
[00:30:30.490]And hopefully we can see now
[00:30:33.340]that we have that one whole diorite system together.
[00:30:39.020]We can actually look at our vein system
[00:30:41.670]in three different ways if we wish to,
[00:30:43.357]and we’ll go through these,
[00:30:46.310]we can, of course, as we’re currently viewing,
[00:30:48.830]see it as the one whole vein system
[00:30:53.810]but I could also choose to look at the cut
[00:30:56.940]or indeed the uncut individual parts.
[00:31:00.900]And the icons here actually do give you an idea
[00:31:05.180]of what it is that you’re looking at.
[00:31:07.850]So let me just load up a quick horizontal slice through this
[00:31:13.940]so that we can have a look at what’s happening.
[00:31:18.310]And let’s have a look at our cut individual veins,
[00:31:21.260]first of all.
[00:31:23.470]So if I zoom in,
[00:31:27.159]you can hopefully see here
[00:31:29.480]that even within our cut individual veins,
[00:31:34.040]they are still operating individually.
[00:31:36.770]This is still a closed volume.
[00:31:39.320]They’re just simply terminating against those dyke one,
[00:31:45.690]given the interactions that I set
[00:31:47.040]and it’s the exact same up here as well with dyke three.
[00:31:53.640]If I come now and have a look at the dyke system itself,
[00:31:57.880]and this is really where the dyke system comes into play,
[00:32:04.360]then you can see now
[00:32:05.450]that those internal walls have been removed
[00:32:09.260]or the internal breaks, sorry,
[00:32:10.830]have been removed to create our one vein system.
[00:32:17.550]And it’s this functionality that’s really dictated
[00:32:20.980]by the vein system and why it’s useful.
[00:32:24.550]So if I just come and activate that now,
[00:32:27.550]so we can also have a look at the output for you,
[00:32:35.400]then I can also pull that complete
[00:32:42.170]output volume as well for my whole diorite vein network.
[00:32:48.670]If I look at the properties now, you will of course see
[00:32:52.980]just the one volume.
[00:32:56.250]So a couple of last points on that,
[00:32:59.680]this one output volume created for the entire vein system,
[00:33:05.700]if you are doing estimation using Leapfrog Edge,
[00:33:09.660]then the individual veins can be chosen as domains.
[00:33:15.760]And perhaps something also to bear in mind is that
[00:33:21.120]the surface volume to highlights
[00:33:25.390]of a vein system might not be the same
[00:33:28.550]as the final output volume depending on
[00:33:32.540]what surface chronology interactions are defined
[00:33:35.580]in the project.
[00:33:37.070]All right, so that’s actually everything
[00:33:39.570]that I was going to run through from my side.
[00:33:43.480]So hopefully that’s just giving you a good idea
[00:33:45.320]of all the different sort of building blocks
[00:33:47.840]of vein modeling.
[00:33:49.370]And I’m going to hand over now to James,
[00:33:52.970]so he can step into the breach
[00:33:55.050]and run us through a more complex, folded example.
[00:34:00.850]<v ->Fantastic, thank you, Suzanna.</v>
[00:34:04.114]So what I’m going to do is we’re going to build on
[00:34:06.440]the fundamentals that Suzanna has just taken you through
[00:34:09.860]of how veins are constructed.
[00:34:11.740]And we’re going to have a look at this particular example,
[00:34:14.330]which is a real world example.
[00:34:16.770]And we’re going to look at an alternative workflow
[00:34:20.930]for how you can take your drillhole data
[00:34:24.980]and get to this kind of result to manage areas
[00:34:28.130]where you have complexity of overturn in tight folds
[00:34:31.290]and in some cases, very narrow intersections.
[00:34:35.740]So this is essentially a pretty much a four-step process,
[00:34:40.160]and really this starts back
[00:34:42.710]at how you manage the drillhole data itself.
[00:34:46.830]So in this particular project for my drillhole data,
[00:34:52.307]I have my collar survey and lith table.
[00:34:55.550]I’ve done two things to this.
[00:34:57.060]And again, this is something that you can take
[00:34:59.860]and use in your projects as well.
[00:35:03.020]For the collar table,
[00:35:04.320]if I open this up,
[00:35:06.240]I’ve created a new column here called Valid.
[00:35:10.890]So I’ve done that by right clicking
[00:35:12.970]and creating a new category selection.
[00:35:16.180]And the purpose of this is that
[00:35:18.050]when I add new data into my model,
[00:35:20.610]particularly when it gets to be a very large model
[00:35:23.840]with a lot of drillholes,
[00:35:25.734]the situations where I want to add data into my projects,
[00:35:29.380]but I don’t necessarily want it to run all my updates
[00:35:32.880]and reprocess my whole model straight away.
[00:35:35.340]What I might want to do is have a look at how that data fits
[00:35:38.570]against my current interpretation
[00:35:40.810]and make some judgments on either the current interpretation
[00:35:44.980]on the drillholes or how that’s going to affect my end model.
[00:35:49.700]So by creating a category selection
[00:35:52.860]and generating this new column of holes
[00:35:55.610]that should be included,
[00:35:56.560]and you can see an example here of holes
[00:35:58.320]that are currently excluded.
[00:36:00.500]I can create a filter.
[00:36:02.830]So I’ve created a filter on my collar table
[00:36:05.750]to basically only allow valid holes to be used in my model.
[00:36:11.090]So that was the first step is to go through,
[00:36:12.660]unless I can load that on and we can have a look.
[00:36:16.290]Here, as you can see,
[00:36:17.123]for example, hole 26 is currently set as excluded
[00:36:22.760]and everything else is on as included.
[00:36:28.940]So I’ll come back to those ones
[00:36:30.840]towards the end of this process.
[00:36:32.317]And we can see how that can change.
[00:36:35.810]The other thing I’ve done,
[00:36:36.670]and again, it’s strongly recommended
[00:36:39.270]when you go through building a model,
[00:36:40.850]is I’ve taken the different parts of my vein
[00:36:43.670]and I’ve created an interval selection column.
[00:36:46.650]So this interval selection column
[00:36:47.960]again is just going to give me the ability
[00:36:50.080]to make refinements to my interpretation on the fly,
[00:36:55.410]rather than having to go back and change master data.
[00:37:00.150]So the first step for this process is we’re going to use points
[00:37:04.870]rather than the drilling itself to build my vein model.
[00:37:09.460]So there’s a number of reasons for this,
[00:37:10.650]but partly it gives you more control
[00:37:13.000]over editing the veins,
[00:37:15.610]and also allows you to recognize
[00:37:17.190]multiple intersections of veins.
[00:37:19.230]If you use the drillholes directly,
[00:37:21.800]then Leapfrog will identify a top and a bottom intersection.
[00:37:26.660]The challenge when you have overturn such as this,
[00:37:29.060]if we jump into section here, is you can see
[00:37:33.170]on any single hole
[00:37:34.300]I can have multiple intersections of my vein.
[00:37:37.180]So here I have one in section here, here and here.
[00:37:40.950]So using the drilling is going to identify my top
[00:37:45.480]and bottom contact.
[00:37:47.480]And what I actually wanted to do is to recognize all three
[00:37:50.290]so I can manage that full shape.
[00:37:53.720]So first step is to come down to my points folder,
[00:37:58.800]and I’m going to create three different sets of points.
[00:38:02.780]Firstly, I wanted to find my hangingwall
[00:38:05.555]and footwall contacts.
[00:38:06.840]So I’m going to create new contact points.
[00:38:10.600]I’m going to use my vein interval selection column.
[00:38:15.131](mouse clicking)
[00:38:18.050]I’m going to build my query filter in.
[00:38:19.940]So I’m going to say, only use holes that are considered valid.
[00:38:24.240]And the first set of points I’m creating is anywhere
[00:38:27.420]with my footwall contacts, my vein,
[00:38:31.710]and here you see I’ve set both sides.
[00:38:34.180]So again, because I have overturn in,
[00:38:37.540]I have places where my footwall is contacting the vein above
[00:38:40.490]and also where it’s contacting below.
[00:38:42.580]So here I want to use both.
[00:38:46.400]So I can let that one run.
[00:38:48.080]And I’m going to repeat that process.
[00:38:50.000]So here I’m going to create another set of contact points
[00:38:53.330]from my interval selection column,
[00:38:57.320]set my query filter to only use valid holes.
[00:39:01.830]And this time I’m using anywhere, the hangingwall contacts,
[00:39:06.770]the vein on both sides.
[00:39:11.450]Now the last step and this is where again,
[00:39:13.203]what is now going to be possible in Leapfrog 6.0 is using
[00:39:18.110]an alternative mesh as my reference surface.
[00:39:22.100]So here I’m going to come to my points
[00:39:24.230]and I’m going to define the midpoint.
[00:39:26.330]So go my intersections.
[00:39:28.080]So I’m going to come down to new informed midpoints,
[00:39:33.340]pick my info selection column,
[00:39:36.400]valid holes again.
[00:39:37.970]So here, I’m still just setting the data up.
[00:39:43.700]I would rename this so it’s a bit more identifiable.
[00:39:46.450]So we’re going to call Lith
[00:39:50.040]Now what this particular step has done,
[00:39:53.230]if I load these on is, it’s created points,
[00:40:00.658]and let’s just make those a bit more realistic,
[00:40:03.740]it’s created midpoints at every intersection.
[00:40:07.160]What I’m interested in is the midpoints on my vein.
[00:40:10.640]So again, I’m going to set up a query filter on my points.
[00:40:16.320]So I build a query here and say that anywhere I want to see
[00:40:20.970]where the vein part interval selection is equal to my vein,
[00:40:27.670]so I can call this vein.
[00:40:33.130]So now if we apply that filter,
[00:40:35.470]you can see it only gives us our vein midpoints.
[00:40:40.330]So that’s my first step.
[00:40:42.080]I now have my three data point sets.
[00:40:46.480]So step number three is to create my reference surface.
[00:40:51.100]So what I’m trying to do here is replicate
[00:40:53.510]the fold in my data.
[00:40:56.470]So for now, until I come out of this section
[00:40:59.577]and we can actually turn,
[00:41:00.830]let’s turn it the collars off so we can see.
[00:41:02.100]So we have our points
[00:41:04.166]and we want to try and generate a mesh
[00:41:05.590]that’s going to represent the folded surface here.
[00:41:10.930]So to do that, I’ve got to come to the Meshes folder.
[00:41:15.430]I’m going to create a new mesh from points.
[00:41:22.598]I’m going to select my lith midpoints.
[00:41:28.610]Make sure I’m only using the midpoints from the vein.
[00:41:30.900]So I’m just using that query filter that we just set up
[00:41:34.870]and we’ll drop the resolution down
[00:41:37.360]because of some pretty tight folding up here.
[00:41:41.880]So that will go through
[00:41:43.070]and it will build a first pass attempt at my mesh.
[00:41:47.950]So it starting to pick out my fault structure.
[00:41:51.430]It’s still not perfect.
[00:41:52.460]So I’m going to give it a bit of a helping hand here.
[00:41:54.820]So the next step I’m going to do is I’m going to add a trend.
[00:41:58.890]So I’m going to try and give it a bit of a helping hand
[00:42:00.890]to understand where the greatest direction
[00:42:03.230]of continuity is in my data.
[00:42:06.560]So here I’ve just generated a plane,
[00:42:09.630]go in roughly along strike for this hinge zone.
[00:42:13.730]And then I can come into my mesh surface over this side,
[00:42:19.680]go to my trend and set it from the plane.
[00:42:23.030]The other thing I’m going to do here is that
[00:42:24.740]I’m going to give it a bit more an isotropic ranges.
[00:42:29.110]So I’m going to say it’s more continuous
[00:42:30.980]along the strike of the fold.
[00:42:33.310]So I’m going to keep that one at three,
[00:42:35.660]drop that one down to two
[00:42:37.110]and leave it in one in the other orientation.
[00:42:41.720]So when you’re doing this process,
[00:42:43.810]this is the area where you probably want to spend
[00:42:45.780]a bit more time working on refining your reference surface
[00:42:50.340]to really honor that fold structure.
[00:42:52.690]So put your time in here
[00:42:54.200]and the rest of the process should flow a lot more smoothly.
[00:42:59.550]So now we’ve generated our reference mesh
[00:43:02.410]and it’s again, done a pretty good effort
[00:43:04.820]at picking out my tight fold instructions.
[00:43:09.890]So now we can go into the last step of creating my vein.
[00:43:12.670]So I’m going to come down to,
[00:43:13.640]I’ve got a blank geological model down here,
[00:43:16.841]and I’m going to create a new vein.
[00:43:19.410]So this time,
[00:43:21.160]rather than creating a new vein from base lithology,
[00:43:24.590]I’m going to create a new vein from points.
[00:43:27.531](mouse clicks)
[00:43:29.660]I can now select my hangingwall points.
[00:43:34.058]So I’m going to come down to my hangingwall vein contacts,
[00:43:37.080]and I can then select my footwall.
[00:43:42.840]So now I’m selecting my footwall vein contacts
[00:43:46.750]and my internal lithology.
[00:43:48.910]So set in the vein as my internal lithology,
[00:43:54.258]so I’m going to click okay.
[00:43:58.600]And then the next step I want to do is I want to come
[00:44:00.340]into my vein and I’m going to go
[00:44:02.452]and have a look at my reference surface.
[00:44:05.970]So if I open my reference surface,
[00:44:09.590]you can see that currently by default,
[00:44:11.910]it has gone with points to a planar reference surface.
[00:44:16.460]So here you can see how it’s defining a single plane,
[00:44:20.170]which isn’t really ideal for what I want.
[00:44:22.630]So I’m going to change it here to my custom reference mesh.
[00:44:26.380]And now I just need to point it towards my lith mid vein.
[00:44:33.930]So now that I pointed it towards my mesh,
[00:44:35.890]the vein is going to rebuild.
[00:44:38.400]The hangingwall and footwall objects are going to be used
[00:44:41.620]in the contact points from my drillholes
[00:44:46.810]and vein reference surface is now using my mesh
[00:44:52.060]that I’ve created here.
[00:44:53.640]Now, what you might find sometimes
[00:44:54.980]as you’re going to turn this one off,
[00:45:02.530]is that when you first create this,
[00:45:04.800]if you load it on and you’re just seeing some very small,
[00:45:08.440]bits of vein in through here,
[00:45:10.490]then there’s a good chance
[00:45:12.210]that your reference surface has just inverted.
[00:45:15.550]So the hangingwall and footwall are the wrong way around.
[00:45:20.010]So it’s very easy to come down
[00:45:20.900]and flip the orientation of your hangingwall and footwall.
[00:45:24.290]So this is essentially that reference surface saying
[00:45:26.960]on which side should the hangingwall be.
[00:45:31.772]When that one processes,
[00:45:34.120]that should load our vein back up
[00:45:37.651]and we can now see that we have the first attempt,
[00:45:41.630]at our vein object itself.
[00:45:46.150]Now there’s a couple of things in this already
[00:45:47.890]that I can see is that
[00:45:49.050]where I’m getting some of these tighter folds.
[00:45:50.750]I’m getting a few holes up here.
[00:45:53.390]So one of the things I might do,
[00:45:54.677]and this is very much dependent
[00:45:56.770]on your deposit, is I might come into the settings,
[00:46:01.510]the surface in and set a minimum thickness
[00:46:04.000]and see if that will help fix it.
[00:46:06.030]So in this case,
[00:46:06.863]I’m setting a minimum thickness of .5 meter.
[00:46:11.380]So just to give that a chance
[00:46:12.630]to where I’m having these tight folds,
[00:46:14.740]I could do one or two things.
[00:46:16.730]I could either try and drop the resolution of my surface,
[00:46:20.420]which will take a bit longer to process,
[00:46:22.350]or if it’s appropriate,
[00:46:23.640]I can set a minimum thickness
[00:46:26.440]and you can see that’s got rid of some of those holes
[00:46:30.270]where the hangingwall or footwall are crossing.
[00:46:32.690]So essentially creating a pinch out.
[00:46:38.160]From here, there’s a few other changes
[00:46:40.100]you might want to make,
[00:46:41.520]but that’s pretty much
[00:46:42.680]the basic building blocks of that workflow.
[00:46:47.900]If you wanted to improve
[00:46:52.148]how the vein object follows that fold structure,
[00:46:55.530]you want to go back and work on your reference surface.
[00:46:59.590]So what I’ve done here in this case is I’ve used
[00:47:02.490]a couple of polylines
[00:47:05.070]and in some places I’ve tried to define the fold hinges.
[00:47:09.120]So you can see there’s a good example at the top here
[00:47:12.890]where my hangingwall in blue is currently
[00:47:15.720]on the wrong side.
[00:47:17.510]So what I want to see is my fold come over
[00:47:21.540]and all of this hangingwall material should be on
[00:47:24.150]the other side of the vein.
[00:47:25.590]So I’ve used a couple of polylines here
[00:47:27.410]to try and control that.
[00:47:30.220]So what I can do is come back to my reference surface
[00:47:33.870]and I can add the polylines I’ve created
[00:47:36.820]to guide that reference surface.
[00:47:39.770]So here, it’s just ask me to pick it.
[00:47:42.950]And while that’s doing now is it’s updating
[00:47:44.530]my reference surface and that’s going to flow through
[00:47:48.410]and update my vein as well.
[00:47:53.340]Now, while that runs,
[00:47:54.770]a couple of other things we looked at
[00:47:56.020]at the very beginning was to use the category selection
[00:48:01.760]on your collar table
[00:48:03.410]and to use the interval selection on your lith table.
[00:48:07.980]So if we go and have a look as an example,
[00:48:11.700]let’s load that collars back on.
[00:48:17.360]Okay, so see, now it’s finished running.
[00:48:18.830]You can see it started to create that overturn in this area,
[00:48:22.730]honoring that polyline for me here.
[00:48:27.120]Now, the other one I want to have a quick look at is if
[00:48:29.740]we come down and stick this intersection now,
[00:48:39.132]and we can see how this is performing.
[00:48:42.230]So what you might find is this examples like this,
[00:48:44.970]where maybe there’s been two vein categories locked,
[00:48:50.860]and you might not agree with how that’s been done.
[00:48:53.160]So in this situation,
[00:48:55.690]I want my vein to come over
[00:48:57.550]and I want to change this one around.
[00:49:00.290]So, because I’ve set my model up from my interval selection,
[00:49:03.880]I can double click to activate the interval selection tool.
[00:49:08.330]I can highlight that intersection
[00:49:10.110]and set it back to hangingwall.
[00:49:14.030]And again, now when I click save,
[00:49:16.210]we turn our vein back on.
[00:49:20.500]So I saved that change to my lith codes.
[00:49:25.220]And the nice thing of using this interval selection,
[00:49:27.173]the one that’s running if we open our lith code up,
[00:49:30.110]is that it preserves the original category.
[00:49:32.750]So that vein parts interval selection is a copy
[00:49:35.910]of this table or this column.
[00:49:38.170]So I still have my original logged data
[00:49:40.910]and I’m just updating this column.
[00:49:42.740]So if I want to revert back, I can always go back.
[00:49:46.770]So that actually will run through and process.
[00:49:49.940]And it’s a very similar step to follow,
[00:49:53.300]if you want to include a drillhole
[00:49:55.337]that’s been previously excluded.
[00:49:57.520]So again, you’d go to your valid table,
[00:50:03.380]double click,
[00:50:05.300]highlight the color of interest
[00:50:07.540]and you just sign it to be included.
[00:50:10.730]And then when you click save,
[00:50:13.060]that will run through and process.
[00:50:14.373]The way you can see is that
[00:50:15.830]when we’ve updated there has now helped us
[00:50:17.740]to form a better fold structure.
[00:50:23.110]So now anytime you add data or in the future,
[00:50:25.080]it’s going to come in, you log at your lith table
[00:50:28.270]that will only flow through to your points,
[00:50:31.160]if you set the hole as valid.
[00:50:33.370]And that gives you your complex fold structure.
[00:50:40.451]So that was a very quick run-through
[00:50:41.730]of one way to approach this challenge.
[00:50:45.140]There are several different workflows you could use.
[00:50:47.610]And again, each situation requires
[00:50:50.140]often a different approach.
[00:50:52.640]Essentially people like myself, Suzanna and Nik,
[00:50:55.600]we’re here to help you guys.
[00:50:56.890]So if you are coming up with situations
[00:50:59.100]where you’re not too sure about the right approach to take,
[00:51:02.420]then please just let us know and give us a shout.
[00:51:06.120]We’ve got plenty of resources available.
[00:51:08.880]For example,
[00:51:10.110]you can always come through to the support line.
[00:51:13.150]We also have a number of YouTube videos
[00:51:16.440]on the My Seequent page, there’s learning material.
[00:51:19.870]And on our homepage, we have, again, a lot of short videos,
[00:51:24.470]quick tips, and the longer webinars as well.