


In this video we will introduce the workflow used to build a basic structural trend and how this can be applied to our geological surface.
Duration
6 min
See more on demand videos
VideosFind out more about Seequent's mining solution
Learn moreVideo Transcript
[00:00:02.540]
<v Instructor>Welcome to this quick tutorial</v>
[00:00:04.450]
on getting started with structural trends.
[00:00:06.740]
This follows on from further guides
[00:00:08.880]
and videos available on the Seequent website
[00:00:11.160]
and YouTube channel,
[00:00:12.780]
including our recent blog post released on June 3rd.
[00:00:17.800]
Structural trends are similar to global trends
[00:00:20.620]
and that they both allow for changes
[00:00:22.380]
in directional continuity over a surface.
[00:00:25.650]
Structural trends however,
[00:00:27.200]
go one step further by allowing the user more flexibility
[00:00:31.220]
on controlling the strength and direction of the trend
[00:00:34.080]
at different points in space.
[00:00:36.790]
It’s not often that mineralization or geological units
[00:00:41.320]
behave in a consistent plaintiff fashion.
[00:00:44.260]
In which case, applying a structural trends
[00:00:46.600]
can be a great tool in helping to reflect this complexity.
[00:00:51.210]
A structural trend can be built using any number of meshes,
[00:00:55.810]
representing different trend directions.
[00:00:58.770]
They can be planar or curved.
[00:01:01.600]
They can be imported into Leapfrog
[00:01:03.780]
or created using just about any combination of data types.
[00:01:08.720]
For example, polylines, points, GIS lines,
[00:01:11.980]
structural observations, et cetera.
[00:01:20.410]
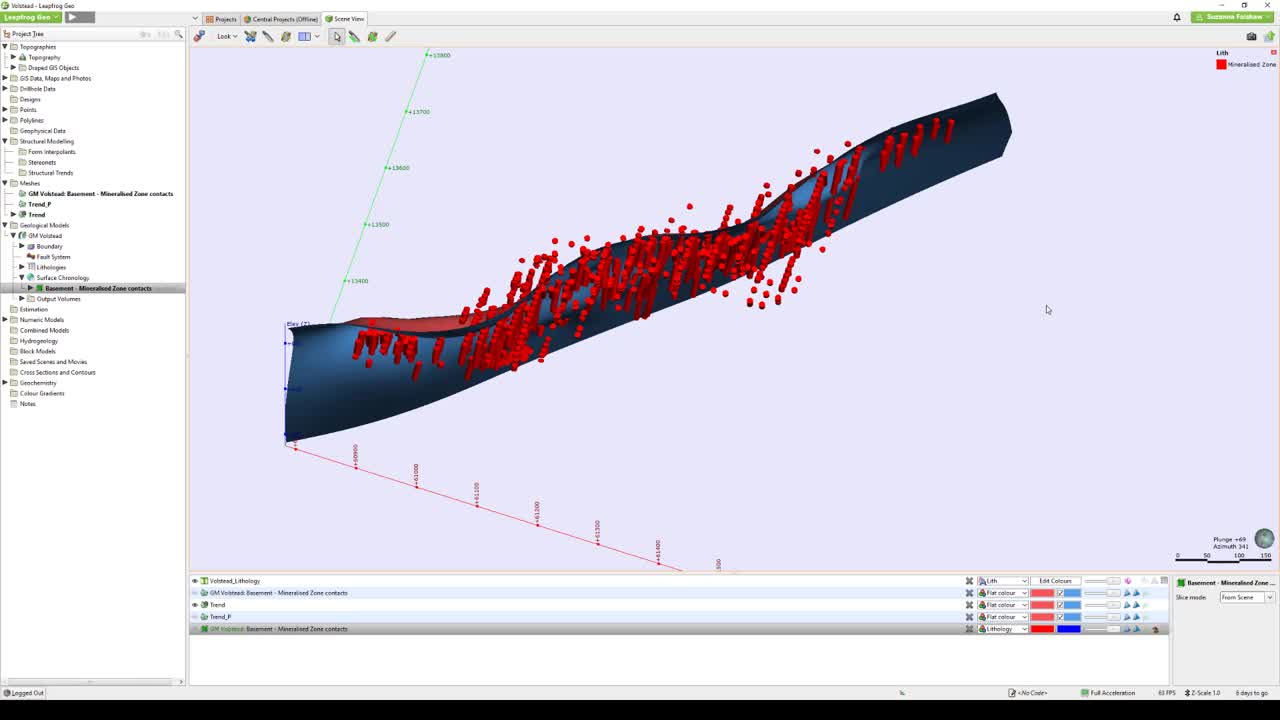
Currently in my 3D scene is my original surface
[00:01:24.800]
without any preferred orientation defined.
[00:01:27.660]
And it’s looking pretty unrealistic
[00:01:29.660]
to what I know of the mineralization.
[00:01:34.140]
By defining the different trend directions
[00:01:37.240]
and ensuring that they are available in my meshes folder,
[00:01:41.380]
I can start by right clicking structural trends,
[00:01:45.490]
new structural trend.
[00:01:49.080]
Under the trend type dropdown lists,
[00:01:51.050]
there are three options available to us.
[00:01:53.780]
Strongest along inputs, blending and non decaying.
[00:01:58.070]
I’ll start with non decaying,
[00:01:59.720]
which assumes that the strengths of the trend
[00:02:02.030]
doesn’t decay away from the mesh.
[00:02:04.760]
Click Add to select the mesh or meshes required.
[00:02:09.990]
And for now I’ll leave the default strength as they are.
[00:02:19.850]
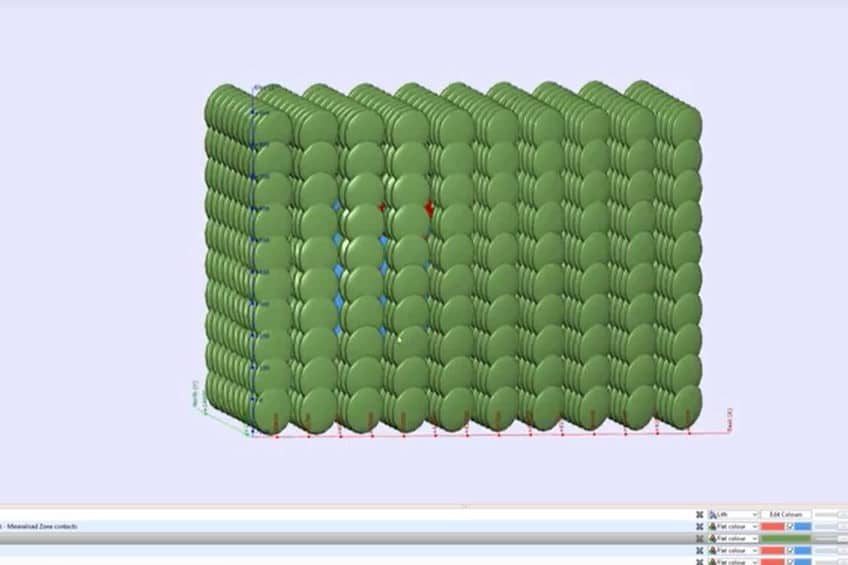
We can see a visual representation of these parameters
[00:02:23.500]
by viewing the structural trend object in the scene.
[00:02:26.850]
Applying the default strength five, for instance,
[00:02:29.910]
has created an oblate spheroid
[00:02:32.143]
that is five times wider than it is thick.
[00:02:35.900]
Of course, this can be adjusted as applicable.
[00:02:40.930]
Using a non decaying structural trend is useful in defining
[00:02:44.460]
a more or less constant trend that has influence
[00:02:47.320]
across your entire model.
[00:02:51.160]
Let’s go back to the structural trends objects,
[00:02:55.100]
double click, and this time around,
[00:02:57.551]
I’m going to select my trend type as strongest along inputs.
[00:03:02.140]
Strongest along inputs allows you to create multiple trends
[00:03:05.580]
that decreases in strength away from the mesh
[00:03:07.870]
to a certain range.
[00:03:09.670]
After the set range,
[00:03:10.770]
there will be no effect from the trend.
[00:03:13.070]
In this example, I will change the range to 100
[00:03:18.430]
and leave the default strength parameter as five.
[00:03:25.070]
Leapfrog all the process, and we can visualize the outcome.
[00:03:32.170]
Using a strongest along input trend is useful in defining
[00:03:36.310]
a strong, localized geological trend
[00:03:39.770]
that essentially fades away from that point in space.
[00:03:45.060]
Let’s go back once again,
[00:03:47.750]
by double clicking our structural trend object.
[00:03:51.320]
And this time selecting blending for my trend type.
[00:03:56.440]
Blending will allow you to build a trend
[00:03:58.530]
for multiple meshes.
[00:04:02.910]
Where you can specify a range and strength for each.
[00:04:09.190]
Where trends intersect,
[00:04:10.740]
Leapfrog will workout to combine trend.
[00:04:13.770]
So this is a useful structural type
[00:04:16.360]
where two or more trends merge,
[00:04:18.850]
and you want to see a smooth transition.
[00:04:24.050]
Once you are happy with your structural trend
[00:04:27.230]
and you want to apply it,
[00:04:31.140]
then we can do so either to intrusion context surfaces
[00:04:34.720]
in the geological model,
[00:04:36.170]
as well as great shells in a numerical model.
[00:04:38.810]
In this example,
[00:04:39.960]
I’m going to apply my blended trend
[00:04:42.230]
to my mineralize intrusion surface.
[00:04:45.350]
Double click your surface under surface chronology
[00:04:49.300]
to bring up the edit dialogue.
[00:04:54.960]
Go to the surface in tab and click Additional Options
[00:04:58.040]
to enable further options for editing the surface.
[00:05:02.790]
From Trend select Structural Trend.
[00:05:08.380]
And when you click Ok, Leapfrog Geo will warn us
[00:05:11.680]
that it cannot use a linear interpolant
[00:05:13.980]
with a structural trend.
[00:05:16.140]
By clicking Ok, we are taken to the interpolant tab
[00:05:22.750]
where we can select spheroidal instead.
[00:05:28.910]
By clicking Ok, Leapfrog will regenerate
[00:05:37.620]
and we can look at the outcome.
[00:05:42.280]
We can compare our regenerated surface
[00:05:46.500]
with what we had originally,
[00:05:50.500]
and it’s looking much better than where we started.
[00:05:57.400]
Thank you very much for watching this quick video.
[00:05:59.510]
If you have any questions on this tutorial,
[00:06:01.580]
then please feel free to reach out
[00:06:03.410]
to the Seequent Support Team
[00:06:05.140]
using email [email protected].