


Objective:
The requirement of importing block models into Leapfrog Geo enables the user to visualise and interrogate block models made externally to the project. Whilst you can currently import regular block models, at the time of writing (January 2021) it is not possible to import sub-block models. This document outlines a workaround to enable the user to do this procedure.
The procedure is split into two main parts depending on whether the user has the original constraining (domain) meshes or not. The meshes are required to re-create the sub-celling along the boundaries and effectively constrain the domain values within the volume. Steps 1 to 4 assume that you have the domain meshes. If the original meshes are not available, or they are not valid in Leapfrog Geo, go to Section 5 for the method to re-create them.
The general procedure to re-creating the sub-block model:
- Import model as points.
- Create a sub-block model using the domain meshes as triggers for the sub-blocking
- Use nearest neighbour to press the imported grades onto the blocks for each domain.
Resolution:
1. Import sub-block model
- Import the sub-block model as points.
- Assuming that there are multiple domains, a Geological Model will used to recreate the Domain model that was originally used. If the meshes are available, then it is a bit more straightforward.
2. Creating the domain model
- Create new Geological Model. Select None as the base lithology as we will be creating our own coding to be used for the Lithology. Ensure that the Model Extents and resolution are appropriate and press OK.
- Double click Lithologies and add the relevant domain names.
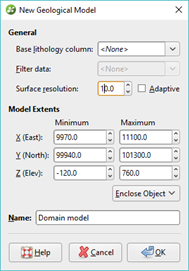
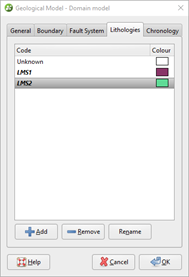
Figure 1 Setting up the Domain model
- Right click on Surface Chronology, select New Intrusion, from Surface. Select the mesh input for the domain and then select the matching Lithology for the First Lithology, leave the second lithology as unknown.
- Repeat until the domain model has been re-created.
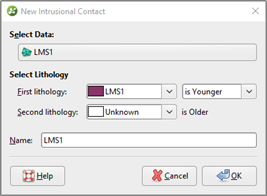
Figure 2 Use the intrusion and the domain mesh for the domain model.
3. Nearest Neighbour Interpolation
- Under the Estimation folder, create a New Domained Estimation object using the required domain from the Domain Model and the input values from the imported sub-block model.
- Under the Estimators folder create a Nearest Neighbour estimator. Ensure that the ellipsoid ranges would give adequate coverage to the original parent block size.
4. Block-model
- Create a new sub-block model ensuring that the parent block centroids and dimensions match the original model. Use the Domain Model as the sub-block trigger.
- Evaluate the Domain Model and Nearest Neighbour estimator onto the block model.
- Create a Report on the block model to check the tonnage, grade and contained material.
5. Creating the Domain Model when meshes are not available
If the meshes are not available, then they will need to be recreated in order to constrain the block model. To do this we will do a two-step process using the Distance Function under the Numeric Models.
The idea is that you create a distance buffer around the original block model points, using a distance buffer large enough so that there are no internal gaps. This will extend well beyond the actual domain boundary and will not be useful to constrain the domain in the block model. A second distance buffer is created, using the output volume from the first distance buffer, to create a surface at the same distance as the first one in the opposite direction, which will create a surface close to what the original domain boundary is.
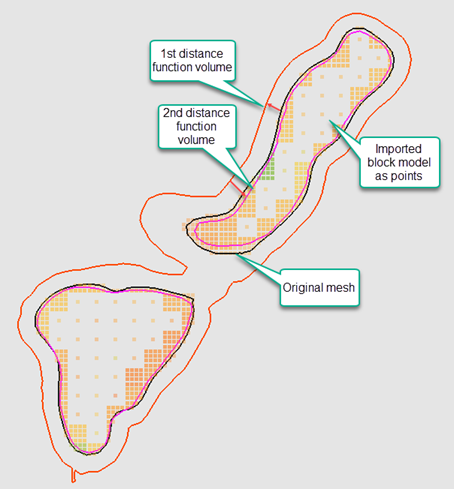
Figure 3 Summary of distance functions created
5.1. First distance function
Create the first Distance Function using the points for the domain of interest. It is an iterative process to get the correct distance, the goal is to make sure there are no internal gaps. This will be around the original parent block size but could be a metre or so less. To check for internal gaps, inspect areas of the model where the full size parent block size is intact (Figure 4). Another check would be to Extract Mesh Parts (without going completing the Extract process), and if there are negative volumes then the buffer size needs to be increased (Figure 5).
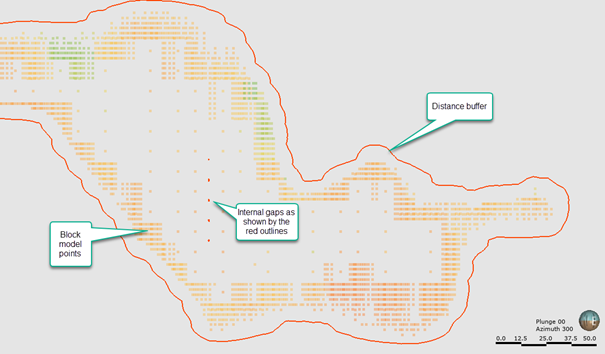
Figure 4 Checking the Distance Function for internal coverage
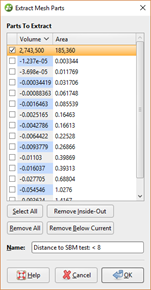
Figure 5 Using the Extract Mesh option to check for internal negative volumes
5.2. Second distance function
Create a second Distance Function, this time using the Output volume from the previous one created as the Object.
Treat closed surfaces as Surfaces rather than Volumes. This will create an outer and inner volume relative to the input object. We are interested in the inner volume, which will be the negative volume when you Extract Mesh Part. On the Buffers tab, select the same value as was used in the first distance buffer, in the example below this is 9m.
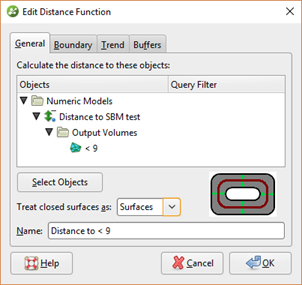
Figure 6 Create a second Distance Function using the input from the first Distance Function and change to Surfaces for how to treat the closed surfaces.
Right click on the Output volume, Extract Mesh Parts and select the largest negative volume. There may be some very small negative volumes which can be ignored. This surface should reasonably reproduce the domain boundary.
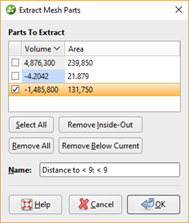
Figure 7 Select the largest negative volume when extracting the mesh parts.
The extracted mesh will be in the Meshes folder. You must invert the mesh, as this is the negative volume and the outside/inside will be the opposite way round to usual. Double click on the mesh and check the box for ‘Invert mesh orientation’.
Create the Domain Model in the same way as outlined in Section 2, instead using the newly created domain meshes as the inputs.
This surface should reasonably reproduce the original domain boundary and will not be perfect. The success will also depend on the morphology of the domain, the more convoluted and narrow it is, the more difficult it would be to reproduce the original. Overall, this method would be suitable to perform checks on the block model but it would not replicate reported tonnages and grades exactly.