


Some of the highest costs associated with geothermal exploration and development come from drilling, so it is crucial all the key decision makers can understand the risks in a common platform.
Having tools which allow multiple subsurface data types to be included in the analysis of where to drill and decision making during drilling saves time and cost.
We were excited to share with you new ways in reducing risk in decision making around these high expenditure decisions.
In particular the Directional Well Planning tool in Leapfrog Energy enables subsurface professionals to integrate geological and associated subsurface parameters (temperature, pressure, drilling, geophysics etc) during well planning. This enables testing of alternative drilling scenarios in a collaborative environment with other disciplines such as drilling engineers.
The directional well planning tool supports:
- Multiple section (kick-off) types including; Hold, Build (to a target end of section), Build to inclination, Build to length, Build and hold, Hold and drop
- Model evaluations and visualisation
- Drilling prognoses table
- Export to; Drilling plan, Interval table (csv), Points (csv)
- Import drilling plan (csv)
- Copy planned well
Duration
11 min

See more on demand videos
VideosFind out more about Seequent's energy solution
Learn moreVideo Transcript
[00:00:03.520]<v Narrator>Leapfrog Energy now supports</v>
[00:00:05.830]a new direction, or well planner that enables
[00:00:07.970]you to define a well trajectory
[00:00:10.300]consisting of multiple section types.
[00:00:13.300]These section types include a hold,
[00:00:18.874]a build to a target end of section,
[00:00:21.630]a build to a target inclination,
[00:00:24.980]a build to a target length,
[00:00:27.620]build and hold to a target end of section,
[00:00:31.030]and hold and drop to a target end of section.
[00:00:35.770]In the example shown we have a slice geological model
[00:00:38.750]and a number of existing planned wells.
[00:00:42.070]The simplest is the vertical well
[00:00:43.670]which is just a straight vertical hold to a given depth.
[00:00:48.230]The J well is an initial hole with a build
[00:00:51.370]followed by a final hold to the target end of section.
[00:00:56.800]The S-shaped well is an initial hold
[00:00:59.210]followed by a build, followed by a hold and drop.
[00:01:02.970]And we also have an example of the multi-section well
[00:01:05.520]consisting of multiple build and hold sections
[00:01:08.840]to reach a given target.
[00:01:11.080]As you can see we’ve evaluated
[00:01:13.660]the geological model on to two of the wells,
[00:01:17.140]and the numeric temperature model onto the other two wells.
[00:01:21.720]To do these evaluations select a well in the tree,
[00:01:24.440]and select the evaluations option.
[00:01:26.230]On the left-hand side you have the available models
[00:01:29.260]and on the right-hand side you can drag and drop
[00:01:31.440]these to create the list of models that will be evaluated.
[00:01:35.080]For the numeric models you need to set a sample distance,
[00:01:38.350]and then click okay for the evaluations to be made.
[00:01:47.190]If you evaluated models onto the planned wells,
[00:01:50.510]you can also get a tabular drilling prognosis.
[00:01:55.950]So, for example for the multi-section well,
[00:01:58.370]I’ve evaluated the geological model and temperature,
[00:02:01.600]so I can produce this table which shows the well name,
[00:02:04.510]the from two depths, the name of the geological unit
[00:02:09.200]and the value for temperature.
[00:02:12.090]These can be selected, cut, and paste,
[00:02:14.960]and copied to go into a external document.
[00:02:21.600]The planned wells can also be exported
[00:02:23.530]in a number of different formats.
[00:02:25.790]They can be exported as interval tables
[00:02:27.920]which will produce a color file, a survey file,
[00:02:32.200]and one valuation CSV file for each of the models evaluated.
[00:02:37.240]They can also be exported as points
[00:02:39.300]which will create a CSV file, and you have to specify
[00:02:43.320]a sample rate for exporting to points.
[00:02:47.390]And finally, they can be exported as a drilling plan
[00:02:49.970]which is a CSB file with a hitter attached,
[00:02:53.600]defining the name of the well and the top location.
[00:02:59.950]A planned well can also be imported from an external file
[00:03:04.010]that is in that drilling plan format,
[00:03:06.800]and I’ll show you an example later.
[00:03:11.090]A well can also be copied and edited,
[00:03:16.060]so we can take a copy of this multi-section well
[00:03:22.780]that would produce this well here
[00:03:28.930]which we are going to edit,
[00:03:32.110]and we could just change the location of that,
[00:03:34.930]bring it across to somewhere over here,
[00:03:37.510]project onto the typography,
[00:03:41.280]and if we’re happy with that click okay to save it.
[00:03:46.000]This is one that I prepared earlier,
[00:03:48.550]so you can see where I’ve taken this same shape
[00:03:51.530]of the original multi-section well and translated it
[00:03:55.464]to a new topographical location and then saved it.
[00:04:04.620]I’ll now show you an example of interactively planning,
[00:04:08.960]a well trajectory, and what we will do as a relatively
[00:04:12.320]simple S-shaped well over in this part of the reservoir.
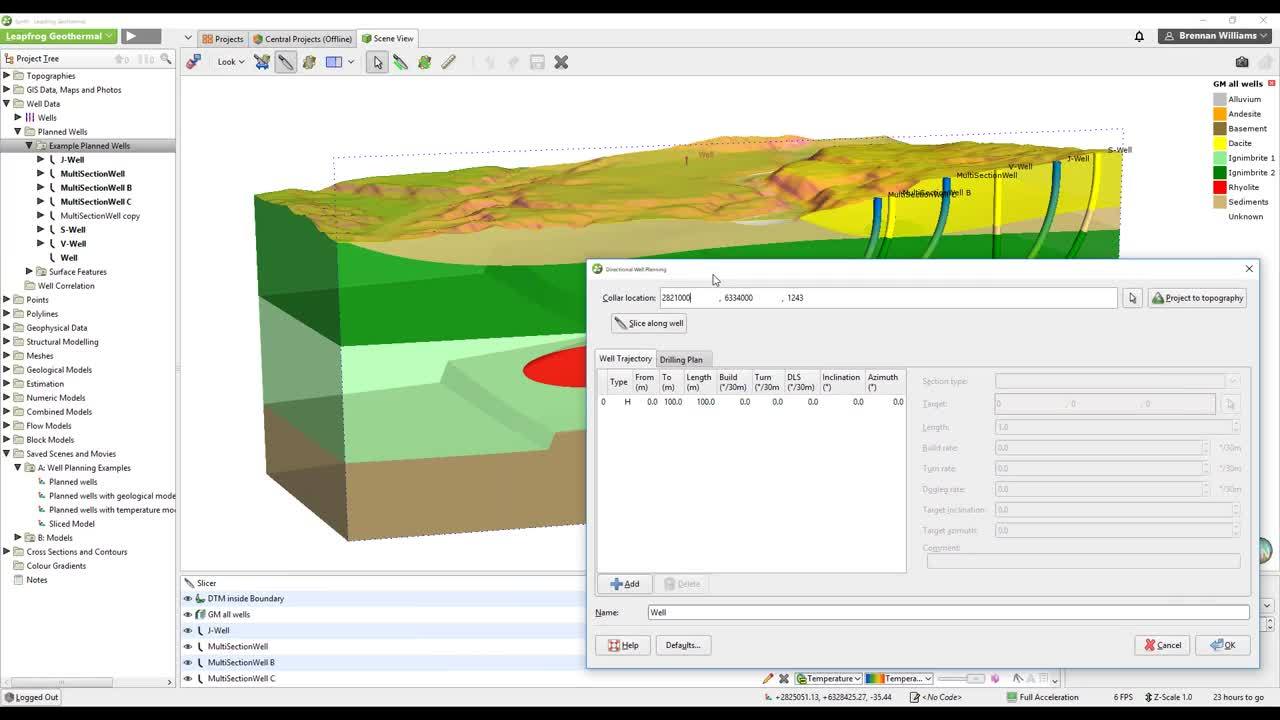
[00:04:18.530]Right click and select plan direction well,
[00:04:21.290]this brings up the direction of well plan in dialogue.
[00:04:24.900]The first thing you need
[00:04:25.733]to do is to find the collar location.
[00:04:27.910]You might find it useful to display
[00:04:31.360]the topographical surface and to select face step,
[00:04:37.370]and you might also find it useful to use a color range
[00:04:41.390]whereby you can set a tolerance
[00:04:44.240]in this example of five degrees,
[00:04:46.710]so everything colored green has got a dip
[00:04:50.000]of less than five degrees, and so it’s relatively flat
[00:04:53.043]for a top location for the well.
[00:04:58.110]So, let’s say I will project over here
[00:05:04.100]and that’s my start point,
[00:05:05.660]I have an initial hold of a hundred meters.
[00:05:08.510]Lets increase this down to 200 meters.
[00:05:12.813]We now going to add the build section,
[00:05:16.100]so on the right-hand side here in my six
[00:05:18.210]available section types, I’ve started with a hold,
[00:05:22.190]now I want to build and I’m going to build to target,
[00:05:25.960]I click on the arrow here, come back into the scene
[00:05:29.570]and go right I’m going to build to the target here.
[00:05:36.020]This calculates my required build and turn rate
[00:05:39.300]as I’m working in a plane, my turn rate is zero.
[00:05:45.600]Now, I want to add an additional hold
[00:05:48.650]and then drop in order to create my S shape.
[00:05:52.730]Again, hold and drop is to a target end of section
[00:05:56.850]which you specify in the scene,
[00:05:58.930]so I’m going to hold and then I’m going to drop down to here.
[00:06:05.030]You notice that I’ve got to calculate a dogleg right,
[00:06:07.580]that I can increase or decrease,
[00:06:10.150]so as I increase that it will shorten the drop section
[00:06:17.610]which is effectively a build with a negative build rate,
[00:06:21.110]and it will increase the hold section.
[00:06:23.690]Once I’m happy with the trajectory of my well,
[00:06:27.000]I can check my drilling plan which would be exported
[00:06:30.210]out to the drilling plan CSB far.
[00:06:33.000]This has got columns for measured depth down the trajectory,
[00:06:36.520]the inclination hasn’t met the TBD SS
[00:06:40.640]north, south, east, west offsets the absolute offset
[00:06:43.770]my build and turn rate, my dog licks off severity rate,
[00:06:47.120]and my absolute North, East and elevation
[00:06:49.800]for the points down the sections.
[00:06:53.120]If I’m happy with that lets give it a well name,
[00:06:58.401]call it S well two then click okay to save it.
[00:07:05.597]You’ll notice that unlike the other wells,
[00:07:08.010]all I have is the trajectory,
[00:07:12.030]I don’t have no models evaluated on it as yet.
[00:07:17.160]So, let’s right click on it, select valuations.
[00:07:21.920]We’ll do the geological model,
[00:07:25.030]resistivity model and the temperature model,
[00:07:27.810]and probably a sample rate of two meters
[00:07:30.710]is a little bit too low, so let’s make it 25 and click okay.
[00:07:39.610]We’re now evaluating down the trajectory
[00:07:42.960]those three models, temperature,
[00:07:45.510]geological model, and resistivity.
[00:07:51.090]Now, that that’s finished we can come back in seamless,
[00:07:54.960]and we can say let’s look at the temperature.
[00:08:02.090]You’ve got various controls over whether your well label
[00:08:08.910]is at the top, or the bottom of the trajectory,
[00:08:12.000]and also display options such as how thick
[00:08:18.770]your lines or slow in design.
[00:08:22.460]And if we’re happy with that we can now export it,
[00:08:25.020]let’s export it out to a drilling plan.
[00:08:32.440]So, if we want to see an example
[00:08:33.660]of the drilling plan here we have one here,
[00:08:36.880]so it’s effectively a CSV file with the tables
[00:08:40.720]being the same as in the drilling plan
[00:08:43.780]when we were defining it interactively,
[00:08:46.040]but there is a header above it
[00:08:47.840]which gives you the name of the well,
[00:08:50.310]the name of the person that created it,
[00:08:52.180]the software used, the date of creation,
[00:08:55.060]the top location, the kickoff depth,
[00:08:58.590]the units that we’re using in terms
[00:09:00.340]of our build and turn rates per 30 degrees per 30 meters,
[00:09:05.160]total measured depth, total vertical depth,
[00:09:08.070]and the absolute horizontal offset.
[00:09:12.030]We can actually import the snap,
[00:09:17.530]so import directional drilling plan select it
[00:09:23.070]this will now create a new well here
[00:09:28.180]multi-section well two, creates the wealth trajectory
[00:09:31.820]and the drilling plan and we can see that in the same here.
[00:09:37.440]And we may feel that that has gone too far down the bottom,
[00:09:40.810]so let’s take that final build two to length
[00:09:47.230]and bring it back from 1,072 to 500,
[00:09:52.930]so that just brings it back up a little bit.
[00:09:55.740]We’re happy with that, we’ll select okay.
[00:10:00.400]And then again, because we’ve imported that
[00:10:02.530]we don’t currently have any new evaluations on it.
[00:10:05.930]So, we’ll select the geological model
[00:10:09.440]and select the temperature model,
[00:10:12.100]and again, let’s choose a different sample great 40,
[00:10:16.885](soft music)
[00:10:27.660]and then select temperature.
[00:10:33.490]So, that’s a brief example
[00:10:34.940]of the new directional well planning.
[00:10:40.010]If you’d like more information,
[00:10:41.460]please contact [email protected]@seequent.com