Good core photographs produce an excellent record of the drill core, which is valuable for cross-referencing logged data. Auto mode on a camera produces decent core tray images when the surrounding light conditions can’t be controlled. However, phenomenal core imagery is actually very easy to capture by stepping outside of Auto with a controlled lighting set up. This article goes over the basic manual camera settings to control exposure in order to capture better core images. Follow Imago on LinkedIn to make sure you don’t miss out on the next article on our series on Capturing Better Drill Core Images.
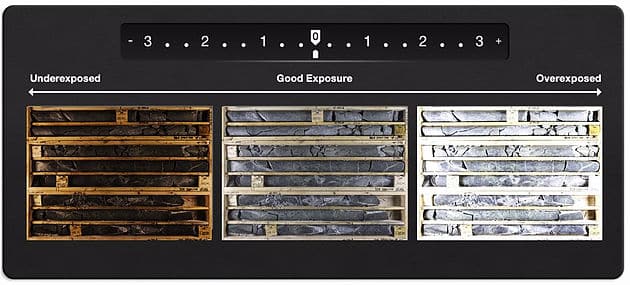
Exposure is the amount of light a digital camera’s sensor captures when a photo is taken. Too much light results in a washed out photo. Too little light and the photo will be too dark.
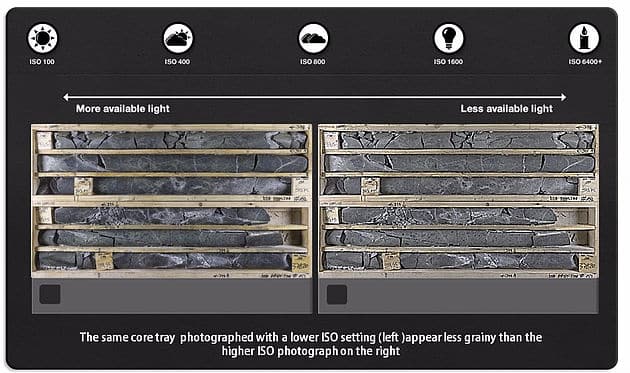
ISO – controls the sensitivity of the camera’s light sensor. High ISO will cause graininess so as a rule use the lowest ISO possible.
Shutter Speed – the length of time the shutter remains open controls how much light is exposed to the image sensor. This is the main variable to control exposure without sacrificing image quality in a controlled lighting environment. You should try to get to a high shutter speed.
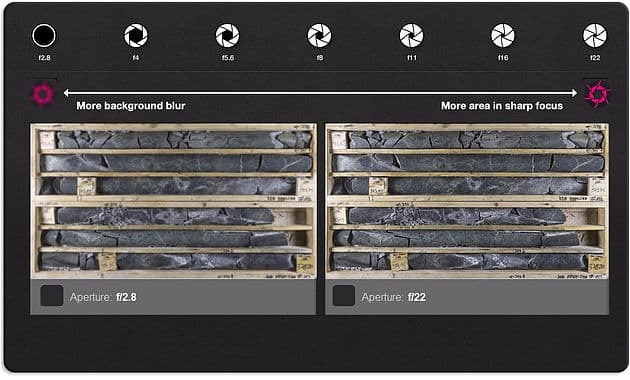
Aperture – the opening of a lens’s diaphragm through which light passes. It is ideal to use the smallest aperture setting (largest f/stop) in order to have all parts of the core in focus despite its cylindrical shape resulting in the middle of the core being closer to the camera than the edge. Since a small aperture results in less light reaching the camera’s sensor, good exposure will require a slower shutter speed.
Check your camera’s manual to learn how to set it for aperture priority. Use the highest f/stop setting (smallest aperture) and the lowest ISO, and the camera should automatically figure out the appropriate shutter speed to give you a good exposure. If your camera doesn’t have an aperture priority setting, you can experiment with various shutter speeds in order to achieve a good result.
General Guidelines
Feel free to print of this guide, laminate it, and put it somewhere visible in your workspace for every new employee to follow to get the best results and extract the most meaningful data from your images.
Step 1 – Zoom lens set it so the FOV to cover the perimeter of the box
Step 2 – Ensure your lens is set to ‘AF’ or Auto Focus
Step 3 – Exposure Compensation set to +1EV
Step 4 – ISO set to 100
Step 5 – White Balance set to Auto
Step 6 – Aperture setting set to F5.6
Step 7 – Aperture Priority Exposure Mode
Note: These settings are optimal for a dark colored rock. If the core sample is dry or light color our recommendation would be to reduce the exposure compensation to 0EV…but have a play and have fun!
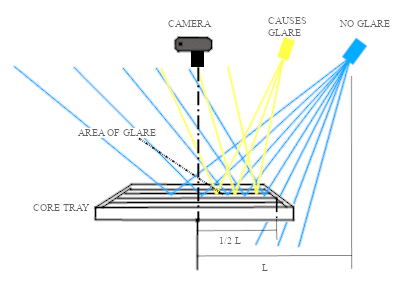
Glare
The angle and distance of your light can have a big impact on the quality of your images. Glare happens when light from a light source reflects off of a surface and into the camera lens resulting in intense bright spots. The best way to: 1. Polarize the light and use a polarizing filter on the lens, 2. Diffuse the light and position it at the right angle and distance. Light can be diffuse using many various methods such as bouncing the light against a surface before it reaches the wet core or passing it through a diffuser.
Establishing strong core photography procedures will ensure that photographs faithfully depict color and texture for any subsequent image analysis. Make sure you check our website to learn about how our cutting edge software can help you extract insights from your core, automatically catalog your core imagery, and connect imagery to all aspects of your workflow – whether you’re logging, targeting, or modeling!