


This webinar highlights the new features in August’s release of Seequent Central.
Discover even more ways to easily communicate and collaborate with your project team including:
- New scenes capability, making it easier than ever for you to engage with key stakeholders and keep them up to date with the latest developments in your projects.
- Web visualization improvements, enabling you to view your project in 3D, right in the web browser.
- Connect with GeoStudio, allowing multi-disciplinary modelling across your organization by connecting your geological model updates with geotechnical analysis.
- And much more.
Overview
Speakers
Stephanie Vanos
Project Geologist and Data Management Specialist – Seequent
Duration
19 min

See more on demand videos
VideosFind out more about Seequent Central
Learn moreVideo Transcript
[00:00:01.330]
<v Stephanie>Hello and welcome to today’s webinar.</v>
[00:00:04.030]
My name is Stephanie Vanos
[00:00:05.540]
and I’m Seequent North America’s Data Management Specialist.
[00:00:09.040]
I’ll be your host in today’s featured demonstration
[00:00:11.560]
of our latest Central release.
[00:00:14.500]
Before we launch into the presentation,
[00:00:17.030]
our Seequent is now part of Bentley systems.
[00:00:19.440]
And as a public company,
[00:00:21.120]
I need to briefly share the statement of confidentiality
[00:00:24.150]
and disclaimer and ask that the audience
[00:00:26.860]
please respect the intentions it expresses.
[00:00:31.020]
The software products that will be shown today
[00:00:33.330]
are the latest versions of Central August 2021
[00:00:36.650]
and GeoStudio 2021.
[00:00:39.400]
Despite the webinar’s technical connotation,
[00:00:41.910]
the presentation is designed for all Central users
[00:00:44.870]
from the technical and non-technical domains.
[00:00:48.240]
During the webinar, the audience is muted
[00:00:50.570]
to ensure that the presentation doesn’t run over time,
[00:00:53.590]
but should you have any questions,
[00:00:55.700]
please don’t hesitate to write into the question window
[00:00:58.590]
and go to meeting.
[00:01:00.170]
We will make sure that a personalized reply
[00:01:02.470]
will be sent to you via email in due time.
[00:01:05.920]
After the webinar, we would like to ask you to remain
[00:01:08.810]
for one to two minutes longer to partake in a short survey
[00:01:12.080]
that will help us understand your needs
[00:01:14.370]
and learn how we can improve our offering.
[00:01:17.510]
And as always, if you wish to maintain
[00:01:20.010]
or share a recording of this webinar,
[00:01:22.240]
a link to the video will be sent to you shortly
[00:01:24.700]
after the presentation.
[00:01:26.880]
Okay, so let’s get started.
[00:01:29.530]
This Central release is filled
[00:01:31.200]
with a multitude of new features
[00:01:32.830]
that aim to optimize your daily modeling workflow
[00:01:35.700]
and meet your data management needs.
[00:01:37.970]
And we will show most of these
[00:01:39.270]
in the live demonstration portion,
[00:01:41.450]
but there are three main components
[00:01:43.100]
that I’d like to highlight
[00:01:44.260]
which truly enhance your ability to work
[00:01:46.520]
as a connected team of Geo Sciences experts.
[00:01:50.590]
The first refers to the addition of 3D scenes to the portal,
[00:01:54.140]
which will allow you to capture essential moments
[00:01:56.660]
in your project history that make it easy to engage
[00:01:59.700]
with your colleagues more strongly
[00:02:01.340]
and build a compelling story of what’s next.
[00:02:04.720]
The second refers to a new set of reviewing tools
[00:02:07.620]
in the 3D web browser that allow
[00:02:09.470]
for even greater granularity
[00:02:11.220]
and more effective stakeholder collaboration.
[00:02:14.110]
And the third feature brings
[00:02:15.330]
yet another geoscientific discipline to the table.
[00:02:18.620]
For the first time, we can invite geo-technical experts
[00:02:21.750]
to collaborate through a direct connection with GeoStudio.
[00:02:26.810]
Let’s start by looking at the addition of 3D scenes
[00:02:29.730]
into your portal environment.
[00:02:33.250]
Modeling projects can be or become quite complex,
[00:02:36.340]
especially as time goes on.
[00:02:38.070]
And for non-technical users
[00:02:39.760]
or those less familiar with the project,
[00:02:42.010]
it could be difficult in Central to figure out
[00:02:44.270]
what they were supposed to focus on.
[00:02:46.490]
There was no way for users to easily navigate
[00:02:48.950]
to the important points of interest in a project.
[00:02:51.630]
Comments helped, but they are tied to specific branches
[00:02:54.630]
and revisions and don’t persist
[00:02:56.300]
as the project evolves over time.
[00:02:58.327]
The scene axis of 3D bookmark allow you
[00:03:00.920]
to easily navigate back to the same view of the data in 3D.
[00:03:05.270]
Scenes also allow your team and stakeholders
[00:03:07.720]
to rapidly navigate to the point of interest.
[00:03:10.800]
Scenes in Central exists at the project level,
[00:03:13.380]
which means that they never get lost
[00:03:14.980]
in the history of your project.
[00:03:16.880]
They can also be easily opened
[00:03:18.680]
on the latest version of the model.
[00:03:22.200]
Next, we’ll look at a new set of reviewing tools
[00:03:25.070]
in the 3D web browser that allow
[00:03:27.040]
for even greater granularity
[00:03:28.830]
and more effective stakeholder collaboration.
[00:03:33.090]
Engaging and collaborating with a wide audience
[00:03:35.510]
is challenging.
[00:03:36.600]
And the requirements of using desktop software add to this.
[00:03:40.230]
With organizations consisting of multi-disciplinary teams,
[00:03:44.050]
one of the best ways to enable collaboration
[00:03:46.290]
with key stakeholders is around a visual representation
[00:03:49.490]
of an asset.
[00:03:51.070]
Over the last few months,
[00:03:52.430]
we have introduced a huge amount of functionality
[00:03:54.810]
within the Central portal to enable you
[00:03:56.780]
to visualize your project in even greater depth in 3D
[00:04:00.050]
right in your web browser.
[00:04:02.250]
Easily navigate through time
[00:04:03.900]
and step through older versions of your project
[00:04:06.070]
to understand changes.
[00:04:07.810]
Truly collaborate with your peers
[00:04:09.510]
utilizing the latest features our cloud technology offers
[00:04:12.830]
without the need for a full software license.
[00:04:17.620]
The third release highlight and major milestone
[00:04:20.010]
for Seequent Central is the integration with GeoStudio.
[00:04:24.960]
This integration brings yet another geoscientific discipline
[00:04:28.310]
to the table.
[00:04:29.610]
For the first time, we can invite geo-technical experts
[00:04:32.760]
to join the team through a direct connection
[00:04:35.230]
with GeoStudio.
[00:04:37.350]
This is our first step or phase in the interoperability
[00:04:40.400]
of Leapfrog, Central, and GeoStudio
[00:04:42.960]
enabling 3D meshes created in Leapfrog
[00:04:45.510]
to be published to Central and then imported into GeoStudio.
[00:04:49.800]
Directly connect to a central geological model
[00:04:52.280]
to import mesh-based topographic or context surfaces
[00:04:55.570]
into build 3D to use as background geometry
[00:04:58.810]
or for parametric surface fitting.
[00:05:01.220]
Import your mesh directly into Central
[00:05:03.320]
from Build 3D and using GeoStudio.
[00:05:07.190]
For the first time,
[00:05:08.440]
geo-technical engineers can be fully immersed
[00:05:10.910]
and interactively engaged in the modeling process
[00:05:13.620]
of the physical site and introduce essential 3D surfaces
[00:05:17.460]
directly from Central as soon as change occurs.
[00:05:20.800]
This allows them to pursue an agile geo-technical analysis
[00:05:24.450]
throughout the life cycle of an asset.
[00:05:28.480]
Now, I’ll move over into the active demonstration
[00:05:31.410]
and give you a little bit more insight
[00:05:33.010]
into just what these new features can do.
[00:05:38.100]
So here we are in our Central portal
[00:05:40.240]
and I’ve already opened the relevant project.
[00:05:42.790]
Let’s say I have a new member joining my team
[00:05:45.370]
or maybe an auditor request some insight,
[00:05:47.640]
or there’s a C-level executive that needs an update
[00:05:50.250]
for budget purposes.
[00:05:52.210]
In the past, sharing this information
[00:05:54.190]
would probably have required me to portray the history
[00:05:56.570]
of the project and the main decision making process
[00:05:59.440]
through both 2D and 3D means.
[00:06:01.960]
Most likely, a PowerPoint with some screenshots in it
[00:06:04.930]
and opening up Leapfrog Geo to spin the model around.
[00:06:08.890]
Central already helps dramatically
[00:06:10.790]
through structured publishing events,
[00:06:12.980]
establishing version control,
[00:06:14.630]
and correlated notes and comments.
[00:06:17.150]
I can add my new team member to the portal
[00:06:19.290]
and they can easily see the history of the project
[00:06:21.610]
and what decisions were made
[00:06:22.900]
that has influenced the model so far.
[00:06:26.650]
Sometimes, major milestones can be buried
[00:06:29.270]
in the comment section, making them hard to find.
[00:06:32.320]
To address this, we can now add scenes.
[00:06:35.250]
Some can be pinned to highlight their importance
[00:06:37.500]
and set on top of the list and others can be used
[00:06:40.400]
for current conversation or exchange.
[00:06:43.410]
Anyone with access to the project can easily navigate
[00:06:46.210]
to the most important parts, engage as a project team,
[00:06:49.430]
and ensure that they are looking at the correct aspects
[00:06:51.770]
of the project.
[00:06:54.000]
If I click on a scene,
[00:06:55.380]
it opens the scene properties window
[00:06:57.380]
where I can see information about the scene
[00:06:59.900]
and choose to open it in the original revision
[00:07:02.070]
it was created in or in the latest revision.
[00:07:05.780]
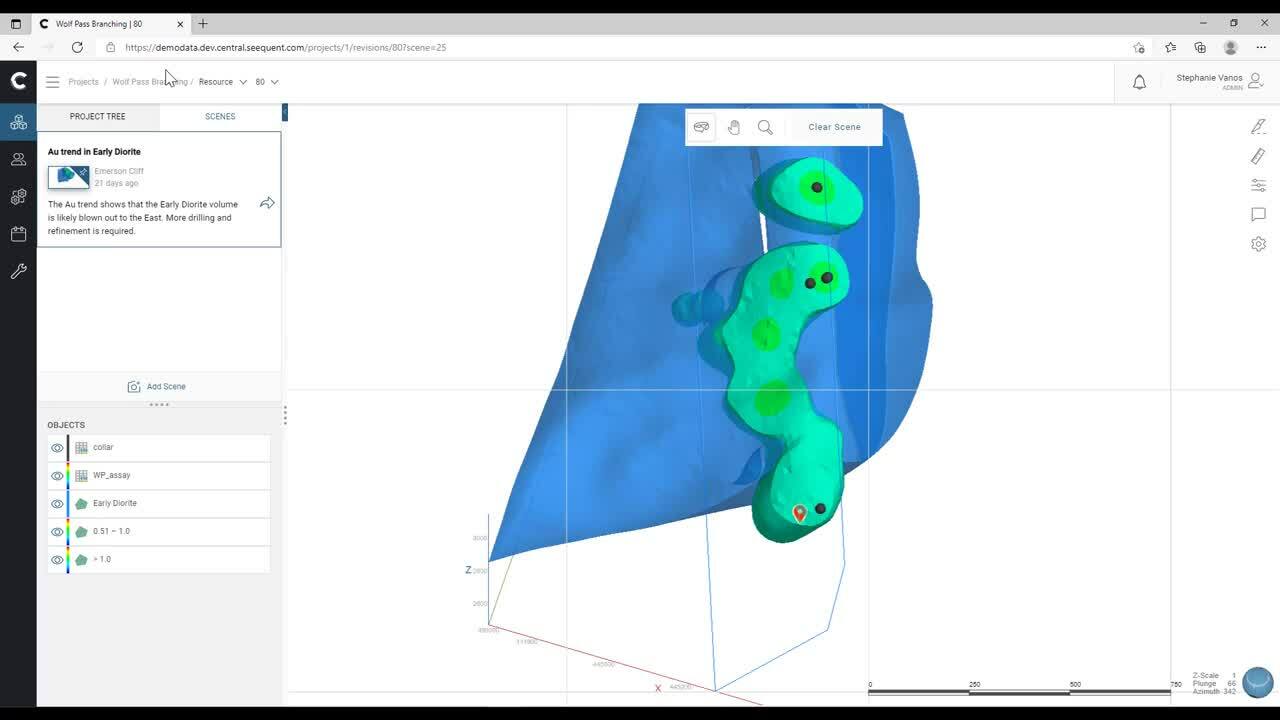
Let’s start off by opening the original revision.
[00:07:09.480]
Clicking on this takes me right to the scene view
[00:07:11.770]
that was saved, showing everything
[00:07:13.670]
that was originally loaded on a Geo tag
[00:07:16.010]
of the area of interest.
[00:07:17.970]
The scene was created for two reasons.
[00:07:20.280]
The first being to show off the gold trend
[00:07:22.620]
from the drilling, and the second to indicate
[00:07:25.450]
that it looks like the early diorite shape,
[00:07:27.950]
which is the lithology the gold distribution is linked to,
[00:07:31.200]
is being blown out to the east and needs to be refined.
[00:07:35.530]
In addition to scenes,
[00:07:37.020]
we can now easily navigate our project history
[00:07:39.520]
from within the web visualization.
[00:07:42.290]
If we click on this arrow up here,
[00:07:44.090]
we can then switch to the latest revision.
[00:07:46.970]
I now have the same view of the data,
[00:07:49.240]
but I can see how the addition of new drilling
[00:07:51.050]
has changed the shape of the gold trend.
[00:07:55.320]
The comment about the shape of the diorite
[00:07:57.320]
has been taken by a colleague over to the lithology branch,
[00:08:00.720]
where the shape has been refined based on the findings
[00:08:03.210]
of the resource model.
[00:08:07.890]
We can move between the previous revision
[00:08:09.900]
and the latest one,
[00:08:11.100]
just to see how much the shape has changed.
[00:08:19.100]
Now, let’s say I’ve been tasked
[00:08:20.810]
with planning drill holes for the Dacite dike.
[00:08:23.870]
This is something we’ll probably go back to a few times
[00:08:27.160]
or need to share with a colleague or superior.
[00:08:29.950]
So let’s create a scene of my lung section
[00:08:32.470]
showing my drill hole pierce points.
[00:08:35.290]
I’ll create a slice, set the width
[00:08:39.720]
and go into my Scenes tab where I can add the scene.
[00:08:45.090]
I’ll give it a title,
[00:08:51.490]
a brief description,
[00:09:05.970]
and maybe a Geo tag of where I want to drill first.
[00:09:10.900]
Then I click on Add,
[00:09:12.610]
and now it’s saved a new lithology branch
[00:09:14.770]
and I can go back to it whenever I want to.
[00:09:18.630]
Now that my scene is saved,
[00:09:20.260]
I can go to the previous revision
[00:09:22.090]
and see how the drilling that I’ve done
[00:09:24.010]
has changed the shape between the last revision and now.
[00:09:27.820]
In the future, when there’s another revision,
[00:09:30.360]
I can see how the shape continues to evolve
[00:09:32.510]
with the drilling that we’ll be doing.
[00:09:37.450]
If I want to make sure my scene doesn’t get lost,
[00:09:40.240]
I can click on the ellipses and pin it to the main bar.
[00:09:45.040]
Now if I go to the project overview,
[00:09:47.230]
my scene is front and center
[00:09:48.770]
and I can easily open it to get back to it.
[00:09:54.050]
It’s very easy to maintain a clean environment
[00:09:56.780]
by editing, unpinning, or deleting scenes
[00:10:00.390]
you no longer need.
[00:10:03.810]
I can also share my scene with other Central users
[00:10:06.630]
by clicking on the arrow and inviting them to collaborate
[00:10:09.520]
through their email address.
[00:10:11.630]
This notifies them of the scene
[00:10:13.810]
and sends them right to it from an email
[00:10:16.090]
or the notifications pane.
[00:10:23.890]
Now we’ll take a closer look at more of the new features
[00:10:26.670]
included in the web visualization.
[00:10:29.960]
Let’s say I made a mistake when naming my branch
[00:10:33.070]
or one of my team members gave a branch a name
[00:10:35.810]
that was a bit odd.
[00:10:39.500]
Now, finally, it can be renamed.
[00:10:42.920]
This has been one of our most requested features,
[00:10:45.240]
and we’re happy to bring it to you.
[00:10:47.890]
Opening the revision, I can now multi-select objects
[00:10:51.400]
and drag and drop them into the scene,
[00:10:53.680]
making it faster to look at my data.
[00:11:00.950]
I can cut a slice through my scene
[00:11:03.250]
and have individual objects be sliced from the scene
[00:11:06.040]
or unsliced allowing me a greater variety of ways
[00:11:09.090]
to look at my data.
[00:11:20.250]
Uh-oh!
[00:11:21.130]
Now I’ve lost my solving space.
[00:11:22.930]
I hate it when this happens.
[00:11:24.982]
Ah, but that’s okay,
[00:11:27.110]
because now I have the option to click on the ellipse
[00:11:30.330]
and zoom to view, which will bring me right back
[00:11:32.890]
to where I need to be.
[00:11:36.010]
Let’s have a closer look at these drill holes.
[00:11:38.990]
I’d like to look at the gold
[00:11:40.220]
so we’ll turn on the gold color map,
[00:11:42.220]
but I also have copper values.
[00:11:44.850]
Previously, I would have to look at them separately,
[00:11:48.070]
but now I can scale my radius by a different legend.
[00:11:51.820]
Let’s see how the gold and copper values compare.
[00:11:58.500]
I can also click on each individual disk
[00:12:01.410]
and see the values of my data.
[00:12:13.550]
I can measure distances in 3D.
[00:12:22.530]
It looks like this drill hole spacing is pretty broad,
[00:12:24.730]
so we might need to add another hole between these.
[00:12:29.460]
We also have the ability to adjust the add settings
[00:12:32.570]
by exaggerating the z-axis scale,
[00:12:35.560]
changing the camera angle,
[00:12:37.370]
and choosing whether we want to see the screen grid,
[00:12:40.520]
access lines, scale bar, and compass ball.
[00:12:45.280]
This new functionality allows me to navigate
[00:12:47.720]
to the project much easier,
[00:12:49.540]
see all the data that’s relevant
[00:12:51.470]
and removes the need for me or other team members
[00:12:54.100]
to have access to desktop software
[00:12:56.430]
when not actively updating the model.
[00:13:00.530]
For projects which have a lot of activity,
[00:13:03.110]
being notified every time there is an event
[00:13:05.230]
can be a bit annoying.
[00:13:07.080]
In this new release,
[00:13:08.480]
notifications emails are sent in batches
[00:13:11.040]
every 30 minutes based on the events that occur.
[00:13:14.570]
This reduces the noise for customers
[00:13:16.650]
who are active in Central
[00:13:18.330]
and provides a more effective report structure
[00:13:20.440]
for supervising team members.
[00:13:31.460]
For the third release highlight,
[00:13:33.180]
let’s pretend that I’m a geo-technical engineer
[00:13:35.680]
and I’ve been invited to Central to familiarize myself
[00:13:38.580]
with the project that I will be collaborating on.
[00:13:41.730]
I can use this handy pin scene to quickly open the project
[00:13:45.520]
and the relevant data in the web visualization
[00:13:48.280]
and familiarize myself with the content of the project.
[00:13:52.130]
I can see here that there are three relevant surfaces
[00:13:54.770]
that I will need to do my analysis.
[00:13:57.850]
And I can click on them
[00:13:58.960]
and find their names here in the bottom corner.
[00:14:14.420]
Moving over into GeoStudio Build 3D,
[00:14:17.910]
I have already imported a background mesh
[00:14:20.210]
for the topography of the site.
[00:14:22.830]
Let’s just give that a spin
[00:14:24.040]
and make sure everything looks okay.
[00:14:26.870]
Now to bring in the needed meshes from Central,
[00:14:29.560]
I’ll navigate to Import
[00:14:31.100]
and choose Import Background from Central.
[00:14:35.460]
In this window, I select the Central server,
[00:14:40.570]
then the project name,
[00:14:44.630]
the branch,
[00:14:47.020]
the ID or in this case, we’ll use the latest revision
[00:14:51.110]
and finally the geological model.
[00:14:55.370]
After hitting OK,
[00:14:57.550]
I’ll navigate into the import background window
[00:15:00.630]
and change some of the key settings
[00:15:02.640]
to create these background meshes.
[00:15:07.680]
First off, notice I can select which background meshes
[00:15:11.450]
I want to include from the geological model.
[00:15:16.150]
Further down, we have the transformation section
[00:15:19.120]
of the dialog box.
[00:15:21.010]
Notice once the import is complete
[00:15:23.690]
that the background meshes are not oriented
[00:15:25.890]
with the surface topography.
[00:15:28.360]
From the dropdown, I can select to save transformation,
[00:15:32.010]
which automatically remaps the meshes
[00:15:34.200]
from Leapfrog coordinates to GeoStudio coordinates.
[00:15:37.700]
This moves the base point,
[00:15:38.950]
such that the background meshes are located closer
[00:15:41.710]
to the 0, 0, 0 axes.
[00:15:44.890]
And just like that, I’ve downloaded my meshes from Central
[00:15:47.950]
and I’m ready to use them in GeoStudio.
[00:15:52.480]
To connect with the Central August 2021 release,
[00:15:55.450]
you will need to ensure you are using these versions
[00:15:57.690]
of our desktop solutions.
[00:16:02.600]
In summary, this release of Central
[00:16:04.700]
is probably one of the most significant for Seequent,
[00:16:07.700]
with huge amounts of development time
[00:16:09.390]
and company resources committed to delivering
[00:16:12.060]
the best products and solutions we can
[00:16:14.200]
based on your needs, ideas and suggestions.
[00:16:18.010]
All features, whether they be the creation of scenes,
[00:16:21.500]
improvement of web visualization tools,
[00:16:23.940]
or our phase one integration with GeoStudio
[00:16:27.270]
are all aimed to connect you
[00:16:28.837]
and your multidisciplinary network more strongly,
[00:16:32.010]
visually engage your audience,
[00:16:34.180]
and allow everyone to create a real time,
[00:16:36.570]
subsurface digital twin.
[00:16:40.130]
Before we end our release webinar today,
[00:16:42.820]
we would love to provide you with a sneak peek
[00:16:44.950]
of what other great Central features await you in 2021.
[00:16:50.870]
One of our main objectives
[00:16:52.400]
is to forward our continued software integration,
[00:16:55.340]
not just with GeoStudio but also with Oasis montaj,
[00:16:59.290]
to be able to share even more objects,
[00:17:01.650]
both in the 2D and 3D world as well as taking advantage
[00:17:05.610]
of the model management capabilities of Central.
[00:17:09.370]
Being able to cast an even wider net
[00:17:11.530]
to all stakeholders involved in the project
[00:17:13.790]
is a key component for effective collaboration.
[00:17:17.050]
As such, we will provide the ability
[00:17:19.310]
to share 3D scenes through public sharing
[00:17:21.710]
and embedding capabilities.
[00:17:23.660]
No sign in required, just send the link.
[00:17:26.690]
And finally, it is the little things
[00:17:29.160]
that make such a huge difference to our daily modeling
[00:17:31.700]
and data management routine.
[00:17:33.990]
As such, we are working hard on adding estimation objects
[00:17:38.090]
to support mining customers and partners,
[00:17:40.860]
surface metadata to support our civil customers,
[00:17:44.940]
section line work, both for GeoStudio
[00:17:47.540]
and civil customers and published linked geological models,
[00:17:51.650]
which closes off key feedback
[00:17:53.410]
from the Central 4.0 release.
[00:17:56.450]
As always, you the customer,
[00:17:58.910]
are key in the development of our products,
[00:18:01.130]
and we invite you to continue to share your ideas
[00:18:03.690]
and suggestions .
[00:18:06.040]
Together, we can create a product
[00:18:08.440]
that not only fits your needs today,
[00:18:10.850]
but also anticipates the demands of tomorrow.
[00:18:14.870]
And on that note, I’d like to remind
[00:18:17.140]
and encourage everyone to attend Lyceum 2021.
[00:18:20.900]
For more information and to register,
[00:18:23.560]
head over to seequent.com.
[00:18:28.040]
Thank you so much for attending today.
[00:18:30.820]
I hope this webinar held some valuable information for you.
[00:18:34.390]
And as always, should you have any questions,
[00:18:37.590]
please don’t hesitate to reach out
[00:18:39.530]
and get in touch with us
[00:18:40.820]
through our regional representatives.
[00:18:43.470]
If you have a few minutes to spare,
[00:18:45.540]
I would also like to invite you to a brief survey
[00:18:48.060]
at the end of this presentation
[00:18:50.040]
that will help in identifying what’s important to you
[00:18:53.060]
and what we can do better next time.
[00:18:56.710]
Thanks again and have a wonderful rest of your day.