


This webinar will take you through the best practice workflow for modelling interbedded geology in Leapfrog Works.
Please note: The objective of this webinar is to focus on the tools in Leapfrog Works and give you some helpful workflow ideas and tips & tricks to elevate your modelling skills. The material covered in this webinar is meant to be high-level using simplified datasets.
In this webinar we will cover:
- Explanation of the interval selection tool to model interbedded geology
- How to interval borehole data in preparation for modelling
- Building an interbedded geology model
Duration
40 min
See more on demand videos
VideosFind out more about Leapfrog Works
Learn moreVideo Transcript
[00:00:01.640]<v Instructor>Hi there everyone,</v>
[00:00:02.520]thanks for joining us today.
[00:00:04.800]Today we’re going to go through the Best Practice
[00:00:07.580]for Building a Geological Model in Leapfrog Works.
[00:00:13.690]So the agenda for today,
[00:00:15.380]so we’re going to start with visualizing
[00:00:18.010]and analyzing your data in Leapfrog Works.
[00:00:22.040]We’re then going to look at choosing the right surface types
[00:00:25.020]for your geological model.
[00:00:26.800]So we’re going to go through the four core surface types
[00:00:30.450]in Leapfrog Works.
[00:00:31.880]These are deposits, erosions, intrusions, and veins.
[00:00:37.310]And then after that, we’re going to go through
[00:00:39.810]building a geological model.
[00:00:43.988]And now I am going to move over into Leapfrog Works
[00:00:47.870]am I going to talk a little bit about
[00:00:49.690]visualizing and analyzing your data.
[00:00:55.726]And the first thing I just want to briefly talk about
[00:00:57.530]is the user interface.
[00:00:59.240]So we have three main parts of the Leapfrog Works window.
[00:01:04.010]We have the scene here in the middle, this big blue box
[00:01:08.700]and this is where we visualize all of our data.
[00:01:13.090]We can see here that we can rotate around.
[00:01:16.740]We can zoom in and out and we can also pan across.
[00:01:23.100]Over to the left here we have the project tree,
[00:01:25.740]and this is where you will import your data,
[00:01:29.060]it’s where you will manage your data,
[00:01:30.987]that’s also where you start to build your models.
[00:01:35.510]And on the bottom here, we have the shape list.
[00:01:37.980]Now the shape list is a list of all of the objects
[00:01:42.200]that are within the scene at the time.
[00:01:44.890]So we can see down the bottom here we have our topography,
[00:01:49.920]which we can see in the scene,
[00:01:51.510]some borehole intervals and our color.
[00:01:54.520]So these are the objects
[00:01:56.350]that are in the scene at the time.
[00:01:59.970]Today we’re going to build a geological model
[00:02:02.120]based on boreholes, but there are many other data types
[00:02:05.240]that can be used to build lithological surfaces
[00:02:08.780]for geological model, for example, points or polylines
[00:02:12.920]or other existing surfaces.
[00:02:16.048]This is a best practice webinar, I’ll be going through
[00:02:18.590]a workflow that I personally use
[00:02:20.540]when building a geological model from boreholes.
[00:02:25.030]However, just to begin with, I just want to show you
[00:02:27.160]a couple of little tips that you might find really useful.
[00:02:31.780]So if you have a lot of objects on your project tree,
[00:02:35.650]it can get really overwhelming.
[00:02:38.120]So for example, if you have everything open
[00:02:42.400]and let’s say you have lots and lots of other objects here
[00:02:45.510]in the project tree, you can collect all of the folders
[00:02:49.060]in the project tree by right clicking up here,
[00:02:52.260]where it says project tree and select collectible.
[00:02:55.920]And that will collect all of your folders
[00:02:57.910]so you have a really project tree.
[00:03:02.760]We also have a really useful button up here.
[00:03:05.410]So this here is called clear the scene.
[00:03:07.980]Now you’ll notice that as we hover over this button,
[00:03:10.890]we can see that little yellow dialog box
[00:03:13.310]pop up saying clear the scene.
[00:03:15.330]So as we hover over all of these icons along the top,
[00:03:20.250]Leapfrog will tell us what that tool does.
[00:03:25.350]This one here is the one I wanted to show you though,
[00:03:27.550]the clear the scene button and what this does is
[00:03:30.120]it will clear everything that has been scene view in here
[00:03:34.600]and also in our shape list, because remember the shape list
[00:03:39.250]is just a list of the objects that are within the scene.
[00:03:43.120]So for example, if I click the clear the scene button,
[00:03:46.570]there is now nothing in my scene
[00:03:48.630]and nothing in my shape list.
[00:03:52.260]Now to visualize anything within Leapfrog Works,
[00:03:56.300]you want to drag it into the scene.
[00:03:58.510]So for example, if I come over to my borehole data over here
[00:04:03.520]and I wanted to visualize it, I can either right click
[00:04:08.320]on the object and select view
[00:04:12.540]or I can click and drag it into the scene.
[00:04:17.200]So here we have the borehole data that I have
[00:04:20.890]for this project.
[00:04:22.230]And we have a couple of different tables
[00:04:24.610]within our boreholes.
[00:04:26.060]And that’s why we see the different diameters of cylinders
[00:04:29.470]in our scene.
[00:04:31.340]Now down here in the shape list, we can see a list
[00:04:34.810]of all of these different tables
[00:04:37.090]that we have in the scene at the moment.
[00:04:38.750]And I’m just going to remove some of them
[00:04:41.150]by selecting this little X button here.
[00:04:45.200]Now the only ones I want to look at for now
[00:04:48.310]are the intervals and the color.
[00:04:52.820]So here we have our intervals and we can see down here
[00:04:57.100]in our shape list that our intervals
[00:04:58.930]are showing our lithology.
[00:05:05.190]So this is the data we’re going to use
[00:05:07.630]to build a geological model, these boreholes right here.
[00:05:11.620]But first I’d just like to go through a very quick overview
[00:05:14.910]of the surface types within Leapfrog Works.
[00:05:27.090]So the surface types in Leapfrog Works,
[00:05:30.950]we have four main contact surface types.
[00:05:35.610]So these are the deposit, the erosion,
[00:05:38.400]the intrusion and the vein.
[00:05:41.710]So these are the ones I’m going to talk about today.
[00:05:44.340]We also have some specific function surfaces
[00:05:47.250]such as the structural surface, the offset
[00:05:49.970]and the vein system and stratigraphy
[00:05:52.610]but these are more complex.
[00:05:53.900]So we’re not going to be covering these today.
[00:05:59.730]Here we can see just some images
[00:06:02.510]of those four main surface types,
[00:06:04.870]the deposit, the erosion, the intrusion and the vein.
[00:06:09.070]So firstly, we’re just going to look at the deposit
[00:06:12.310]and the erosion.
[00:06:15.910]So the deposit and the erosion are very similar,
[00:06:19.760]they’re actually the same surface.
[00:06:22.200]They just behave differently when activated.
[00:06:25.100]So they use one point of contact in each borehole.
[00:06:29.400]So we can see here, we have a red lithology,
[00:06:33.610]a yellow lithology and an orange lithology.
[00:06:37.980]These green dots here, these are our contact points
[00:06:41.430]of the bottom of our red lithology.
[00:06:45.700]So it will be below the red lithology.
[00:06:50.050]And then this is the contact surface that will be generated
[00:06:53.360]from those singular contact points within each borehole.
[00:06:59.460]So the difference between the erosion and the deposit
[00:07:03.210]is that an erosion will cut into older underlying surfaces.
[00:07:09.660]Like we can see here in this slide.
[00:07:12.170]So we have here, this is the same red lithology
[00:07:16.890]that we saw in the previous slide.
[00:07:20.080]This is how the red lithology would behave
[00:07:22.870]as a depositional surface.
[00:07:24.650]So it would just sit on top of the orange
[00:07:27.520]and the yellow lithologies.
[00:07:31.770]Whereas over here, we have an erosion surface
[00:07:34.070]where our red lithology is behaving as an erosion
[00:07:38.370]and it will cut into the older underlying
[00:07:42.060]depositional surface, which is this orange lithology here.
[00:07:46.570]So the differences I’d like to draw your attention to,
[00:07:50.130]add this area here to this section of the orange lithology
[00:07:55.280]that is being eroded away by our red erosional surface.
[00:08:02.160]Some common uses for deposits can include bedrock
[00:08:05.820]or sedimentary lithologies that just sit on top
[00:08:09.180]of other underlying lithologies.
[00:08:12.180]And some common uses for an erosion surface could include
[00:08:15.640]top soil or fill where these lithologies
[00:08:19.210]can erode into the units below them.
[00:08:23.830]Now let’s have a look at the intrusion surface.
[00:08:28.600]So the intrusion uses one set of contact,
[00:08:32.170]but it looks for contact points above and below
[00:08:36.150]the unit of interest.
[00:08:38.330]So in this case, the unit that we’re looking at
[00:08:40.760]is this yellow unit here.
[00:08:44.600]And we can see that there are contact points
[00:08:46.450]both above and below our yellow unit of interest.
[00:08:53.880]So it can have multiple contact points per borehole.
[00:09:00.480]Some lithological units are quite obviously intrusional
[00:09:03.690]and can be modeled as such, but the intrusion surface
[00:09:06.790]and work actually has a lot of different parameters
[00:09:09.550]that can be changed to suit your model.
[00:09:12.410]So it’s really one of the most versatile
[00:09:14.570]surface types and works.
[00:09:17.120]So what this means is that you may have a lithology
[00:09:20.680]that is depositional in situ,
[00:09:23.400]but it is best modeled in Leapfrog
[00:09:25.950]using an intrusional surface.
[00:09:28.770]This may seem counterintuitive but it can still be useful.
[00:09:33.210]For example, if you have a discontinuous sanderlings
[00:09:37.380]or an irregularly shaped unit.
[00:09:41.500]So the intrusion uses multiple contact points
[00:09:46.650]per unit per borehole.
[00:09:48.930]And in the first instance, it creates quite a spherical
[00:09:52.200]lithological surface that can be manually changed
[00:09:55.970]and has a lot of flexible parameters.
[00:10:00.570]Lastly, we’re going to have a look at the vein surface here.
[00:10:07.580]Now a vein surface uses two sets of contact points.
[00:10:12.840]It uses a set of contact points above the unit of interest
[00:10:16.890]and below the unit of interest.
[00:10:19.240]So in this case, we’re wanting to create a vein surface
[00:10:22.770]for this green lithology through here.
[00:10:26.010]So the vein surface looks for the contact points
[00:10:28.830]above the green lithology and below
[00:10:32.450]to create the hanging wall, which is above
[00:10:35.650]and the foot wall, which is below.
[00:10:40.620]The vein surfaces can be a little bit finicky to begin with
[00:10:43.420]but they’re very, very useful.
[00:10:47.670]Some of the common uses are for dyke lithologies
[00:10:50.550]that run through the wrist of your geological model
[00:10:53.470]but can also be useful for lenses and intubated lithologies
[00:10:57.830]because they have the ability to punch out.
[00:11:04.760]So these are just the specific function surfaces
[00:11:07.280]with some images that show how they can be used.
[00:11:12.020]These surfaces are available to use in works
[00:11:14.627]but we aren’t going to be covering them in this webinar.
[00:11:19.540]So now I’m going to move back into Leapfrog Works
[00:11:26.832]and I’m going to go through how to build
[00:11:28.590]a basic geological model using the borehole data.
[00:11:34.470]So I’m just going to start by looking at my borehole data
[00:11:37.190]in the scene and seeing what the distribution
[00:11:40.100]of each lithology is like.
[00:11:42.210]So this is the validating and analyzing the borehole data.
[00:11:49.560]What I personally like to do is I like to come down
[00:11:52.540]to the shape list down here at the bottom
[00:11:54.800]and I like to click on the edit colors
[00:11:57.670]for the intervals here.
[00:12:00.130]If I drag this dialog box over to the left hand side,
[00:12:03.280]what we can see as we have the legend for the lithology.
[00:12:09.090]What we’re able to do in this dialog box
[00:12:11.520]is we’re able to deactivate the visibility of certain units.
[00:12:17.030]So we can just look at one unit at a time.
[00:12:20.820]So for example, I can just look at the distribution
[00:12:23.740]of one lithology, which will help me decide
[00:12:27.190]which of my surface types would be best
[00:12:30.220]to model the lithology.
[00:12:33.390]So what I’m going to do is I’m going to make
[00:12:34.910]all of my lithological units invisible
[00:12:37.160]by clicking this I icon here at the top
[00:12:41.750]and I’m going to go through the units individually
[00:12:44.190]to see how they look on their own.
[00:12:47.350]In this case I’m going to start at the bottom
[00:12:49.710]with my limestone.
[00:12:52.050]So if I click here on this I icon, we can see now
[00:12:56.040]that the only units I can see in the scene
[00:12:58.887]are my yellow limestone intervals.
[00:13:05.340]What we can see here in the scene is limestone
[00:13:08.620]is really consistent across the site.
[00:13:13.250]This means that a limestone could easily be modeled
[00:13:16.040]as a deposit or an erosion, depending on how you want it
[00:13:19.550]to interact with the other units in your model.
[00:13:23.867]The next case we’re going to model it as an erosion.
[00:13:28.850]If we continue to step through the units and the style up,
[00:13:32.550]we can then look at the gravel there.
[00:13:36.920]Now this color isn’t great.
[00:13:39.800]This color is probably a little too close to the background
[00:13:43.350]of the scene, so what we can actually do
[00:13:45.390]is we can change the color of this unit
[00:13:48.210]in this scene dialogue box.
[00:13:49.977]And we can do this by clicking on the little color
[00:13:53.970]over to the side.
[00:13:55.300]So in this case, I’m going to change this to light pink.
[00:14:03.940]That makes it a lot easier to see in the scene.
[00:14:09.410]So this gravel layer, it also seems quite consistent.
[00:14:13.820]Again, this means that a deposit or an erosion
[00:14:16.360]should be sufficient.
[00:14:19.210]And this case we want the gravel to sit on top
[00:14:22.800]of the older underlying unit, not cut into it.
[00:14:26.700]So we’re going to build this as a deposit.
[00:14:31.330]Next we’ll look at the fine sand.
[00:14:35.310]So this unit is not as consistent as the others.
[00:14:38.700]It’s not presenting every borehole in the intervals,
[00:14:42.410]theory and width.
[00:14:43.710]So we have some really thin intervals over here.
[00:14:49.770]And then we also have some quite thick intervals over here.
[00:14:55.810]So in this case, a deposit or an erosion surface
[00:14:58.960]will not be as useful
[00:15:00.870]as the unit is two variable across the site.
[00:15:04.800]So even though this fine scene maybe a deposit in situ,
[00:15:09.990]it doesn’t mean that a depositional surface
[00:15:12.630]in Leapfrog is the best way to model it.
[00:15:16.180]So in this case, an intrusion or a vein
[00:15:19.320]would probably be the best way forward.
[00:15:23.950]Next we’ll look at the clay.
[00:15:34.160]This clay is also quite consistent across the site.
[00:15:37.110]So we’ll model this as I deposit.
[00:15:42.040]I generally find that this is the best way to analyze
[00:15:44.530]my borehole data for my first pass of my geological model,
[00:15:48.530]looking at all the units separately on their own
[00:15:52.930]to try and figure out the distribution
[00:15:54.790]in which surface type will best represent that lithology.
[00:16:01.470]Now I’m going to turn all of my lithologies back on
[00:16:08.030]and I’m going to start building my geological model.
[00:16:13.980]To do this I’m going to right click on my geological models
[00:16:18.360]over here in my project tree
[00:16:20.320]and I’m going to select new geological model.
[00:16:27.110]So I need to set a few parameters for my geological model,
[00:16:30.520]including the extents and what data I want to use
[00:16:33.950]to build my geological model.
[00:16:37.546]In this case I want to use my lithology column
[00:16:39.740]from my boreholes, so what I need to do
[00:16:42.200]is I need to make sure that my base lithology column in here
[00:16:47.290]is the column that I want to use.
[00:16:50.610]In this case the lithology is the only column
[00:16:54.900]that can be used but in lots of cases
[00:16:58.150]you’ll have more than one column to choose from.
[00:17:00.460]So you need to make sure that this is the right column
[00:17:04.210]within your geological model when you set it up
[00:17:06.900]because the base lithology column is one of the only things
[00:17:11.020]that can’t be changed when you build a geological model.
[00:17:17.930]Here you could choose to filter the data if you want,
[00:17:20.190]so if you had any query filters you wanted to apply,
[00:17:23.650]in this case we don’t have any.
[00:17:27.540]Then I want to set my surface resolution.
[00:17:30.580]So the resolution of your surface
[00:17:32.520]is a very important concept in Leapfrog
[00:17:35.630]as it represents the dimensions of the triangles used
[00:17:39.830]to build the surface.
[00:17:42.270]All surfaces in Leapfrog are generated using triangulations.
[00:17:46.520]And you want the corners of the triangles to attach
[00:17:50.050]to your data points.
[00:17:52.830]This means that if your boreholes are 10 meters apart,
[00:17:56.660]a resolution of 50 meters may cause the surfaces
[00:18:00.620]not to adhere to your boreholes as much as you’d like
[00:18:04.840]as the corners may not attach to your boreholes.
[00:18:09.220]My general rule of thumb for resolution
[00:18:11.740]is to use the distance between your two closest boreholes.
[00:18:16.730]This can be changed at any time if needed
[00:18:19.200]but in this case I’m going to leave it as 50.
[00:18:23.340]Lastly, I need to set my model extents.
[00:18:29.560]We can see the default dimensions in the scene if I zoom out
[00:18:33.680]and we can see that these are way too large already.
[00:18:38.263]What we do have the option to do is to enclose an object.
[00:18:43.090]So this is really useful.
[00:18:44.720]If you want your extents for your model
[00:18:47.320]to be automatically fitted to a certain object
[00:18:50.780]within your project.
[00:18:54.500]In this case I’m going to choose my typography.
[00:18:57.050]So I’m going to click on enclosed object
[00:19:02.600]and I’m going to select my typography extents.
[00:19:10.170]This is because your geological model will automatically use
[00:19:14.100]your topography as the upper boundary.
[00:19:16.650]So the geological model either needs to be the same size
[00:19:20.950]or smaller than your typography.
[00:19:24.270]I’ll just repeat that ’cause that’s a really important part
[00:19:27.220]of building a geological model in Leapfrog,
[00:19:31.137]your geological model needs to be the same size
[00:19:34.810]or smaller than your topography.
[00:19:40.620]Now I’ll just rename this geological model.
[00:19:48.310]Here we go, okay.
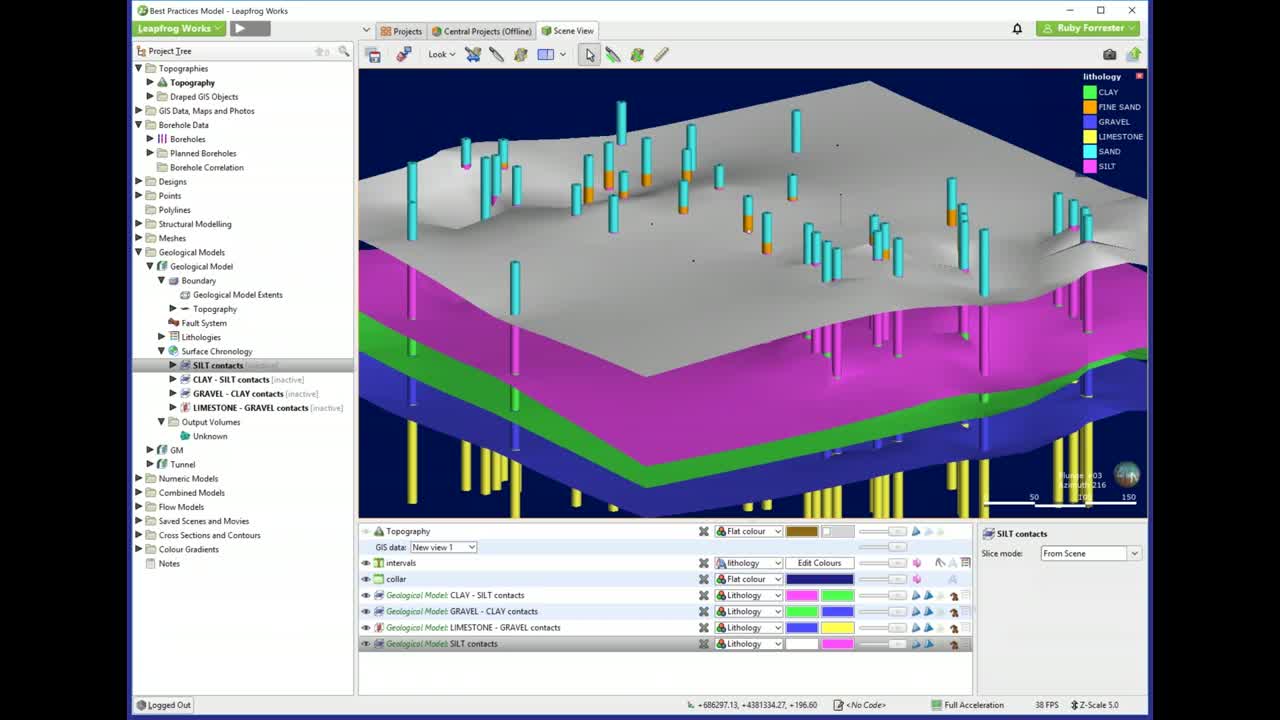
[00:19:52.800]That has been created in new geological model here
[00:19:56.170]in my project tree.
[00:20:02.150]And what it’ll do is it will generate a singular volume
[00:20:06.380]down here in the output volumes tab.
[00:20:09.929]If I drop down on this,
[00:20:11.030]we have a singular volume called unknown.
[00:20:13.710]If I drag that into the scene
[00:20:18.190]and if I bring in my model extents,
[00:20:21.620]we can see that this volume of unknown
[00:20:25.040]is extending all the way out to the boundary
[00:20:29.134]but it’s also adhering to our topography.
[00:20:32.910]If I drag that into the scene.
[00:20:35.270]So it’s using the topography as the upper boundary
[00:20:39.160]and using the extents that we specified
[00:20:42.940]as the lateral boundary.
[00:20:49.530]So the next step for us is to build surfaces
[00:20:52.230]for our lithologies
[00:20:53.720]so that we can replace this unknown volume.
[00:20:58.958]I’m going to remove the unknown volume from the scene
[00:21:02.150]and remove that model extents.
[00:21:04.950]So that we’re just looking at our models again.
[00:21:10.180]Now we’re going to look at building the lithological surfaces
[00:21:14.060]for our geological model.
[00:21:18.880]I’m going to keep my boreholes and the scene
[00:21:21.430]because what I want to do is I want to build my surfaces
[00:21:24.640]and then also visualize them
[00:21:26.240]to see how well they’re adhering to my boreholes.
[00:21:31.870]I’m going to start building my surfaces from the bottom up.
[00:21:36.500]So I’m going to start with my limestone by coming over
[00:21:40.660]to the surface chronology and my geological model,
[00:21:44.810]I’m going to right click on surface chronology
[00:21:48.380]and select new erosion from base lithology.
[00:21:55.000]So base lithology means from the borehole data,
[00:21:58.590]but you can see that there are a lot of other data types
[00:22:02.990]that can be used to build your lithological surfaces,
[00:22:06.770]for example, polylines or points.
[00:22:09.650]So you don’t actually need boreholes
[00:22:13.040]to build a geological model
[00:22:15.120]but it is by far the most common way.
[00:22:17.750]So that’s why we’re going to build our geological model
[00:22:20.860]today from our boreholes.
[00:22:23.620]I’m going to select from base lithology
[00:22:26.690]and I need to come up here and select the primary lithology.
[00:22:32.020]So I’m going to select my limestone
[00:22:35.110]and then we need to choose use contacts above
[00:22:39.120]or contacts below.
[00:22:40.890]So if we remember back to when we were going through
[00:22:43.810]our surface types in the PDFs, a deposit or an erosion
[00:22:48.790]uses one set of contact points,
[00:22:51.620]either above or below the unit of interest.
[00:22:55.870]So in this case for our limestone, if we use contacts above,
[00:23:02.280]what we can see here is that Leapfrog
[00:23:04.520]is automatically looking at all of the units
[00:23:08.070]of the limestone and seeing what other units
[00:23:12.780]are contacting the limestone.
[00:23:16.446]In this case we have contacts above ticked.
[00:23:19.870]So what we see here is that the limestone
[00:23:23.140]is contacting the gravel above it 44 times.
[00:23:30.410]That’s what this number here in the bracket says,
[00:23:32.960]that is the number of instances
[00:23:35.210]where the limestone is contacting the gravel.
[00:23:39.520]If we use contact below,
[00:23:41.790]we’ll see that there are no contacting lithologies.
[00:23:47.098]And if I drag the dialog box over to the left,
[00:23:49.830]we can see why, it’s because our limestone
[00:23:52.280]is right at the bottom of our boreholes.
[00:23:54.290]It’s not contacting anything below it.
[00:23:58.500]So we see over here, this list of ignored lithologies.
[00:24:02.867]These are all of the lithologies within our boreholes
[00:24:06.210]that aren’t contacting and therefore they have zero
[00:24:10.590]in the brackets.
[00:24:12.850]So we’re going to use the contact above.
[00:24:15.840]I’m going to keep the rest of these settings as is
[00:24:19.387]and I’m going to select OK.
[00:24:24.760]That has been generated the surface
[00:24:26.750]which I can now drag into the scene.
[00:24:30.410]Now if I zoom in a little, what we see here is a surface
[00:24:36.670]that’s blue on the top and yellow on the bottom.
[00:24:39.820]So yellow, like the limestone and blue like the gravel.
[00:24:50.250]But what we can also see is that this surface
[00:24:53.540]isn’t quite attaching to the contact points
[00:24:57.670]as much as we’d like.
[00:24:59.140]If I zoom right in here
[00:25:00.540]we can see that the surface through here
[00:25:04.120]is actually cutting through that limestone.
[00:25:06.940]It’s not quite attaching itself to the contact.
[00:25:11.750]So there are a couple of things we can do to fix this.
[00:25:15.120]One thing we can do is we can change the snapping
[00:25:18.620]for our geological model.
[00:25:22.580]So what we’re going to do is we’re going to right click
[00:25:25.420]on our geological model and select open.
[00:25:31.933]That then opens up this dialogue box
[00:25:34.790]where we can come down here to under surface generation
[00:25:39.070]where it says snap to data.
[00:25:41.500]We can see that this is currently set as path
[00:25:45.580]but what we can change it to is this one here drilling only.
[00:25:49.720]This means that the surfaces will try their very best
[00:25:53.460]to snap to the boreholes.
[00:25:57.150]If you have more data types that you also want to snap to,
[00:26:01.710]you can also choose all data.
[00:26:04.120]In this case, our geological model is just from boreholes.
[00:26:08.150]So we kind of keep it as drilling only.
[00:26:15.615]And then select OK and what we should see
[00:26:18.070]is that the surface has changed a little bit
[00:26:21.770]so that it attaches a little bit better
[00:26:25.130]and adheres a little bit better
[00:26:27.400]to the contact points within our boreholes.
[00:26:35.470]I’m now going to continue to build my lithological surfaces.
[00:26:39.570]And next I’m going to build the gravel.
[00:26:43.762]To do that I’m going to right click on surface chronology
[00:26:47.100]and I’m going to select new deposit.
[00:26:49.900]So remember we want our gravel
[00:26:52.330]to just sit on top of our limestone.
[00:26:54.920]We don’t want our gravel to cut into our limestone.
[00:26:59.670]We just want it to sit on top.
[00:27:02.490]That is why we are selecting a deposit and not an erosion.
[00:27:07.320]Also our gravel is very consistent across the site,
[00:27:11.330]which is why we are not selecting intrusion or vein.
[00:27:16.600]So if I go to new deposit from base lithology,
[00:27:21.820]again, I need to select my primary lithology.
[00:27:25.920]In this case I’ll select my gravel.
[00:27:30.040]And we can see using the contacts above
[00:27:33.950]that the gravel is contacting the clay above it 44 times.
[00:27:40.800]This is fine, I’m happy with this, so I’m going to select OK.
[00:27:50.130]That has built my gravel clay contacts
[00:27:54.190]and I can drag it into the scene.
[00:27:56.820]And again, notice the colors,
[00:27:59.370]there’s green on the top, the clay
[00:28:03.290]and blue on the bottom for the gravel.
[00:28:11.290]Next we’re going to do the clay.
[00:28:14.590]So we’re going to right click on the surface chronology,
[00:28:18.470]select new deposit from base lithology.
[00:28:21.610]Again, we just want the clay to sit on top.
[00:28:25.180]So new deposit from base lithology.
[00:28:30.633]You can say that it’s automatically selected
[00:28:31.970]the clay for us, it’s great.
[00:28:35.664]We’re going to use the contact above.
[00:28:37.470]We can see that it is contacting silt 44 times.
[00:28:41.420]Happy with that, so I’ll select OK.
[00:28:47.470]If I drag that into the scene, again, pink on the top,
[00:28:54.100]a little bit hard to see but it is green on the bottom.
[00:29:04.490]Next we’ll build the silt.
[00:29:06.530]Again, we’re going to build it as a deposit.
[00:29:08.930]So new deposit from base lithology, choose the silt.
[00:29:15.990]And in this case we can see that the silt is contacting
[00:29:19.390]the fine sand and the sand on the contact above.
[00:29:25.950]Now we want to use both of those.
[00:29:27.950]So we’re going to keep both of those
[00:29:30.820]and we’re going to select OK.
[00:29:36.080]If I drag that into the scene, we can see that the surface
[00:29:40.910]is pink on the bottom, representing the silt.
[00:29:45.020]It’s actually gray on the top,
[00:29:47.060]that’s because it is contacting two different lithologies
[00:29:50.400]on the top, not just the one.
[00:29:56.100]So now what we want to build is the lens
[00:29:59.930]of this orange lithology here, this fine sand.
[00:30:04.560]This was the one that when we looked at distribution
[00:30:07.580]of the intervals,
[00:30:10.330]when we were just looking at our boreholes,
[00:30:13.000]it wasn’t consistent, it’s quite variable,
[00:30:16.550]the units were of variable thickness
[00:30:18.870]and they weren’t within
[00:30:20.960]all of the boreholes in our project.
[00:30:24.110]So what we’re going to do to model our orange lithology,
[00:30:28.230]our fine sand is we’re going to create a new vein.
[00:30:34.560]So again, we’re going to come back to our surface chronology,
[00:30:37.730]right click to new vein from base lithology.
[00:30:45.026]In this style of box
[00:30:45.880]we only need to choose the vein lithology
[00:30:49.630]because remember with a vein is looking for contact points
[00:30:54.710]above and below the unit of interest
[00:30:57.890]to create that hanging wall and the foot.
[00:31:02.730]So we’re going to select the fine sand and then select OK.
[00:31:08.860]The vein is just going to persists for a second.
[00:31:13.160]We can see it here in the project tree now.
[00:31:15.437]And if I drag it into the scene, there’s our vein.
[00:31:22.100]Well, notice that this vein is actually extending out
[00:31:25.120]to the model boundary.
[00:31:26.650]And we know that the intervals within our boreholes
[00:31:31.010]don’t extend to the model boundary.
[00:31:33.180]We know that our intervals for this fine sand
[00:31:36.490]are actually very discontinuous.
[00:31:40.220]So this is not what we want, this is not how we want
[00:31:43.790]our fine sand vein to behave.
[00:31:48.770]So one of the really useful tools available
[00:31:51.470]within the vein surface type
[00:31:54.450]is the ability to activate punch outs.
[00:31:57.520]So to do this, I’m going to right click on the vein
[00:32:00.760]in the project tree and I’m going to select open.
[00:32:06.040]If I come over here to the surfacing tab,
[00:32:10.660]we have an option down here for punch out.
[00:32:16.860]Enabling the punch outs means that the surface
[00:32:19.800]won’t extend out to the model boundary,
[00:32:23.510]it would just attach itself to where the intervals are.
[00:32:28.150]So if I go, okay, that’s reprocessed.
[00:32:32.190]And we can see that this vein no longer extends
[00:32:35.410]all the way out to the boundary like it did before.
[00:32:42.380]So if we look at all of the surfaces
[00:32:45.000]and the scene with our boreholes,
[00:32:47.400]we can see that we still have one unit left to model,
[00:32:51.230]which is this blue sand unit here.
[00:32:56.690]We don’t need to model every lithological surface
[00:33:00.580]as we’re able to setup a background lithology.
[00:33:03.810]The background lithology will fill the gaps
[00:33:06.900]where you haven’t already built a surface.
[00:33:11.430]So to do this, what we’ll do
[00:33:15.890]is we’ll come to the surface chronology,
[00:33:18.510]select open and down the bottom here
[00:33:22.670]we can specify a background lithology as the sand.
[00:33:31.770]If I just drag this dialog box over a little bit,
[00:33:34.700]you’ll also notice that all of our surfaces
[00:33:38.310]have an active and brackets next to them.
[00:33:43.000]Leapfrog Works does this to save on processing time
[00:33:46.430]so you can continue to eat it and change the surfaces.
[00:33:50.280]And Leapfrog will only process the changes to the surface.
[00:33:56.490]This is because as soon as we activate these surfaces,
[00:34:00.340]we’re asking Leapfrog to generate output volumes
[00:34:03.300]for those surfaces.
[00:34:05.660]And these output volumes take a lot more time to process.
[00:34:10.410]So leaving them inactive while you’re manually editing them
[00:34:13.840]will save a lot of time and processing
[00:34:16.580]because it is not also trying
[00:34:19.010]to build the output volumes at the same time.
[00:34:23.330]So I generally recommend to leave the surfaces inactive
[00:34:27.810]until you’re happy with them and you’re ready to create
[00:34:30.360]the output volumes to save on processing time.
[00:34:34.470]Now, in this case we’re happy with the surfaces.
[00:34:37.130]We think these surfaces
[00:34:38.940]represent our lithologies pretty well.
[00:34:42.750]So we’re going to activate all of our surfaces
[00:34:46.197]and our surface chronology by ticking this tick box up here
[00:34:50.220]and activating all of them.
[00:34:53.410]It’s also really important to make sure
[00:34:55.610]that your lithologies are in the right order
[00:34:58.460]of youngest to oldest.
[00:35:01.110]The way that we’ve built our geological model
[00:35:04.010]from the bottom up generally means
[00:35:07.680]that our surfaces within our surface chronology now
[00:35:13.220]should be ordered correctly from youngest to oldest.
[00:35:16.820]This will of course be dependent on your data
[00:35:20.260]and how you build the model.
[00:35:22.600]But for example, if we wanted to move some of our surfaces
[00:35:25.990]up and down, we can do so by using this younger button
[00:35:31.070]or older button here and move them up in the order.
[00:35:37.240]However, we’re happy with this.
[00:35:40.110]Again, we’ve also set up background lithology,
[00:35:43.540]so I’m going to select OK.
[00:35:47.290]That activates all of our surfaces,
[00:35:49.390]you’ll notice that all of our surfaces
[00:35:51.560]no longer have an active in brackets next to them.
[00:35:58.920]And what I’ll do is I’ll just clear the scene.
[00:36:05.310]And in our output volumes now
[00:36:07.460]we have our lithological volumes.
[00:36:10.560]We no longer have that unknown volume.
[00:36:15.130]If I drag the whole folder of output volumes into the scene,
[00:36:20.600]we have different volumes that represent
[00:36:23.430]our lithological units.
[00:36:26.680]I can turn on the legend and the shape list down here
[00:36:33.230]and we can see all of our lithological units
[00:36:37.043]and our geological model.
[00:36:42.490]It’s also a good idea to compare
[00:36:44.810]the geological model output volumes with your boreholes.
[00:36:48.830]So what I’ll do is I’ll just drag my intervals
[00:36:52.990]back into the scene and the easiest way to make sure
[00:37:02.620]that your lithological volumes adhere to borehole data
[00:37:07.310]is to change the transparency
[00:37:10.270]of your geological model volumes.
[00:37:13.160]Now you can select all of them really easily down here
[00:37:17.260]in the shape list by double clicking on any of them.
[00:37:20.690]So I have just double clicked on the fine sand
[00:37:23.750]and that has selected all of the lithological volumes
[00:37:28.090]that I’ve build and then if I move the slider across
[00:37:33.220]to change the transparency,
[00:37:36.565]you can see it is changing the transparency
[00:37:38.800]for all of the volumes at the same time.
[00:37:43.140]We can see our boreholes in the scene as well
[00:37:47.030]but usually the best way to make sure that it is adhering
[00:37:51.810]is just cut a slice through the geological model.
[00:37:56.100]I generally find the easiest way to do this
[00:37:58.200]is to look down on the geological model
[00:38:01.530]by either tapping the D key on your keyboard, the letter D,
[00:38:07.840]or if you come up here to the look drop down,
[00:38:12.550]you can select down as well.
[00:38:17.350]We can draw a new slice right through our model.
[00:38:26.497]And what we’ve created here is a thick slice.
[00:38:31.010]Let’s zoom in, we can look at the units
[00:38:36.230]within our boreholes, the surfaces and the volumes
[00:38:39.720]that have been generated for this geological model
[00:38:43.680]generally adhere pretty well and they look pretty good.
[00:38:48.320]We’ve turned on the snipping, so the surfaces are trying
[00:38:51.430]to snap to the contact points as best they can.
[00:38:54.980]And we can see that orange fine sand pane
[00:39:02.550]is punching out and looks quite good.
[00:39:10.130]So this is generally the easiest way to validate your model
[00:39:14.330]and decide whether you need to make any changes.
[00:39:24.999]That’s about all we’re going to go through today
[00:39:26.920]for the best practices for building a geological model.
[00:39:29.960]So we talked about how to look at your boreholes,
[00:39:35.830]how to choose which surface might be best for the intervals
[00:39:40.560]within your boreholes.
[00:39:42.210]We talked a little bit about the different surface types
[00:39:46.130]and then we also looked at how to build a geological model
[00:39:52.210]using these surface types.
[00:39:56.100]So thank you again for joining me
[00:39:58.200]and I hope you have learnt something and happy modeling.