


10 TOP TIPS to getting more from GeoStudio, with research scientist Keely Kulpa.
Hopefully, one of these tips will be new to you and will improve your experience and workflow in Geostudio.
Overview
Speakers
Keely Kulpa
Research & Development Scientist – Seequent
Duration
10 min
See more on demand videos
VideosFind out more about Seequent's civil solution
Learn moreVideo Transcript
[00:00:01.870]
<v Keely>Hello everyone.</v>
[00:00:03.290]
My name is Keeley and I’m a research scientist
[00:00:06.070]
with the GeoStudio group here at Seequent.
[00:00:09.010]
Today, I thought I’d share with you
[00:00:10.650]
some of our favorite tips and tricks.
[00:00:13.280]
Hopefully, at least one of these 10 tips will be new to you
[00:00:17.100]
and improve your experience and workflow in GeoStudio.
[00:00:21.540]
So, let’s get right into it.
[00:00:24.760]
The first tip has to do with the right-click context menu.
[00:00:29.090]
At any time that you are working
[00:00:30.680]
in the GeoStudio project Explorer window,
[00:00:33.810]
you do not have to go to the defined project window
[00:00:36.540]
to add geometry or child analysis,
[00:00:42.970]
delete or rename and analysis or geometry branch,
[00:00:50.450]
or queue an analysis for solving in the solve manager.
[00:01:00.980]
When sketching your geometry in 2D,
[00:01:03.630]
you can use your keyboard
[00:01:04.730]
to activate many CAD light drawing tools.
[00:01:08.140]
For example, while in the draw region mode,
[00:01:11.400]
I can use Control + R on my keyboard,
[00:01:14.720]
which activates the CAD drawing tool in the bottom toolbar.
[00:01:18.380]
Here, the absolute XY coordinate can be entered.
[00:01:22.960]
Alternatively, I could have entered a relative offset,
[00:01:26.480]
relative length and angle, relative X or Y offset and angle,
[00:01:31.730]
or a geometry point ID.
[00:01:35.440]
While drawing, the Shift key can be held down
[00:01:37.830]
to limit movement in the horizontal
[00:01:39.700]
or vertical direction.
[00:01:46.610]
The Control button can be held down
[00:01:48.450]
to snap to an existing geometry line
[00:01:51.080]
to ensure that a tight fit exists between regions.
[00:01:55.500]
Lastly, C on my keyboard will close the region
[00:01:59.180]
or exit the drawing mode.
[00:02:03.390]
GeoStudio has the ability to copy and paste materials
[00:02:06.760]
and functions.
[00:02:08.490]
If you want to include some of the same materials
[00:02:11.470]
from a previous file created for the same site,
[00:02:15.240]
you can copy and paste the materials
[00:02:17.370]
from the previous file directly
[00:02:19.410]
into your new GeoStudio project.
[00:02:22.780]
Take this file as an example.
[00:02:25.600]
I can drag a box over the materials
[00:02:27.800]
or hold down the Control button
[00:02:29.870]
and click on the desired materials and the list
[00:02:32.140]
from the old file.
[00:02:34.610]
I can right-click in the list box and choose Copy.
[00:02:38.640]
Now, when I opened the defined materials window
[00:02:41.440]
in my new GeoStudio file,
[00:02:43.780]
I can right-click in the list box and choose Paste.
[00:02:47.540]
All materials, including their defined, parameters
[00:02:50.620]
and functions will be copied over to the new file.
[00:02:55.220]
Boundary functions and climate functions
[00:02:57.100]
for the land climate boundary condition
[00:02:59.370]
can also be copied from other GeoStudio files
[00:03:02.170]
in a similar manner.
[00:03:04.790]
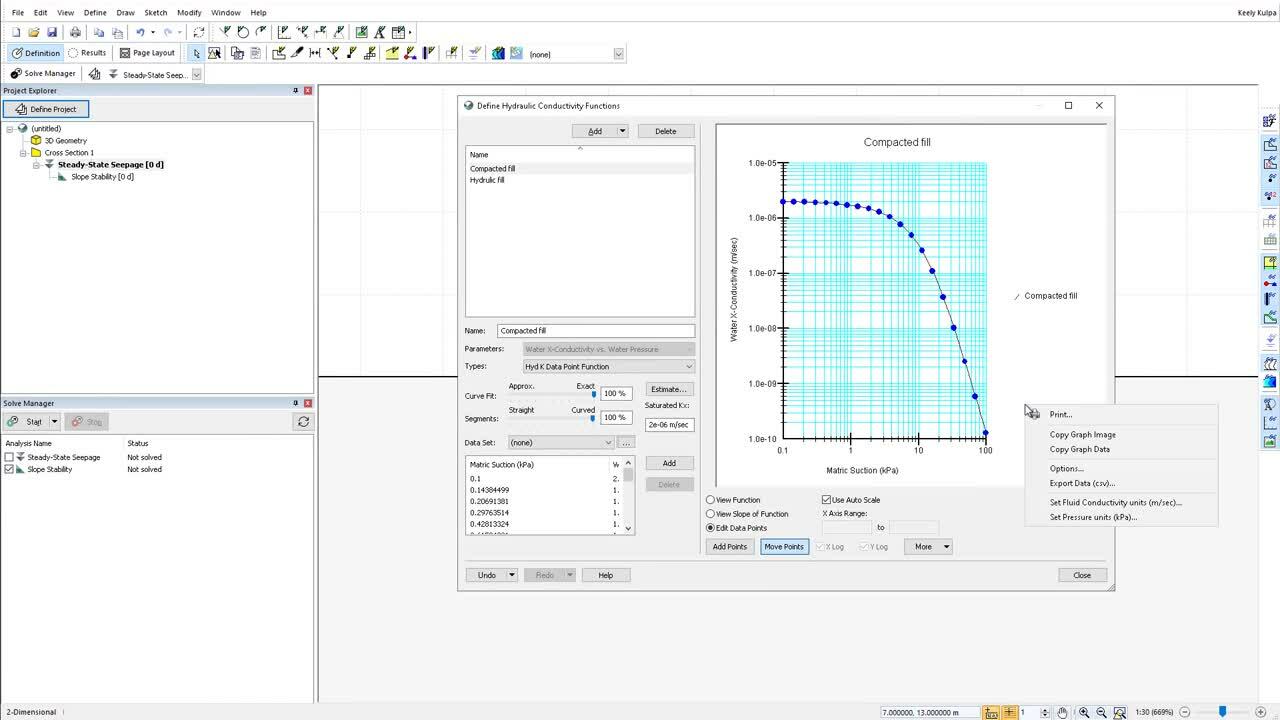
While working with parameters and graphs in GeoStudio,
[00:03:08.340]
you can modify the visible units on your screen
[00:03:10.980]
by right-clicking in either the parameter edit box
[00:03:14.510]
or in the graphing window.
[00:03:16.800]
For example,
[00:03:17.780]
I can change my poor water pressure units
[00:03:19.920]
in this hydraulic conductivity function from kilo pascals
[00:03:23.600]
to pounds per square foot.
[00:03:28.200]
Alternatively, I can change the hydraulic conductivity
[00:03:31.530]
from meters per second to feet per second.
[00:03:34.760]
The data fields automatically convert to the new unit.
[00:03:39.980]
While in the draw materials menu,
[00:03:41.960]
you can apply the same material to a region
[00:03:44.330]
in multiple analyses and geometry
[00:03:47.170]
by activating the apply to multiple analyses toggle.
[00:03:51.740]
This opens up a list box for you to choose
[00:03:54.900]
which analysis and geometries you would like the material
[00:03:58.010]
to be applied to.
[00:04:00.090]
The same action can be used
[00:04:01.730]
in the draw boundary conditions window.
[00:04:05.760]
The finite element mesh
[00:04:07.250]
and GeoStudio is automatically created
[00:04:10.000]
when you add a material to a geometry.
[00:04:13.180]
You can drag a box over the geometry objects,
[00:04:16.290]
or hold down your Control button on your keyboard
[00:04:19.350]
to click on individual objects
[00:04:21.530]
to highlight them in the draw mesh properties window.
[00:04:26.020]
If you want to modify the mesh properties,
[00:04:28.120]
adjust a line, point or region,
[00:04:31.060]
you can change the dropdown menu here.
[00:04:34.730]
This allows you to modify the element size, element type
[00:04:39.310]
or add mesh constraints to your finite element mesh in 2D.
[00:04:44.670]
The Remove Constraints button can be used
[00:04:47.500]
to remove all constraints
[00:04:49.080]
from the finite element mesh returning
[00:04:51.630]
to the default mesh using the defined global element length.
[00:04:57.650]
If at any time your analysis stops solving
[00:05:00.220]
in the middle of the defined duration,
[00:05:02.830]
you can toggle off all other analyses and choose Solve
[00:05:06.570]
from last time step from the dropdown menu
[00:05:09.100]
on the Start button.
[00:05:14.410]
This will allow the solver to start solving
[00:05:16.710]
from the last save time step in the file.
[00:05:21.460]
If you have a large file or multiple files
[00:05:24.020]
that you are solving,
[00:05:25.490]
there is also the option to solve
[00:05:27.200]
from the command prompt window.
[00:05:30.440]
Geo command can be used to automate the solving,
[00:05:33.280]
upgrading, and report generation
[00:05:35.210]
for many project files sequentially.
[00:05:39.010]
In command prompt,
[00:05:40.430]
you would ensure that your path environment variable
[00:05:42.880]
includes the folder where GeoStudio exists.
[00:05:46.640]
Then, you would type in GeoCmd.exe
[00:05:52.410]
with the file name and location, and the analysis name.
[00:05:56.440]
For more information on the Geo Command executable.
[00:06:00.010]
please refer to the tutorial video on our YouTube channel.
[00:06:06.690]
In order to review and interpret your results,
[00:06:09.640]
you will likely need to create multiple graphs
[00:06:12.280]
in draw graph.
[00:06:14.330]
While working in 2D,
[00:06:15.920]
the custom graph locations can be used to specify locations
[00:06:20.080]
on the model domain that are not geometry objects.
[00:06:24.550]
This could be used to choose a specific node
[00:06:27.190]
or element in the mesh,
[00:06:29.380]
holding down the mouse button and dragging a box,
[00:06:32.010]
allows you to choose a number of nodes or elements
[00:06:35.540]
or holding down the Shift key on your keyboard,
[00:06:37.860]
allows you to highlight nodes along the specified line.
[00:06:43.560]
As a final tip,
[00:06:44.690]
I thought I’d share with you my three favorite hotkeys
[00:06:47.310]
in GeoStudio.
[00:06:49.270]
The first one is Control + Z as this can be used
[00:06:52.360]
to undo the last action you made in GeoStudio,
[00:06:56.170]
whether it was drawing a line,
[00:06:58.120]
deleting a data point in a function and so on.
[00:07:02.670]
The next one is F1,
[00:07:04.950]
the F1 button on your keyboard
[00:07:06.930]
will open the GeoStudio help topic for any window
[00:07:10.040]
that you have open.
[00:07:11.850]
For example,
[00:07:12.750]
if I have the draw graph window open and I hit F1,
[00:07:17.570]
the draw graph help topic is opened in the GeoStudio Help.
[00:07:23.400]
Lastly, if at any time you are missing a window,
[00:07:27.060]
such as the solve manager disappearing,
[00:07:29.860]
you can use Alt + W + E to reset your GeoStudio windows
[00:07:35.630]
to the default layout.
[00:07:37.910]
This will not modify your analysis or results,
[00:07:40.660]
but will simply return all windows
[00:07:42.540]
in the GeoStudio user interface to the default view.
[00:07:48.110]
I have now shared with you 10 of our favorite tips
[00:07:50.520]
and tricks for using GeoStudio.
[00:07:53.340]
I hope you have found these helpful
[00:07:54.830]
in your GeoStudio experience and workflow.
[00:07:57.720]
Thank you for watching.