


In this guide we’ll show how to snap (or influence) a surface with mapped points.
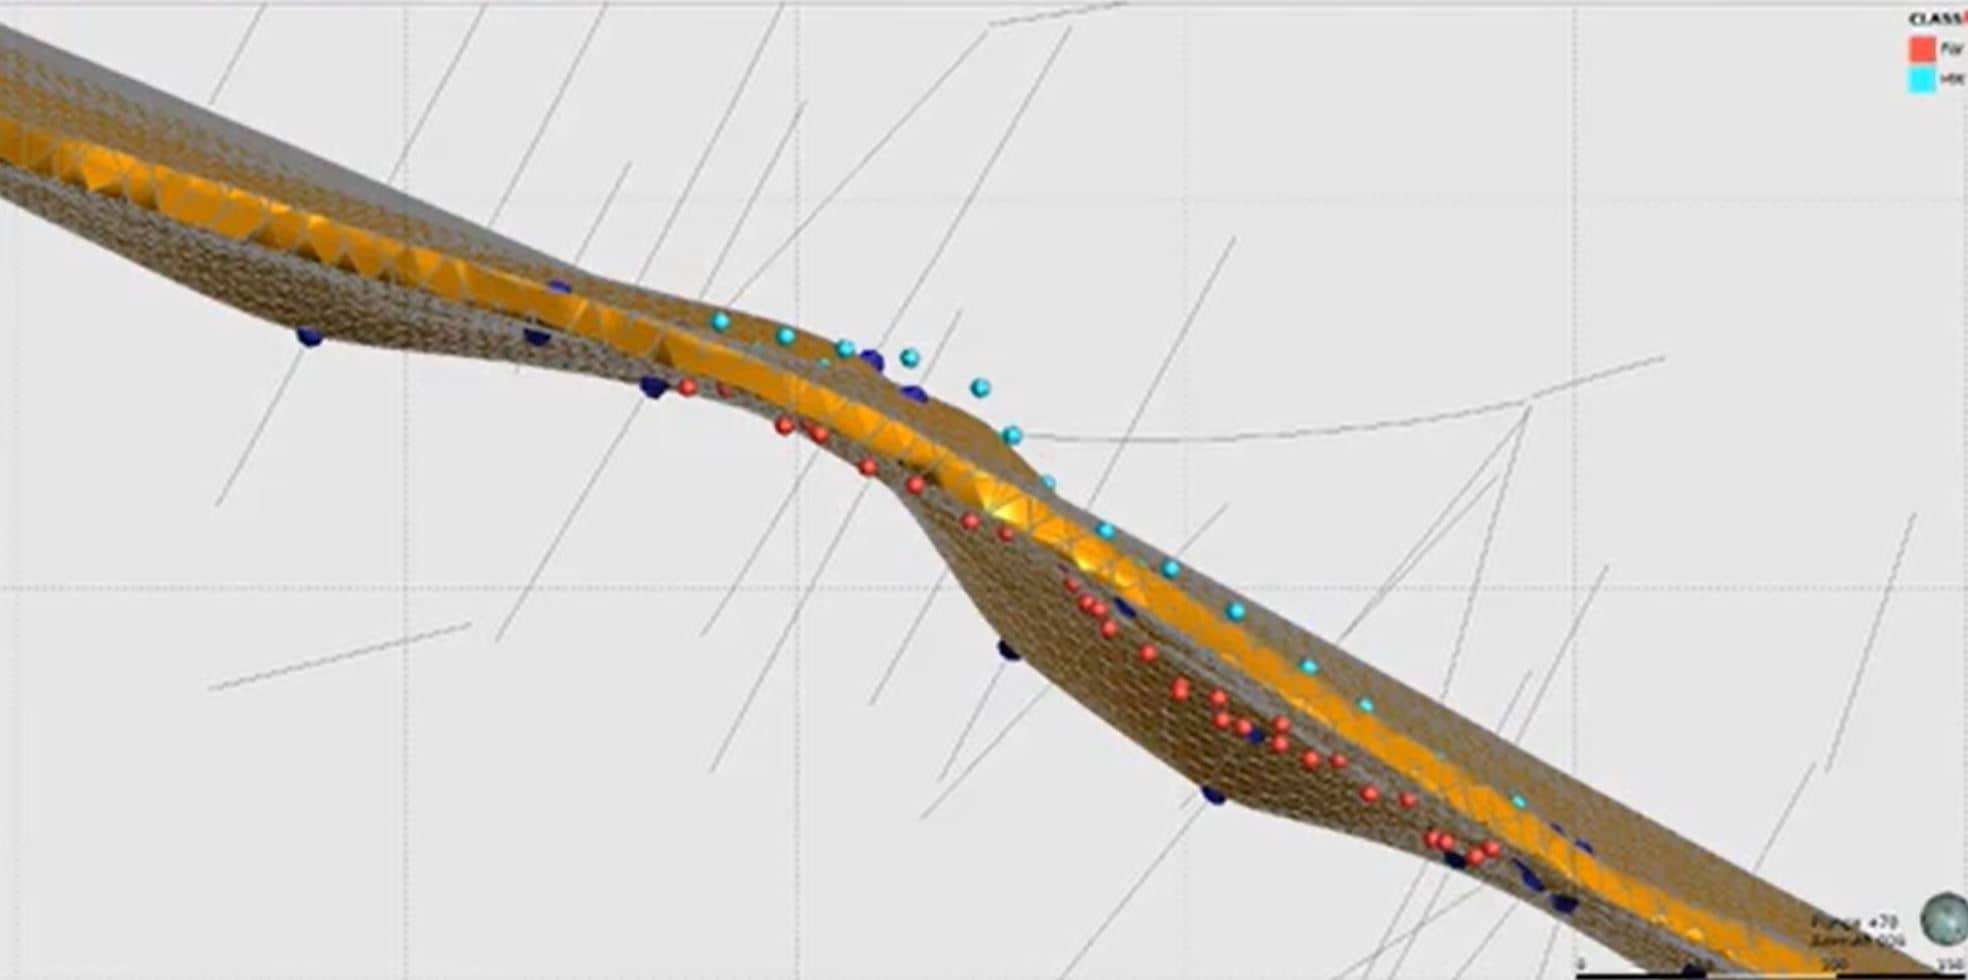
This example shows how to add points into the hanging-wall (HW) and footwall (FW) of a vein.
Duration
10 min
See more on demand videos
VideosFind out more about Leapfrog Geo
Learn moreVideo Transcript
[00:00:05.670]<v Instructor>Hi, welcome to this quick tutorial</v>
[00:00:07.690]on how to incorporate and snap
[00:00:09.830]to geological mapping data in Leapfrog Geo.
[00:00:12.810]This is building on a blog
[00:00:14.650]that was written on our website back in September.
[00:00:17.720]So if you’d like to read in more detail,
[00:00:19.790]you can jump online and have a look.
[00:00:25.220]To go through this workflow,
[00:00:26.270]I’m going to be working in Leapfrog Geo.
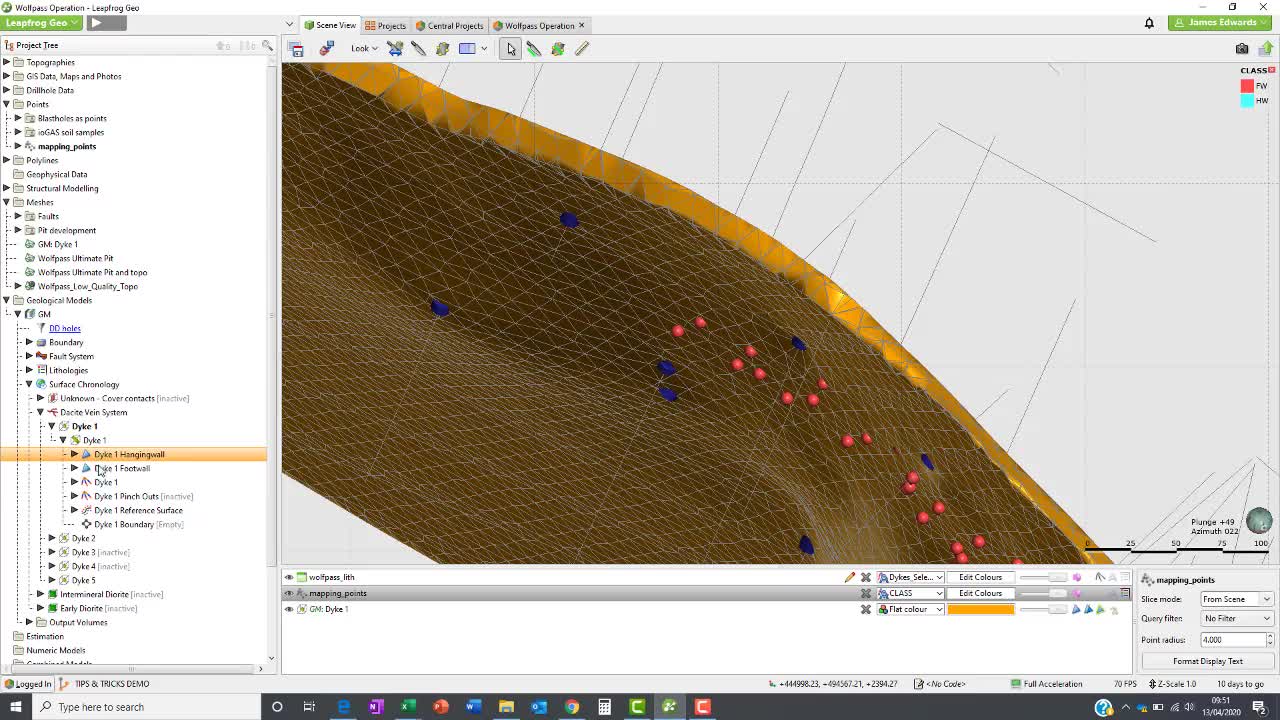
[00:00:29.631]In Leapfrog Geo here,
[00:00:30.464]you can see I have a vein interpretation
[00:00:32.223]that is built off drilling data.
[00:00:35.580]I also have a set of mapping data
[00:00:37.800]that has been collected in the field.
[00:00:40.250]This consists of X, Y, and Z locational data
[00:00:45.000]and two category columns.
[00:00:49.030]The classification here has been broken up
[00:00:50.750]into hanging wall and foot wall contact points
[00:00:54.750]and we’re going to use these
[00:00:57.080]to update the interpretation in the Geo model.
[00:01:03.440]So the first step to be able to update a vein
[00:01:07.190]with mapping data is to put in the data into our project.
[00:01:11.790]To do this, I’m going to come to the points folder,
[00:01:14.090]I’m going to right click, and I’m going to bring the points in.
[00:01:18.075]I’m going to bring in the mapping points,
[00:01:20.936]I’m going to make sure my columns are selected correctly.
[00:01:24.010]So in this case, I need to make sure my elevation is flagged
[00:01:28.130]and I want to bring in the data here as category.
[00:01:36.060]We can then have a look at this data in the seen view.
[00:01:41.530]So you can see here, we have three elevations.
[00:01:51.710]And we have a foot wall dataset and a hanging wall dataset.
[00:02:01.540]And what we want to do is use these points
[00:02:04.310]to update the interpretation.
[00:02:06.400]So you can see when we look from above here
[00:02:08.820]that some of my hanging wall data
[00:02:10.630]suggest that this vein should be coming further out.
[00:02:15.010]So what we’ll do as a first step,
[00:02:16.750]so we’re going to have a look at how this mapping data
[00:02:18.480]impacts our interpretation, we’re going to take a copy.
[00:02:21.360]I’m going to extract my mesh
[00:02:24.900]and we’ll come back to that one later.
[00:02:30.230]Now to update the vein in particular,
[00:02:32.790]we need to focus on the objects that make that vein.
[00:02:36.270]So in this case, I’ve expanded my Dyke 1
[00:02:38.950]and I’ve come to the different objects
[00:02:41.200]that are used to build it.
[00:02:43.130]I want to change the hanging wall and the foot wall
[00:02:45.430]based on the data portion of the project.
[00:02:48.480]Now at the moment I can’t do that
[00:02:49.740]because all the data is contained within one file
[00:02:52.310]and there’s no way within an edit down here
[00:02:55.390]that I can differentiate between the hanging wall
[00:02:57.860]and foot wall.
[00:02:59.030]So to do that, I need to separate this data.
[00:03:04.400]So I will right click and create a new selection.
[00:03:09.370]So my new selection’s going to be built off a query,
[00:03:12.190]and that’s going to focus on the classification column
[00:03:14.640]that I imported and where it is equal to the foot wall.
[00:03:21.940]I’m going to create a foot wall contact dataset.
[00:03:29.520]I can repeat the process here with the hanging wall.
[00:03:31.900]So I’m going to create new selection, and new query
[00:03:35.820]and again, look at the classification column
[00:03:39.700]where it is equal to hanging wall,
[00:03:45.193]and we can call that hanging wall contacts.
[00:03:50.010]Now if you don’t have those classifications
[00:03:51.870]in your data set to begin with,
[00:03:53.840]you can always create a new category selection
[00:03:56.690]from the imported data,
[00:03:58.409]and you can go and update this in the same view.
[00:04:03.320]But now that I’ve split my data out, we can have a look.
[00:04:07.270]So if I load just my foot wall contacts on,
[00:04:10.600]I can see that I’ve split that data
[00:04:12.210]into a foot wall data set and if we load the hanging wall,
[00:04:18.840]it appears on the other side.
[00:04:24.860]So to have this data, the first step is to come down
[00:04:28.870]to the objects themselves.
[00:04:32.780]Now in this case, we’re going to go to the hanging wall,
[00:04:35.740]we’re going to add data and add the points.
[00:04:39.470]Because I’m working on my hanging wall surface,
[00:04:41.120]I want to add the hanging wall contacts, I click okay.
[00:04:45.430]And that will start to reprocess my vein
[00:04:48.800]and the rest of my model.
[00:04:51.490]I can repeat that for the foot wall.
[00:04:53.700]So while this is running,
[00:04:54.930]I’m going to add the points to my foot wall contact as well.
[00:04:58.080]And what we should see is, as this starts to process,
[00:05:01.870]the vein will change based on that mapping data.
[00:05:05.820]So let’s make those points a bit more visible.
[00:05:16.470]So here you can see the vein surface
[00:05:18.410]has now come out to try and honor those points.
[00:05:21.310]However, at the moment it is using them as a guide,
[00:05:24.490]but it is not snapped.
[00:05:25.690]So you can see the edges of my triangulations here
[00:05:27.800]are not snapping to my data points.
[00:05:31.140]So if I want to make sure that my vein interpretation
[00:05:33.940]is also snapped, I need to come back to my dyke down here,
[00:05:38.510]double click, and initially go to surfacing.
[00:05:43.000]In the snap to data, I have changed it to custom.
[00:05:48.050]Yours may often be set to drilling only.
[00:05:52.270]Once I’ve set it to custom, I can come to the inputs.
[00:05:54.280]So this is looking at the data that is creating this vein,
[00:05:57.910]and you can see now that out of the data
[00:05:59.700]that’s making up the hanging wall and the foot wall,
[00:06:02.760]I can choose what I want to snap to.
[00:06:05.740]In this case, I want to snap to my points
[00:06:09.650]and I already have snap to drill holes
[00:06:12.240]selected here as well.
[00:06:18.140]Now that will reprocess again and when it updates,
[00:06:20.880]what you’ll see is that the triangulations here
[00:06:23.589]will now snap to my data as well.
[00:06:35.630]So there you can see the updates.
[00:06:40.010]Now the last thing I want to do
[00:06:41.240]just to make sure that this has worked properly
[00:06:44.780]is we’re going to take a slice at the elevation here,
[00:06:51.489]split this a bit and we’ll look down.
[00:06:57.490]So here you can now see the outline of my vein
[00:07:00.330]based off my mapping data.
[00:07:05.390]We’ll also set the drill holes.
[00:07:10.140]There we go.
[00:07:12.060]Now, if we go back to the copy I took originally
[00:07:14.370]and we load that on, you can see how that has changed
[00:07:18.070]from the original interpretation
[00:07:19.970]to the updated based on the mapping data.
[00:07:24.370]So the great thing is now that you have this setup
[00:07:26.700]is this is now a dynamic edit.
[00:07:30.360]So as you collect more data,
[00:07:32.980]you can refresh your mapping point subject,
[00:07:36.590]which will refresh the context selection
[00:07:39.690]and therefore update your vein.
[00:07:41.820]So just to show you that in action,
[00:07:43.670]if we come back to our full model,
[00:07:47.950]I now have a new set of mapping data
[00:07:50.870]taken here at my 2,970 elevation.
[00:07:55.050]So I’m going to take that data
[00:07:57.500]and I’m going to copy it to the bottom of my current data set.
[00:08:07.610]Click save, and then in my project,
[00:08:12.760]I’m going to come back to my mapping file
[00:08:16.680]and I’m going to choose to reload data.
[00:08:21.730]I’m going to reload the original object
[00:08:29.370]and what we should see is that once that data comes in,
[00:08:32.840]it will update my selection and now you can see,
[00:08:35.130]let’s make this a bit more transparent.
[00:08:38.660]You can see, I have now a new set of data
[00:08:41.930]on my elevation down here.
[00:08:44.600]And as I got a new set of elevation data is now updated.
[00:08:50.960]You can see the vein has now snapped
[00:08:52.780]to this new information.
[00:08:56.090]So it’s really as simple as that.
[00:08:58.100]You create your import file in your points folder,
[00:09:01.140]and you just constantly refresh that
[00:09:03.210]with your new mapping data.
[00:09:05.190]And as you add that data in,
[00:09:06.720]it will work with your project to update your vein.
[00:09:13.600]So thanks very much for joining this quick tutorial.
[00:09:16.610]I’d say there’s plenty more information and guides
[00:09:18.760]and hows to’s on your MySeequent page
[00:09:22.160]and on our YouTube homepage.
[00:09:25.830]Thanks very much.