


С помощью рабочего процесса UAV Workflow вы планируете, собираете и обрабатываете магниторазведочные данные вашего БПЛА и выполняете все важнейшие этапы по подготовке ваших данных для определения целевых объектов и моделирования.
Вебинар будет посвящен основным преимуществам рабочего процесса UAV Workflow в Oasis montaj и концепциям, которые следует учитывать перед началом работы.
Присоединяйтесь к Джоанне Деммер из Seequent (геофизик проекта) и Марку Лоу (старший геофизик проекта), которые обсудят следующее:
- Обзор рабочего процесса UAV Workflow в Oasis montaj и примеры проведения геомагнитной съемки с использованием БПЛА.
- Планирование съемки — как спланировать исследования с БПЛА с возможностями съемки в пределах прямой видимости, бесполетных зон и съемки с обтеканием рельефа.
- Визуализация и передача результатов георазведки.
Обзор
спикеров
Джоанна Деммер (Joanne Demmer)
Геофизик проекта — Seequent
Марк Лоу (Mark Lowe)
Старший геофизик проекта — Seequent
Продолжительность
35 минут

Смотреть больше видео по запросу
ВидеоУзнайте больше об Oasis montaj
Узнать большеРасшифровка видеозаписи
[00:00:01.750]<br />
<encoded_tag_open />v Joanne<encoded_tag_closed />Hello everyone<encoded_tag_open />/v<encoded_tag_closed /><!— wpml:html_fragment </p> —>
<p>[00:00:02.710]<br />
and welcome to this months Technical Tuesday.</p>
<p>[00:00:06.830]<br />
I’m just going to wait for one minute before starting</p>
<p>[00:00:10.060]<br />
just to give everyone a chance to get connected</p>
<p>[00:00:12.540]<br />
and to join the session.</p>
<p>[00:01:01.590]<br />
Thank you all for joining this months</p>
<p>[00:01:03.380]<br />
Technical Tuesday session,</p>
<p>[00:01:05.590]<br />
which is on How To Plan A Drone Magnetic Survey</p>
<p>[00:01:09.290]<br />
Using The UAV Extension In Oasis Montaj.</p>
<p>[00:01:15.297]<br />
I’m Joanne Demmer, a project geophysicist</p>
<p>[00:01:18.500]<br />
at Seequent Australia.</p>
<p>[00:01:25.320]<br />
In this session,</p>
<p>[00:01:26.390]<br />
we’ll cover why collect magnetic data with a drone?</p>
<p>[00:01:30.990]<br />
We’ll go through some case study examples.</p>
<p>[00:01:34.680]<br />
I’ll give you some tips and tricks on survey planning.</p>
<p>[00:01:39.180]<br />
We’ll go through a quick outline of the processing workflow.</p>
<p>[00:01:43.790]<br />
And finally, tips on how to visualize</p>
<p>[00:01:46.440]<br />
and share your results.</p>
<p>[00:01:50.220]<br />
So what is a UAV?</p>
<p>[00:01:52.690]<br />
UAV is short for unmanned aerial vehicle</p>
<p>[00:01:56.550]<br />
and they’re commonly referred to as drones.</p>
<p>[00:02:00.980]<br />
In the last decade, they’ve been many advances</p>
<p>[00:02:03.150]<br />
in the commercialization of UAV systems</p>
<p>[00:02:06.630]<br />
and developments in sensor technology,</p>
<p>[00:02:09.360]<br />
which is changing how we investigate the surface</p>
<p>[00:02:12.430]<br />
and the subsurface of the earth.</p>
<p>[00:02:16.570]<br />
Drones provide a means to acquire high resolution</p>
<p>[00:02:19.560]<br />
magnetic data at a fast pace.</p>
<p>[00:02:23.230]<br />
They are lightweight, powerful</p>
<p>[00:02:25.490]<br />
and improvements in battery technology</p>
<p>[00:02:27.700]<br />
have increased flight times, payloads and ranges.</p>
<p>[00:02:32.640]<br />
Drones can easily and cheaply go where humans can’t</p>
<p>[00:02:36.230]<br />
and they don’t put people at risk.</p>
<p>[00:02:39.840]<br />
So when would you consider doing a drone magnetic survey?</p>
<p>[00:02:44.090]<br />
UAV surveys are not displacing the conventional ground</p>
<p>[00:02:47.480]<br />
or airborne surveys,</p>
<p>[00:02:49.370]<br />
rather filling the gap between them.</p>
<p>[00:02:52.910]<br />
Consider doing a drone survey if you have, for example,</p>
<p>[00:02:56.980]<br />
an area of steep terrain</p>
<p>[00:02:59.290]<br />
that is too rugged for a helicopter to draw it adequately.</p>
<p>[00:03:03.800]<br />
An area too dangerous to access by foot.</p>
<p>[00:03:06.930]<br />
Perhaps you’ve got marshlands, tailings</p>
<p>[00:03:10.000]<br />
or danger zones that contain unexploded ordinance.</p>
<p>[00:03:14.850]<br />
Or a densely populated area or farmland.</p>
<p>[00:03:19.120]<br />
Drones are quiet so reduce disturbance</p>
<p>[00:03:22.500]<br />
to residents and livestock.</p>
<p>[00:03:27.730]<br />
So what types of problems</p>
<p>[00:03:29.120]<br />
can a drone magnetic survey resolve?</p>
<p>[00:03:33.810]<br />
They can be used to locate near surface buried objects</p>
<p>[00:03:37.410]<br />
or infrastructure with a magnetic signature.</p>
<p>[00:03:41.100]<br />
For example, archeological discoveries</p>
<p>[00:03:43.590]<br />
or detecting buried cables or unexploded ordinance.</p>
<p>[00:03:50.000]<br />
This first example shows the results from a Mag Arrow survey</p>
<p>[00:03:54.740]<br />
that was conducted to detect and delineate</p>
<p>[00:03:57.680]<br />
buried oil and gas pipelines.</p>
<p>[00:04:00.960]<br />
The pipes can be identified from the TMI grid on the left,</p>
<p>[00:04:05.300]<br />
which shows high anomalies that have a linear trend.</p>
<p>[00:04:12.320]<br />
Drone magnetic surveys can also detect hazards</p>
<p>[00:04:15.870]<br />
such as sink holes or mine shafts.</p>
<p>[00:04:19.790]<br />
This example, also a Mag Arrow survey,</p>
<p>[00:04:24.080]<br />
was conducted to identify abandoned oil and gas wells,</p>
<p>[00:04:27.960]<br />
and the results were compared with legacy data.</p>
<p>[00:04:32.470]<br />
The TMI highs on the grids on the left</p>
<p>[00:04:36.130]<br />
highlight well locations.</p>
<p>[00:04:39.030]<br />
These have been plotted in blue</p>
<p>[00:04:41.550]<br />
on the Mag heat map on the right</p>
<p>[00:04:44.430]<br />
and compared with the legacy locations</p>
<p>[00:04:46.430]<br />
that have been plotted in black.</p>
<p>[00:04:49.560]<br />
As you can see, the old information was not very accurate.</p>
<p>[00:04:58.030]<br />
Drone magnetic surveys can also map</p>
<p>[00:05:00.640]<br />
environmental contamination.</p>
<p>[00:05:04.320]<br />
The results from this Mag Arrow survey</p>
<p>[00:05:06.800]<br />
were used to characterize a landfill site</p>
<p>[00:05:10.766]<br />
and it was used to identify areas with buried steel</p>
<p>[00:05:14.230]<br />
and isolate areas with buried organic waste</p>
<p>[00:05:18.010]<br />
to try and assess the volume</p>
<p>[00:05:19.360]<br />
of potential methane gas emissions.</p>
<p>[00:05:24.080]<br />
The data from the three examples I’ve shown</p>
<p>[00:05:27.950]<br />
were provided by Ron Bell of Geometrics,</p>
<p>[00:05:31.340]<br />
and they’ve been presented at past sequence Lyceum events.</p>
<p>[00:05:36.770]<br />
Our fourth and final example demonstrates</p>
<p>[00:05:39.830]<br />
how and why drone magnetics is being used</p>
<p>[00:05:42.660]<br />
in mineral exploration.</p>
<p>[00:05:45.459]<br />
A senior project geophysicist, Mark Lowe,</p>
<p>[00:05:48.430]<br />
talked to Adam Kroll,</p>
<p>[00:05:50.090]<br />
the principle geophysicist at AirGEOX</p>
<p>[00:05:53.310]<br />
about their recent Near Mine Project.</p>
<p>[00:05:57.080]<br />
<encoded_tag_open />v -<encoded_tag_closed />Hi, my name is Adam Kroll.<encoded_tag_open />/v<encoded_tag_closed /></p>
<p>[00:05:58.600]<br />
I’m the principle geophysicist of AirGEOX</p>
<p>[00:06:01.780]<br />
a drone magnetometer acquisition company.</p>
<p>[00:06:05.070]<br />
These are my details down here in the bottom left</p>
<p>[00:06:07.570]<br />
in case you want to contact me after this presentation,</p>
<p>[00:06:10.930]<br />
and thanks Mark for inviting me.</p>
<p>[00:06:13.140]<br />
So these are a couple of the drones that we use.</p>
<p>[00:06:14.517]<br />
We’ve got to Gasser Heli at the top</p>
<p>[00:06:17.100]<br />
and a Gasser Electric Hybrid Multirotor</p>
<p>[00:06:20.980]<br />
down the bottom there.</p>
<p>[00:06:21.960]<br />
That’s the one we’ve developed ourselves</p>
<p>[00:06:24.310]<br />
and flies for about an hour and a half up to two hours.</p>
<p>[00:06:28.940]<br />
This is magnetometer that we’ve developed ourselves.</p>
<p>[00:06:33.640]<br />
We use a magnetometer that has a sensitivity</p>
<p>[00:06:35.810]<br />
of one picoTesla per square root Hertz.</p>
<p>[00:06:38.190]<br />
So about the same as a gem or Cintrix magnetometer.</p>
<p>[00:06:44.140]<br />
In the nose here, we also have our</p>
<p>[00:06:48.330]<br />
GPS IMU laser altimeter,</p>
<p>[00:06:50.520]<br />
data acquisition system,</p>
<p>[00:06:53.060]<br />
all that good stuff and a battery</p>
<p>[00:06:54.510]<br />
that gives it two hours flight time,</p>
<p>[00:06:56.600]<br />
and the best thing, 500 grams weight</p>
<p>[00:06:58.760]<br />
so great for endurance of a drone.</p>
<p>[00:07:04.230]<br />
Essentially all of the,</p>
<p>[00:07:07.320]<br />
everything we’ve done to design this bird has been to</p>
<p>[00:07:11.340]<br />
develop the highest sensitivity,</p>
<p>[00:07:13.920]<br />
most accurate magnetometer data possible.</p>
<p>[00:07:17.580]<br />
So the magnetometers in the tail,</p>
<p>[00:07:19.000]<br />
whereas all the electronics are in the nose.</p>
<p>[00:07:21.010]<br />
We also towed the magnetometer bird down here,</p>
<p>[00:07:25.830]<br />
20 meters under the multirotor by a rope.</p>
<p>[00:07:29.290]<br />
And that removes it from any of the electromagnetic noise</p>
<p>[00:07:31.730]<br />
generated from the multirotor.</p>
<p>[00:07:34.870]<br />
Now this survey that I’m going to talk about</p>
<p>[00:07:36.410]<br />
is a near mine site exploration for gold</p>
<p>[00:07:42.040]<br />
hosted in ironstone sediments.</p>
<p>[00:07:44.750]<br />
So obviously being iron, it’s magnetic,</p>
<p>[00:07:47.510]<br />
the best technique is using a magnetometer.</p>
<p>[00:07:51.590]<br />
The problem that the client has is that</p>
<p>[00:07:53.560]<br />
they’ve flown the area with a plane</p>
<p>[00:07:57.370]<br />
and they’ve covered a lot of the ground</p>
<p>[00:07:59.267]<br />
with this ground magnetics.</p>
<p>[00:08:00.830]<br />
Problem with the ground magnetics is that</p>
<p>[00:08:02.450]<br />
they hadn’t had a makeymite there</p>
<p>[00:08:04.070]<br />
and the makeymite produces a lot of really high frequency,</p>
<p>[00:08:07.410]<br />
high intensity results that obscure the deposits</p>
<p>[00:08:11.469]<br />
that they’re looking for.</p>
<p>[00:08:13.150]<br />
And what we found is that that 15 meters altitude</p>
<p>[00:08:17.420]<br />
were effectively filtering out that makeymite noise,</p>
<p>[00:08:21.360]<br />
but we’re seeing deposits</p>
<p>[00:08:22.900]<br />
sort of 15 meters diameter and larger.</p>
<p>[00:08:26.262]<br />
I’ll you a little video of how assist flies.</p>
<p>[00:08:30.858]<br />
(drone engine revving)</p>
<p>[00:08:32.316]<br />
And is the drone up here and the bird down the bottom.</p>
<p>[00:08:37.011]<br />
(drone engine revving)</p>
<p>[00:08:43.627]<br />
And as you can see, 15 meters is a really low altitude.</p>
<p>[00:08:46.760]<br />
It’s not that high above the car.</p>
<p>[00:08:49.090]<br />
And that’s all good and well when you’ve got flat ground</p>
<p>[00:08:51.480]<br />
like this with low level traps.</p>
<p>[00:08:54.990]<br />
But what happens when the client says,</p>
<p>[00:08:57.640]<br />
can you fly over our pit, our open pit, and our dump.</p>
<p>[00:09:03.220]<br />
Flying it that at 15 meters is a little bit hairy,</p>
<p>[00:09:05.440]<br />
but we said, oh, we’ll give it a go.</p>
<p>[00:09:08.580]<br />
So what we did was</p>
<p>[00:09:12.570]<br />
we,<br />
(clearing throat)</p>
<p>[00:09:13.810]<br />
sorry, and here’s a just at the bottom here is a</p>
<p>[00:09:17.360]<br />
it shows that we’re sort of at 330 meters altitude there,</p>
<p>[00:09:20.440]<br />
it drops by 45 meters into the pit, comes out and then the</p>
<p>[00:09:25.680]<br />
dump is 15 meters high.</p>
<p>[00:09:30.370]<br />
So we flew along and as we descended it was going okay.</p>
<p>[00:09:35.460]<br />
And then it went across the pit floor,</p>
<p>[00:09:39.070]<br />
but the trouble started when we started climbing.</p>
<p>[00:09:42.380]<br />
So the drone stopped its horizontal movement</p>
<p>[00:09:45.200]<br />
and then started climbing vertically.</p>
<p>[00:09:47.300]<br />
But the momentum of the bird kept it moving forward.</p>
<p>[00:09:50.670]<br />
And essentially the bird just smashed into the pit wall</p>
<p>[00:09:53.820]<br />
and it dragged off the hole out of the pit wall,</p>
<p>[00:09:58.700]<br />
which really wasn’t nice to see.</p>
<p>[00:10:01.030]<br />
And yeah, pretty much storied out bird.</p>
<p>[00:10:03.170]<br />
So we went to the client and we said,</p>
<p>[00:10:06.350]<br />
you know, we can’t do this.</p>
<p>[00:10:07.790]<br />
We can’t descend into the pit.</p>
<p>[00:10:09.690]<br />
What we’ll do is we’ll just descend say 15 meters</p>
<p>[00:10:12.530]<br />
and then fly level through the pit.</p>
<p>[00:10:14.940]<br />
And so to do that, I generated a DEN</p>
<p>[00:10:18.990]<br />
where if you see here we’ve got the DEN,</p>
<p>[00:10:22.010]<br />
but then it flat lines</p>
<p>[00:10:23.750]<br />
after we’ve descended 15 meters into the pit.</p>
<p>[00:10:26.800]<br />
So that’s what we did.</p>
<p>[00:10:28.370]<br />
So we flew to that flight profile and here,</p>
<p>[00:10:31.620]<br />
you know, Y system shows our GPS altitude, the DEN,</p>
<p>[00:10:36.970]<br />
the drawing essentially flies along, drops at 15 meters,</p>
<p>[00:10:40.710]<br />
flat lines over the pit, climbs again.</p>
<p>[00:10:43.230]<br />
And it does a pretty good job of climbing the dump.</p>
<p>[00:10:47.800]<br />
So everything went well after that little test.</p>
<p>[00:10:53.360]<br />
So let’s have a look now at</p>
<p>[00:10:56.740]<br />
whether we achieved what the client wanted to achieve.</p>
<p>[00:10:59.810]<br />
So this is the plain magnetic data that they had previously</p>
<p>[00:11:06.950]<br />
and this is at a high resolution drone magnetic data.</p>
<p>[00:11:12.095]<br />
So from the outset, all of the features is the same.</p>
<p>[00:11:15.670]<br />
One thing to note is that over the mine site,</p>
<p>[00:11:18.630]<br />
there was no adverse effects from flying</p>
<p>[00:11:24.780]<br />
over the pit or over the dump.</p>
<p>[00:11:27.300]<br />
We can see here, there’s really not much going on there.</p>
<p>[00:11:30.600]<br />
There is some ironstone here off to the side of the pit,</p>
<p>[00:11:37.014]<br />
which is a depth.</p>
<p>[00:11:38.820]<br />
And there’s probably some</p>
<p>[00:11:40.110]<br />
small amount of dumped ironstone there,</p>
<p>[00:11:42.900]<br />
but generally everything went well over there.</p>
<p>[00:11:45.570]<br />
But can we detect the small ironstone deposits</p>
<p>[00:11:48.480]<br />
that they’ve paid us to detect?</p>
<p>[00:11:51.320]<br />
If we scroll over here a little bit,</p>
<p>[00:11:53.080]<br />
we can see there’s a large ironstone deposit</p>
<p>[00:11:55.780]<br />
and here’s a little anomaly off to the side.</p>
<p>[00:11:58.670]<br />
So if we zoom into that and we measure it up,</p>
<p>[00:12:03.250]<br />
we can say that that’s about a 25 meter wide anomaly</p>
<p>[00:12:08.560]<br />
in both directions.</p>
<p>[00:12:11.530]<br />
And if we look at the ground,</p>
<p>[00:12:14.320]<br />
we can sort of see tracks coming off here,</p>
<p>[00:12:16.420]<br />
perhaps drilling was done over here but</p>
<p>[00:12:20.814]<br />
for this spot doesn’t look like any drilling</p>
<p>[00:12:23.860]<br />
has been done there in the past.</p>
<p>[00:12:25.690]<br />
And so that’s exactly what the client wanted to see.</p>
<p>[00:12:28.960]<br />
High frequency, normally anomalies is like that.</p>
<p>[00:12:31.020]<br />
And as we can see, the data’s really smooth.</p>
<p>[00:12:34.420]<br />
Really nice.</p>
<p>[00:12:36.990]<br />
We don’t see makeymite</p>
<p>[00:12:39.010]<br />
so these ironstone deposits stand out.</p>
<p>[00:12:42.101]<br />
So it’s a good result for the client.</p>
<p>[00:12:43.870]<br />
We’ve flown now thousands of line kilometers</p>
<p>[00:12:46.010]<br />
for them over this area and that relationship continues</p>
<p>[00:12:50.300]<br />
because essentially they’re happy that the drone data</p>
<p>[00:12:54.470]<br />
is providing them with something that they can’t get</p>
<p>[00:12:56.510]<br />
from ground mag and they can’t get it</p>
<p>[00:12:58.240]<br />
from traditional airborne mag methods.</p>
<p>[00:13:01.630]<br />
Thank you for your time.</p>
<p>[00:13:04.920]<br />
<encoded_tag_open />v Joanne<encoded_tag_closed />Tips and tricks on how to plan<encoded_tag_open />/v<encoded_tag_closed /></p>
<p>[00:13:06.750]<br />
a dry and magnetic survey.</p>
<p>[00:13:09.660]<br />
So I’ve created a new project in Oasis Montaj,</p>
<p>[00:13:14.200]<br />
and I’ve loaded the UAV extension.</p>
<p>[00:13:18.850]<br />
The first option is survey planning.</p>
<p>[00:13:23.180]<br />
So it’s really easy to plan a UAV survey</p>
<p>[00:13:25.820]<br />
and to create a flight line plan.</p>
<p>[00:13:28.540]<br />
All you need is a DTM grid</p>
<p>[00:13:31.040]<br />
and an area of interest polygon file.</p>
<p>[00:13:35.430]<br />
If you don’t have a DTM or it’s not an adequate resolution,</p>
<p>[00:13:39.830]<br />
you can use the public tab to download free SRTM data.</p>
<p>[00:13:48.370]<br />
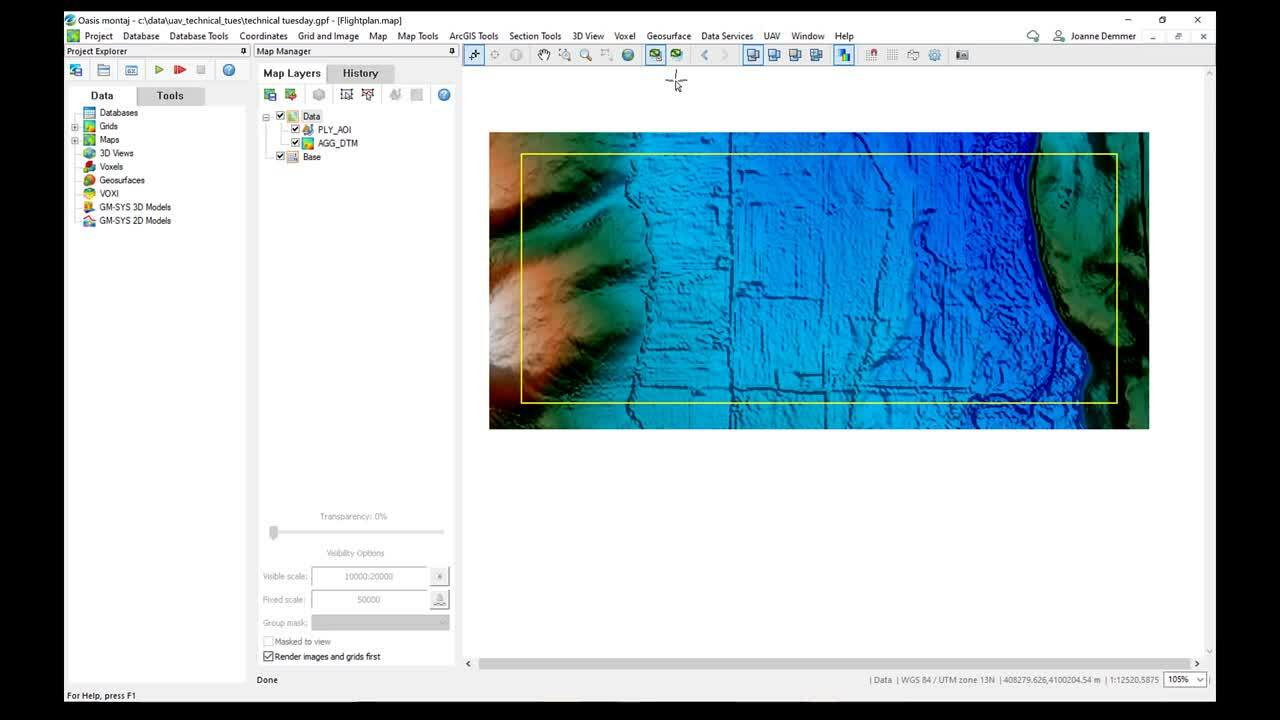
You can define an area of interest</p>
<p>[00:13:50.260]<br />
using CAD tools in Oasis Montaj.</p>
<p>[00:13:53.550]<br />
This area can be inclusive or exclusive</p>
<p>[00:13:57.180]<br />
if you need to navigate over or around cultural obstacles,</p>
<p>[00:14:02.510]<br />
such as pylons or property.</p>
<p>[00:14:07.530]<br />
The area bound by the yellow box</p>
<p>[00:14:11.270]<br />
is an inclusive area of interest.</p>
<p>[00:14:14.652]<br />
And I’m going to modify this</p>
<p>[00:14:16.720]<br />
to incorporate an exclusion zone.</p>
<p>[00:14:21.340]<br />
To do that, I go to map tools, CAD tools,</p>
<p>[00:14:25.810]<br />
and I’m going to create a polygon PLY file.</p>
<p>[00:14:33.380]<br />
My area is going to be exclusive,</p>
<p>[00:14:37.330]<br />
and I’m going to append this to the current</p>
<p>[00:14:39.930]<br />
AOI polygon file.</p>
<p>[00:14:44.369]<br />
I’m going to draw this interactively on the map.</p>
<p>[00:14:50.450]<br />
So there is a property here which</p>
<p>[00:14:55.160]<br />
we’re not allowed to fly over.</p>
<p>[00:14:57.860]<br />
So I’m going to</p>
<p>[00:15:01.760]<br />
create an exclusion zone over that,</p>
<p>[00:15:08.480]<br />
and redraw my polygon file.</p>
<p>[00:15:16.870]<br />
So I’ve now added the exclusion zone to my area.</p>
<p>[00:15:24.320]<br />
So once I’ve defined my area of interest,</p>
<p>[00:15:27.810]<br />
I can go back into the UAV extension and plan a UAV survey.</p>
<p>[00:15:37.950]<br />
The data that I’m using for this example</p>
<p>[00:15:40.190]<br />
was a Mike Arrows survey</p>
<p>[00:15:43.430]<br />
on data was supplied by Ron Bell from Geometrics.</p>
<p>[00:15:50.100]<br />
So I’m going to give it a survey name.</p>
<p>[00:15:55.673]<br />
I’m going to define the area of interest polygon file</p>
<p>[00:15:58.220]<br />
that I’ve just made.</p>
<p>[00:16:03.070]<br />
It’s automatically detected the coordinate system</p>
<p>[00:16:06.120]<br />
based on this polygon.</p>
<p>[00:16:10.620]<br />
So I’m going to plan my UAV survey to a DEM grid</p>
<p>[00:16:13.560]<br />
and specify the DEM grid here.</p>
<p>[00:16:18.590]<br />
You can also plan to a constant elevation.</p>
<p>[00:16:25.500]<br />
A terrain clearance flight line and flight line spacing</p>
<p>[00:16:30.680]<br />
should all be decided based on your target of interest</p>
<p>[00:16:36.520]<br />
and the depth of the target and its orientation.</p>
<p>[00:16:42.730]<br />
Drones can fly really close to the ground</p>
<p>[00:16:45.590]<br />
so this improves signal strength.</p>
<p>[00:16:49.050]<br />
I’m going to put a terrain clearance of 35 meters</p>
<p>[00:16:52.490]<br />
in this example.</p>
<p>[00:16:53.810]<br />
And my flight lines are going to be east-west.</p>
<p>[00:16:57.270]<br />
So 90 degrees.</p>
<p>[00:17:03.560]<br />
And the flight line spacing, I’m going to put 50 meters.</p>
<p>[00:17:08.010]<br />
You can choose to add tie lines,</p>
<p>[00:17:11.550]<br />
it’ll automatically calculate the flight line spacing</p>
<p>[00:17:16.490]<br />
at 10 times the flight line spacing.</p>
<p>[00:17:19.640]<br />
I would recommend adding the tie lines in a separate</p>
<p>[00:17:24.880]<br />
flight plan and merge them in later on,</p>
<p>[00:17:29.490]<br />
this will improve your leveling.</p>
<p>[00:17:34.920]<br />
You can also display the results in 2D and or 3D.</p>
<p>[00:17:41.570]<br />
Under the more options,</p>
<p>[00:17:46.560]<br />
you have further options to</p>
<p>[00:17:51.260]<br />
change the sample spacing.</p>
<p>[00:17:57.100]<br />
You can change the line extension</p>
<p>[00:17:59.410]<br />
beyond the area of interest.</p>
<p>[00:18:01.440]<br />
I’m going to put 10 meters.</p>
<p>[00:18:06.210]<br />
This is advisable to accommodate four terms and also</p>
<p>[00:18:12.160]<br />
push end of line processing artifacts</p>
<p>[00:18:14.990]<br />
outside of the chargeable kilometers boundary.</p>
<p>[00:18:21.597]<br />
You can also change the numbering and the number increment.</p>
<p>[00:18:30.580]<br />
If there is a particular area of interest</p>
<p>[00:18:32.550]<br />
that you want to force your flight plan over,</p>
<p>[00:18:35.480]<br />
you can include weigh points</p>
<p>[00:18:37.710]<br />
and you can locate these interactively on the map.</p>
<p>[00:18:47.590]<br />
If I want to force my flight plan over this point,</p>
<p>[00:18:52.200]<br />
I can.</p>
<p>[00:18:59.080]<br />
So under drape options,</p>
<p>[00:19:00.480]<br />
you can calculate a drape survey altitude for the drone.</p>
<p>[00:19:06.990]<br />
So drones can</p>
<p>[00:19:09.830]<br />
cope with severe changes in elevation really well</p>
<p>[00:19:12.400]<br />
and they can stick to tightly draped flight plans.</p>
<p>[00:19:16.040]<br />
So there’s no need to smooth the drape</p>
<p>[00:19:21.036]<br />
and the climate descent angles can be near vertical.</p>
<p>[00:19:25.130]<br />
I’m going to put 90 degrees.</p>
<p>[00:19:28.980]<br />
So the ability to collect data</p>
<p>[00:19:31.180]<br />
at a consistent height above the ground</p>
<p>[00:19:33.270]<br />
significantly improves data quality</p>
<p>[00:19:35.840]<br />
and interpretation later on.</p>
<p>[00:19:41.730]<br />
So once you’re happy with your settings,</p>
<p>[00:19:46.190]<br />
you can hit okay.</p>
<p>[00:19:49.880]<br />
This step produces a survey report,</p>
<p>[00:19:52.070]<br />
which gives you the line kilometers</p>
<p>[00:19:54.620]<br />
for each plan survey line,</p>
<p>[00:19:58.400]<br />
along with the total line kilometers for all of the lines.</p>
<p>[00:20:01.870]<br />
It gives you the kilometers</p>
<p>[00:20:05.307]<br />
for all of the area and just the area inside</p>
<p>[00:20:09.040]<br />
the area of interest.</p>
<p>[00:20:13.000]<br />
It also produces a flight plan database.</p>
<p>[00:20:19.860]<br />
All of the flight planned lines are shown.</p>
<p>[00:20:22.340]<br />
Note how it split the line around the exclusion zone</p>
<p>[00:20:27.160]<br />
by appending a version one.</p>
<p>[00:20:31.160]<br />
Each line is defined X, Y, latitude, longitude,</p>
<p>[00:20:35.830]<br />
DEM and drape value.</p>
<p>[00:20:38.540]<br />
You can view the flight plan in 3D,</p>
<p>[00:20:46.941]<br />
or in 2D.</p>
<p>[00:20:50.497]<br />
And note how it’s split the lines</p>
<p>[00:20:52.850]<br />
around the exclusion zone there.</p>
<p>[00:20:54.840]<br />
You can also export the flight plan as a K and Z</p>
<p>[00:20:57.850]<br />
and view it in Google Earth.</p>
<p>[00:21:02.280]<br />
So how do you take into account</p>
<p>[00:21:04.160]<br />
short fluctuations of drones?</p>
<p>[00:21:07.290]<br />
So you can generate sorties within the survey area</p>
<p>[00:21:11.000]<br />
based on the drone’s flight range.</p>
<p>[00:21:13.640]<br />
And you can do this back in the UAV extension</p>
<p>[00:21:16.780]<br />
in survey planning to find sortie sub areas.</p>
<p>[00:21:22.560]<br />
So this allows you to take the master flight plan</p>
<p>[00:21:26.010]<br />
that we’ve just made and split it up into sub areas.</p>
<p>[00:21:33.640]<br />
The sortie in length is in meters,</p>
<p>[00:21:37.358]<br />
and this is calculated from the maximum flight time</p>
<p>[00:21:40.990]<br />
of the drone in seconds.</p>
<p>[00:21:44.860]<br />
Each sortie sub area polygon</p>
<p>[00:21:47.930]<br />
is calculated to cover 90 percent of this value.</p>
<p>[00:21:53.080]<br />
10 percent is reserved to allow for distance</p>
<p>[00:21:55.550]<br />
traveled to and from the takeoff location.</p>
<p>[00:22:00.810]<br />
You can include sub area overlap,</p>
<p>[00:22:04.200]<br />
and this is recommended to improve leveling.</p>
<p>[00:22:07.550]<br />
And then reduce this to 20 meters</p>
<p>[00:22:09.930]<br />
and the lateral sub area overlapped to 10 meters.</p>
<p>[00:22:14.960]<br />
And then I’m going to hit, okay.</p>
<p>[00:22:19.150]<br />
This has created eight sub areas,</p>
<p>[00:22:24.150]<br />
and it’s added a takeoff location within each sortie,</p>
<p>[00:22:29.020]<br />
just shown by the white dots.</p>
<p>[00:22:31.980]<br />
And these are automatically set</p>
<p>[00:22:33.840]<br />
to the highest elevation point within the sub area.</p>
<p>[00:22:39.490]<br />
If you want to modify the sortie sub areas,</p>
<p>[00:22:44.800]<br />
you can.</p>
<p>[00:22:45.980]<br />
You can add areas, delete them,</p>
<p>[00:22:48.590]<br />
or interactively edit the sub area.</p>
<p>[00:22:53.410]<br />
And you can also move takeoff locations.</p>
<p>[00:22:57.780]<br />
To help you adjust the takeoff locations,</p>
<p>[00:23:01.100]<br />
you can add Azure Map imagery to include roads,</p>
<p>[00:23:07.750]<br />
and this will help you identify site access areas.</p>
<p>[00:23:15.050]<br />
So the Azure Roadmap has been loaded.</p>
<p>[00:23:18.320]<br />
I’m just going to untick my DT, so I can see it,</p>
<p>[00:23:20.740]<br />
or you can make it transparent.</p>
<p>[00:23:23.610]<br />
And I’m going to move the takeoff location</p>
<p>[00:23:25.990]<br />
for sub area 1-1 and position it on this road.</p>
<p>[00:23:31.110]<br />
So to do that,</p>
<p>[00:23:33.120]<br />
I go back to my survey planning tools in UAV,</p>
<p>[00:23:36.630]<br />
and I want to move takeoff location.</p>
<p>[00:23:40.170]<br />
You can select the sub-area that you want to work in</p>
<p>[00:23:44.070]<br />
and the map that you want to work on.</p>
<p>[00:23:47.660]<br />
You can include access point files</p>
<p>[00:23:49.940]<br />
if you’ve got positions saved in a CSV,</p>
<p>[00:23:53.410]<br />
otherwise you can interactively locate the new position.</p>
<p>[00:24:10.140]<br />
Once you happy with your sortie sub areas,</p>
<p>[00:24:14.410]<br />
your takeoff locations and access points,</p>
<p>[00:24:17.480]<br />
we need to define the sortie paths.</p>
<p>[00:24:20.350]<br />
So we go back to the survey planning options</p>
<p>[00:24:23.370]<br />
to find sortie paths</p>
<p>[00:24:25.140]<br />
and this calculate separate flight paths</p>
<p>[00:24:27.800]<br />
for each individual sortie sub area.</p>
<p>[00:24:31.590]<br />
You can do this for all of the sub areas or individually.</p>
<p>[00:24:40.156]<br />
I’m just going to select 1-1.</p>
<p>[00:24:42.880]<br />
I’m going to extend the flight plan lines</p>
<p>[00:24:44.820]<br />
10 meters beyond the sub areas polygon file.</p>
<p>[00:24:49.290]<br />
And this again is to accommodate for</p>
<p>[00:24:52.480]<br />
the drone turning and</p>
<p>[00:24:55.180]<br />
to remove any edge effects that might creep in</p>
<p>[00:24:58.630]<br />
around the survey boundary.</p>
<p>[00:25:03.190]<br />
You can load each sortie</p>
<p>[00:25:07.120]<br />
flight plan into individual databases,</p>
<p>[00:25:10.240]<br />
and you can display the results on individual maps.</p>
<p>[00:25:17.750]<br />
The survey report is appended with the line</p>
<p>[00:25:22.090]<br />
title line kilometers for the sub area.</p>
<p>[00:25:26.210]<br />
So stats like these are really useful</p>
<p>[00:25:28.480]<br />
to estimate how much time is required to conduct the survey,</p>
<p>[00:25:33.130]<br />
and also helpful to calculate how much it will cost</p>
<p>[00:25:38.370]<br />
and how much you can charge the client.</p>
<p>[00:25:40.910]<br />
You can use it as well to prepare project proposals.</p>
<p>[00:25:46.490]<br />
This step also produces a CSV file,</p>
<p>[00:25:49.760]<br />
which contains all of your takeoff locations in X,Y,Z.</p>
<p>[00:25:53.690]<br />
So this is useful to put into a GPS and take with you.</p>
<p>[00:26:00.470]<br />
It also produces a flight plan map of the sub-area</p>
<p>[00:26:06.320]<br />
along with a flight plan database of the sub area.</p>
<p>[00:26:13.490]<br />
For regions where regulations require the UAV</p>
<p>[00:26:16.750]<br />
to be visible to the controller at all times during flight,</p>
<p>[00:26:21.100]<br />
we can test the VLOS the visible line of sight</p>
<p>[00:26:26.130]<br />
from the takeoff location.</p>
<p>[00:26:29.460]<br />
We can do this in the survey planning menu,</p>
<p>[00:26:32.660]<br />
the UAV extension test line of sight.</p>
<p>[00:26:38.970]<br />
So we are working in a sub-area 1-1.</p>
<p>[00:26:45.158]<br />
And the map we are working from was the</p>
<p>[00:26:46.950]<br />
flight plan map for area 1-1.</p>
<p>[00:26:51.000]<br />
We don’t have an access points file,</p>
<p>[00:26:52.690]<br />
but if you had access point locations save to a CSV,</p>
<p>[00:26:57.880]<br />
you can load that here.</p>
<p>[00:27:01.100]<br />
To demonstrate what happens when you lose line of sight,</p>
<p>[00:27:05.720]<br />
I’m going to put the terrain clearance</p>
<p>[00:27:06.897]<br />
and the takeoff height to one meter.</p>
<p>[00:27:13.820]<br />
The terrain clearance should be the</p>
<p>[00:27:17.570]<br />
terrain clearance that you used in your flight plan.</p>
<p>[00:27:21.430]<br />
And I’m going to display on map.</p>
<p>[00:27:27.720]<br />
So a notification pops up</p>
<p>[00:27:29.170]<br />
telling me that 89.5 percent of the points</p>
<p>[00:27:32.130]<br />
on the full survey path are visible.</p>
<p>[00:27:35.430]<br />
If I click okay,</p>
<p>[00:27:38.370]<br />
and move this box out the way,</p>
<p>[00:27:42.620]<br />
it’s displayed the area that is not visible</p>
<p>[00:27:45.770]<br />
from the takeoff location on the map.</p>
<p>[00:27:50.050]<br />
And you can display, you can see from the color bar,</p>
<p>[00:27:53.340]<br />
the depth below the line of sight that those points are at.</p>
<p>[00:28:00.380]<br />
So I can include up to four extra observers</p>
<p>[00:28:06.970]<br />
and add them to points on the map</p>
<p>[00:28:11.760]<br />
and see if that improves the visible line of sight.</p>
<p>[00:28:16.410]<br />
So I can activate an observer</p>
<p>[00:28:21.210]<br />
and I can locate their position interactively on the map.</p>
<p>[00:28:27.950]<br />
And I’m going to place that observer on this road.</p>
<p>[00:28:34.810]<br />
Put an observer height again of one meter</p>
<p>[00:28:38.310]<br />
and display map.</p>
<p>[00:28:41.260]<br />
And this time the notification is telling me</p>
<p>[00:28:43.400]<br />
that a hundred percent of the points</p>
<p>[00:28:45.400]<br />
on the full survey path are visible.</p>
<p>[00:28:48.100]<br />
So I now know before heading out into the field</p>
<p>[00:28:50.390]<br />
to conduct my drone magnetic survey</p>
<p>[00:28:54.290]<br />
that all the rules and regulations have been adhere to,</p>
<p>[00:28:57.280]<br />
and that the drone is visible at all times during flight.</p>
<p>[00:29:02.920]<br />
So once the survey has been flown,</p>
<p>[00:29:05.540]<br />
data from sorties can be imported individually</p>
<p>[00:29:10.080]<br />
or in batches.</p>
<p>[00:29:13.030]<br />
The UAV extension has input templates</p>
<p>[00:29:15.770]<br />
for single sensor magnetic data</p>
<p>[00:29:18.230]<br />
from commonly used UAV systems,</p>
<p>[00:29:21.120]<br />
mainly the Mag Arrow and drone mag.</p>
<p>[00:29:24.780]<br />
It does also have the ability</p>
<p>[00:29:27.490]<br />
to utilize other ASCII import templates.</p>
<p>[00:29:33.690]<br />
There is a full suite of processing tools</p>
<p>[00:29:36.360]<br />
included in the extension.</p>
<p>[00:29:38.540]<br />
These are for removing data discontinuities</p>
<p>[00:29:43.450]<br />
or masking data that is acquired why the UAV is stationary.</p>
<p>[00:29:49.037]<br />
You can also do base station corrections,</p>
<p>[00:29:51.420]<br />
Idera for removal</p>
<p>[00:29:53.180]<br />
and correct for lag and heading.</p>
<p>[00:29:59.310]<br />
Repetitive tasks could be scripted</p>
<p>[00:30:02.250]<br />
using the record functions.</p>
<p>[00:30:09.920]<br />
So from this point,</p>
<p>[00:30:11.550]<br />
you can easily merge data from individual sorties</p>
<p>[00:30:16.930]<br />
into one master database,</p>
<p>[00:30:21.220]<br />
and then apply leveling</p>
<p>[00:30:24.780]<br />
and grit the total magnetic intensity.</p>
<p>[00:30:30.620]<br />
So this near real-time processing means</p>
<p>[00:30:33.080]<br />
you can QA QC really quickly,</p>
<p>[00:30:35.310]<br />
and you can adjust survey parameters</p>
<p>[00:30:37.060]<br />
whilst you’re out in the field.</p>
<p>[00:30:42.760]<br />
Once I’ve merged each individual sortie</p>
<p>[00:30:45.770]<br />
into one master database,</p>
<p>[00:30:48.450]<br />
printed the TMI and leveled the data,</p>
<p>[00:30:55.550]<br />
what tools are available in Oasis Montaj</p>
<p>[00:30:58.400]<br />
to improve the subsurface understanding?</p>
<p>[00:31:03.440]<br />
So under grid and image, there are a couple of options.</p>
<p>[00:31:07.620]<br />
We can locate and plot the grid peaks.</p>
<p>[00:31:12.640]<br />
So this is a target picking tool.</p>
<p>[00:31:15.360]<br />
It uses Blake Cliff’s method to find peaks in a grid.</p>
<p>[00:31:20.860]<br />
So I’m going to find peaks in my level TMI grid.</p>
<p>[00:31:29.900]<br />
I’m not going to apply a smoothing filter.</p>
<p>[00:31:33.050]<br />
This applies a hunting filter</p>
<p>[00:31:35.640]<br />
to remove low amplitude high frequency noise.</p>
<p>[00:31:39.130]<br />
Increasing this number reduces the number of peaks found.</p>
<p>[00:31:44.410]<br />
I’m going to leave the level of peak detection to normal.</p>
<p>[00:31:49.430]<br />
So the surrounding grid values in</p>
<p>[00:31:52.590]<br />
all directions must be a lower value</p>
<p>[00:31:55.550]<br />
for it to choose that point as a peak.</p>
<p>[00:32:00.450]<br />
And I’m going to save the results as an extra line D 10</p>
<p>[00:32:04.860]<br />
in my merged database.</p>
<p>[00:32:10.360]<br />
This adds an extra column called grid value</p>
<p>[00:32:14.250]<br />
and makes an extra line in my merged database.</p>
<p>[00:32:19.010]<br />
I’m now going to plot these grid value points</p>
<p>[00:32:21.080]<br />
on my level TMI grid.</p>
<p>[00:32:41.620]<br />
So this is now highlighted all of the peaks</p>
<p>[00:32:44.960]<br />
in my level TMI grid.</p>
<p>[00:32:49.250]<br />
Another option is to calculate</p>
<p>[00:32:50.810]<br />
and display the analytical signal.</p>
<p>[00:32:55.980]<br />
This is done in the grid and image filters option.</p>
<p>[00:32:59.300]<br />
So the analytical signal is useful for locating the</p>
<p>[00:33:03.010]<br />
edges of magnetic bodies,</p>
<p>[00:33:05.890]<br />
particularly why a remanence</p>
<p>[00:33:07.800]<br />
and or low magnetic latitude complicates interpretation.</p>
<p>[00:33:13.390]<br />
So I’m going to use my leveled TMI,</p>
<p>[00:33:16.130]<br />
it’s my input.</p>
<p>[00:33:18.460]<br />
You can choose to use the fast forward transform</p>
<p>[00:33:21.360]<br />
or the convolutional methods.</p>
<p>[00:33:30.150]<br />
This traits and analytical signal grid,</p>
<p>[00:33:33.770]<br />
which you can close and then display the grid on your map.</p>
<p>[00:33:49.580]<br />
Once you are happy with your results,</p>
<p>[00:33:51.710]<br />
you can share your findings with your team members</p>
<p>[00:33:55.240]<br />
by connecting to essential server.</p>
<p>[00:33:59.610]<br />
You can see which server you’re connected to</p>
<p>[00:34:01.100]<br />
in the top right of your Oasis Montaj window.</p>
<p>[00:34:06.770]<br />
And then you can use the data services to upload to central.</p>
<p>[00:34:13.160]<br />
We have a wealth of information</p>
<p>[00:34:14.670]<br />
available online at seequent.com,</p>
<p>[00:34:18.130]<br />
where you can find out more about Seequent Solutions,</p>
<p>[00:34:20.750]<br />
including case studies and blogs.</p>
<p>[00:34:24.670]<br />
You can find self-learning content</p>
<p>[00:34:26.650]<br />
at myseequent.com/learning.</p>
<p>[00:34:31.730]<br />
You can also see what webinars and workshops are coming up</p>
<p>[00:34:35.230]<br />
by going to sequent.com/community/events</p>
<wpml_invalid_tag original=»PHA+» />[00:34:40.370]<br />
or by contacting a member of your local Seequent team.