


10 СОВЕТОВ, как получить больше от GeoStudio, с ученым-исследователем Кили Кулпа.
Надеюсь, один из этих советов будет для вас новым и улучшит ваш опыт и рабочий процесс в Geostudio.
Обзор
Спикер
Keely Kulpa
Research & Development Scientist — Seequent
Продолжительность
10 min
Смотреть больше сессий Lyceum по
Учить большеРешения для горнодобывающей промышленности, гражданского строительства, охраны окружающей среды и энергетики.
Учить большестенограмма видео
[00:00:01.870]
<v Keely>Hello everyone.</v>
[00:00:03.290]
My name is Keeley and I’m a research scientist
[00:00:06.070]
with the GeoStudio group here at Seequent.
[00:00:09.010]
Today, I thought I’d share with you
[00:00:10.650]
some of our favorite tips and tricks.
[00:00:13.280]
Hopefully, at least one of these 10 tips will be new to you
[00:00:17.100]
and improve your experience and workflow in GeoStudio.
[00:00:21.540]
So, let’s get right into it.
[00:00:24.760]
The first tip has to do with the right-click context menu.
[00:00:29.090]
At any time that you are working
[00:00:30.680]
in the GeoStudio project Explorer window,
[00:00:33.810]
you do not have to go to the defined project window
[00:00:36.540]
to add geometry or child analysis,
[00:00:42.970]
delete or rename and analysis or geometry branch,
[00:00:50.450]
or queue an analysis for solving in the solve manager.
[00:01:00.980]
When sketching your geometry in 2D,
[00:01:03.630]
you can use your keyboard
[00:01:04.730]
to activate many CAD light drawing tools.
[00:01:08.140]
For example, while in the draw region mode,
[00:01:11.400]
I can use Control + R on my keyboard,
[00:01:14.720]
which activates the CAD drawing tool in the bottom toolbar.
[00:01:18.380]
Here, the absolute XY coordinate can be entered.
[00:01:22.960]
Alternatively, I could have entered a relative offset,
[00:01:26.480]
relative length and angle, relative X or Y offset and angle,
[00:01:31.730]
or a geometry point ID.
[00:01:35.440]
While drawing, the Shift key can be held down
[00:01:37.830]
to limit movement in the horizontal
[00:01:39.700]
or vertical direction.
[00:01:46.610]
The Control button can be held down
[00:01:48.450]
to snap to an existing geometry line
[00:01:51.080]
to ensure that a tight fit exists between regions.
[00:01:55.500]
Lastly, C on my keyboard will close the region
[00:01:59.180]
or exit the drawing mode.
[00:02:03.390]
GeoStudio has the ability to copy and paste materials
[00:02:06.760]
and functions.
[00:02:08.490]
If you want to include some of the same materials
[00:02:11.470]
from a previous file created for the same site,
[00:02:15.240]
you can copy and paste the materials
[00:02:17.370]
from the previous file directly
[00:02:19.410]
into your new GeoStudio project.
[00:02:22.780]
Take this file as an example.
[00:02:25.600]
I can drag a box over the materials
[00:02:27.800]
or hold down the Control button
[00:02:29.870]
and click on the desired materials and the list
[00:02:32.140]
from the old file.
[00:02:34.610]
I can right-click in the list box and choose Copy.
[00:02:38.640]
Now, when I opened the defined materials window
[00:02:41.440]
in my new GeoStudio file,
[00:02:43.780]
I can right-click in the list box and choose Paste.
[00:02:47.540]
All materials, including their defined, parameters
[00:02:50.620]
and functions will be copied over to the new file.
[00:02:55.220]
Boundary functions and climate functions
[00:02:57.100]
for the land climate boundary condition
[00:02:59.370]
can also be copied from other GeoStudio files
[00:03:02.170]
in a similar manner.
[00:03:04.790]
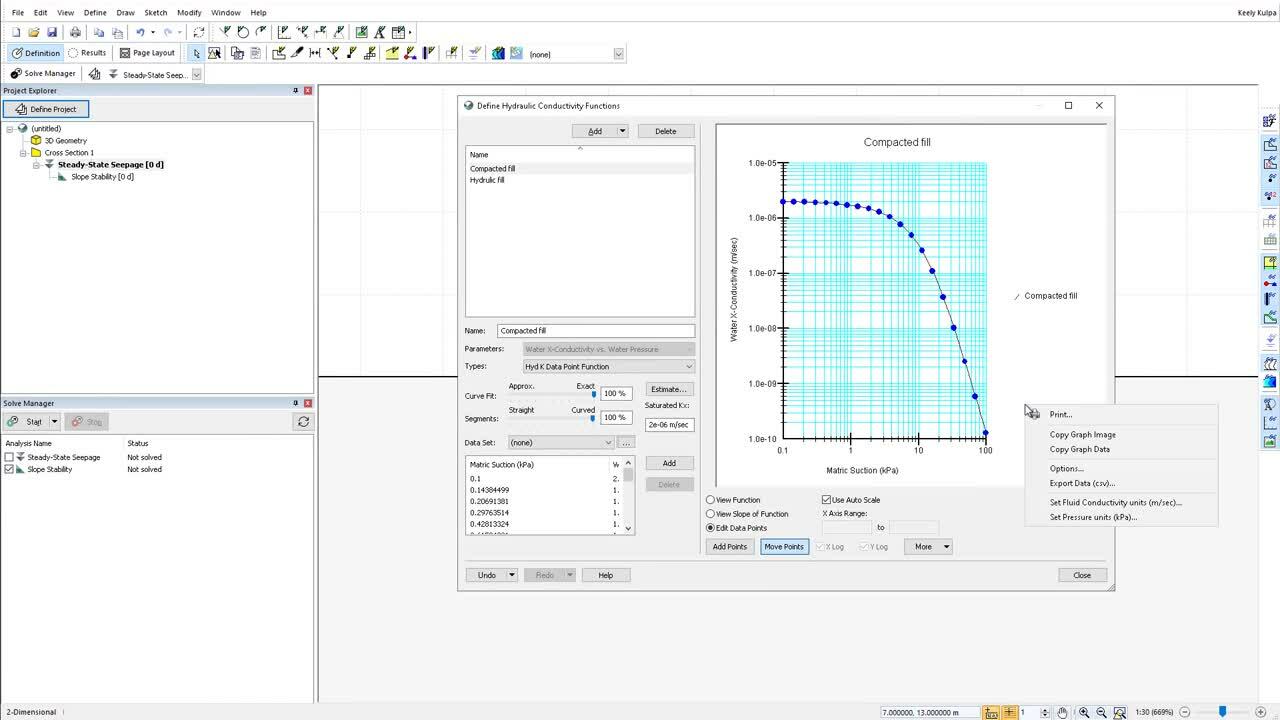
While working with parameters and graphs in GeoStudio,
[00:03:08.340]
you can modify the visible units on your screen
[00:03:10.980]
by right-clicking in either the parameter edit box
[00:03:14.510]
or in the graphing window.
[00:03:16.800]
For example,
[00:03:17.780]
I can change my poor water pressure units
[00:03:19.920]
in this hydraulic conductivity function from kilo pascals
[00:03:23.600]
to pounds per square foot.
[00:03:28.200]
Alternatively, I can change the hydraulic conductivity
[00:03:31.530]
from meters per second to feet per second.
[00:03:34.760]
The data fields automatically convert to the new unit.
[00:03:39.980]
While in the draw materials menu,
[00:03:41.960]
you can apply the same material to a region
[00:03:44.330]
in multiple analyses and geometry
[00:03:47.170]
by activating the apply to multiple analyses toggle.
[00:03:51.740]
This opens up a list box for you to choose
[00:03:54.900]
which analysis and geometries you would like the material
[00:03:58.010]
to be applied to.
[00:04:00.090]
The same action can be used
[00:04:01.730]
in the draw boundary conditions window.
[00:04:05.760]
The finite element mesh
[00:04:07.250]
and GeoStudio is automatically created
[00:04:10.000]
when you add a material to a geometry.
[00:04:13.180]
You can drag a box over the geometry objects,
[00:04:16.290]
or hold down your Control button on your keyboard
[00:04:19.350]
to click on individual objects
[00:04:21.530]
to highlight them in the draw mesh properties window.
[00:04:26.020]
If you want to modify the mesh properties,
[00:04:28.120]
adjust a line, point or region,
[00:04:31.060]
you can change the dropdown menu here.
[00:04:34.730]
This allows you to modify the element size, element type
[00:04:39.310]
or add mesh constraints to your finite element mesh in 2D.
[00:04:44.670]
The Remove Constraints button can be used
[00:04:47.500]
to remove all constraints
[00:04:49.080]
from the finite element mesh returning
[00:04:51.630]
to the default mesh using the defined global element length.
[00:04:57.650]
If at any time your analysis stops solving
[00:05:00.220]
in the middle of the defined duration,
[00:05:02.830]
you can toggle off all other analyses and choose Solve
[00:05:06.570]
from last time step from the dropdown menu
[00:05:09.100]
on the Start button.
[00:05:14.410]
This will allow the solver to start solving
[00:05:16.710]
from the last save time step in the file.
[00:05:21.460]
If you have a large file or multiple files
[00:05:24.020]
that you are solving,
[00:05:25.490]
there is also the option to solve
[00:05:27.200]
from the command prompt window.
[00:05:30.440]
Geo command can be used to automate the solving,
[00:05:33.280]
upgrading, and report generation
[00:05:35.210]
for many project files sequentially.
[00:05:39.010]
In command prompt,
[00:05:40.430]
you would ensure that your path environment variable
[00:05:42.880]
includes the folder where GeoStudio exists.
[00:05:46.640]
Then, you would type in GeoCmd.exe
[00:05:52.410]
with the file name and location, and the analysis name.
[00:05:56.440]
For more information on the Geo Command executable.
[00:06:00.010]
please refer to the tutorial video on our YouTube channel.
[00:06:06.690]
In order to review and interpret your results,
[00:06:09.640]
you will likely need to create multiple graphs
[00:06:12.280]
in draw graph.
[00:06:14.330]
While working in 2D,
[00:06:15.920]
the custom graph locations can be used to specify locations
[00:06:20.080]
on the model domain that are not geometry objects.
[00:06:24.550]
This could be used to choose a specific node
[00:06:27.190]
or element in the mesh,
[00:06:29.380]
holding down the mouse button and dragging a box,
[00:06:32.010]
allows you to choose a number of nodes or elements
[00:06:35.540]
or holding down the Shift key on your keyboard,
[00:06:37.860]
allows you to highlight nodes along the specified line.
[00:06:43.560]
As a final tip,
[00:06:44.690]
I thought I’d share with you my three favorite hotkeys
[00:06:47.310]
in GeoStudio.
[00:06:49.270]
The first one is Control + Z as this can be used
[00:06:52.360]
to undo the last action you made in GeoStudio,
[00:06:56.170]
whether it was drawing a line,
[00:06:58.120]
deleting a data point in a function and so on.
[00:07:02.670]
The next one is F1,
[00:07:04.950]
the F1 button on your keyboard
[00:07:06.930]
will open the GeoStudio help topic for any window
[00:07:10.040]
that you have open.
[00:07:11.850]
For example,
[00:07:12.750]
if I have the draw graph window open and I hit F1,
[00:07:17.570]
the draw graph help topic is opened in the GeoStudio Help.
[00:07:23.400]
Lastly, if at any time you are missing a window,
[00:07:27.060]
such as the solve manager disappearing,
[00:07:29.860]
you can use Alt + W + E to reset your GeoStudio windows
[00:07:35.630]
to the default layout.
[00:07:37.910]
This will not modify your analysis or results,
[00:07:40.660]
but will simply return all windows
[00:07:42.540]
in the GeoStudio user interface to the default view.
[00:07:48.110]
I have now shared with you 10 of our favorite tips
[00:07:50.520]
and tricks for using GeoStudio.
[00:07:53.340]
I hope you have found these helpful
[00:07:54.830]
in your GeoStudio experience and workflow.
[00:07:57.720]
Thank you for watching.